Activate Credit Card or PayPal payments on your store checkout.
By default, the Site Store Pro shopping cart installation has live payments turned off so that the online store can be integrated into your website design and you can test all the features without having to enter any real payment information to complete test orders.
Therefore, when you are ready to accept payments from live customers or want to do a test-order with a real payment method, you need to do two things:
- Activate and configure the settings for the payment provider plugin in the "Plugins" section of the admin area.
- Select the payment provider as the store's active payment processor in the Checkout URL | Payment Provider screen.
This document includes instructions on activating a payments plugin such as PayPal Checkout where the provider includes both credit/debit card payments and PayPal payments through a unified payments platform. There is also a separate tutorial section that provides instructions on using a payment gateway such as Authorize.net for direct credit card payments in combination with the PayPal Express payments for PayPal payments.
The free download versions of all cart platforms come with the PayPal Checkout v2 payments plugin which is the latest version of the PayPal payments API.
If you are currently using a different payment processor plugin and your install did not include PayPal Checkout v2, click here to download the free plugin.
If you require payments from a different provider such as Square, Stripe or Authorize.net, you will need to either upgrade to a paid support plan (which includes all payment processors) or purchase the payment plugins expansion pack to upgrade your free install with additional payment options.
Activate PayPal Checkout Plugin (Both Free and Paid Plans)
All plans, including the Free Download (self-supported) installs include PayPal Checkout v2. For this section, we will assume that you want to use Paypal Checkout to accept credit/debit card, PayPal and Venmo from customers through your online store.
If you are using PayPal Standard, Stripe or Square, the plugin activation process is exactly the same. (The only difference is the fields you need to complete on the plugin settings page that contain your account credentials for the specific payment provider).
If you will be accepting credit card directly on your site using a direct payment provider such as Authorize.net (not through an embedded form like PayPal Checkout, Stripe or Square), please skip to the Direct Credit Card Payments Plugin section of this document.
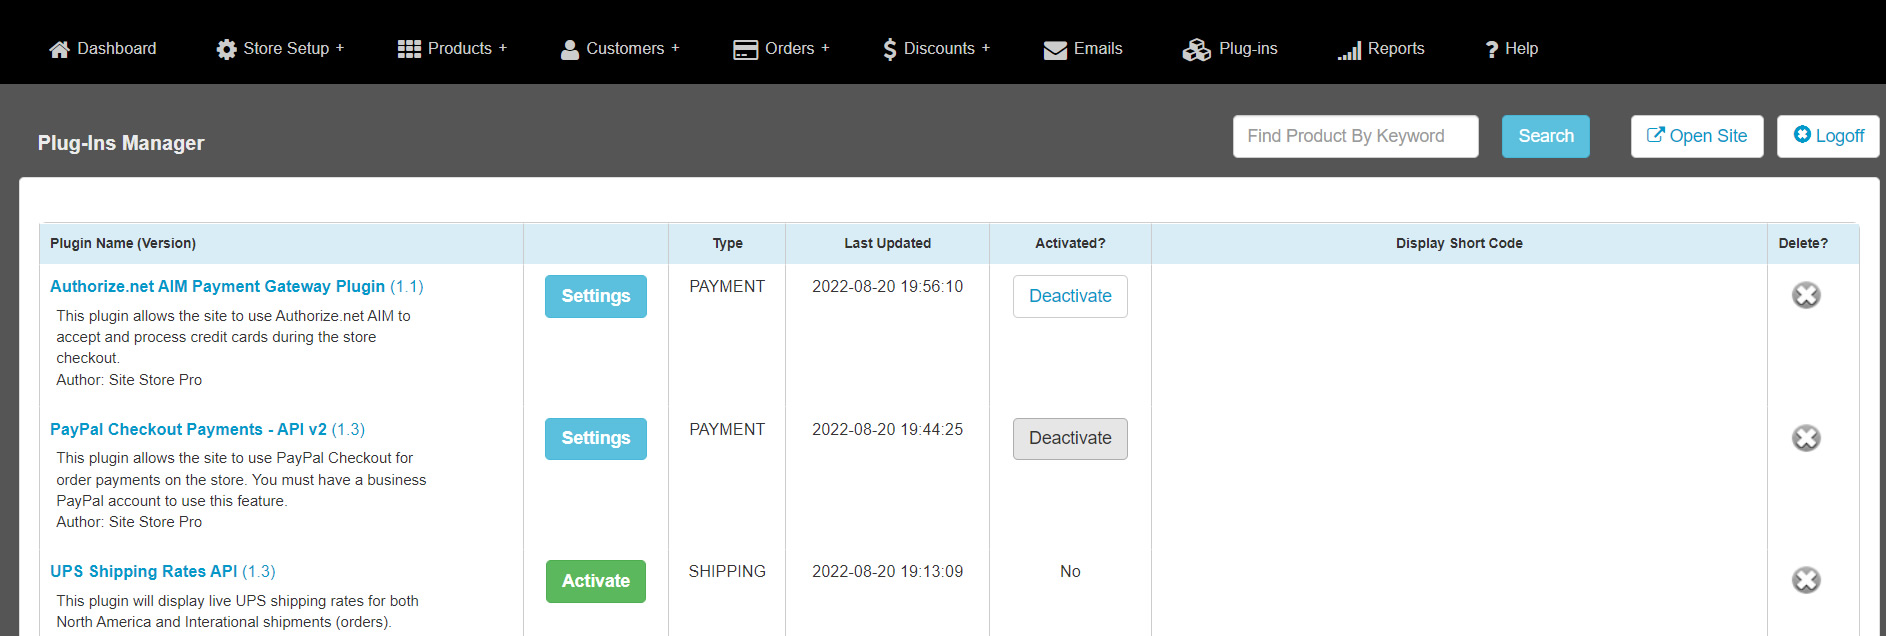
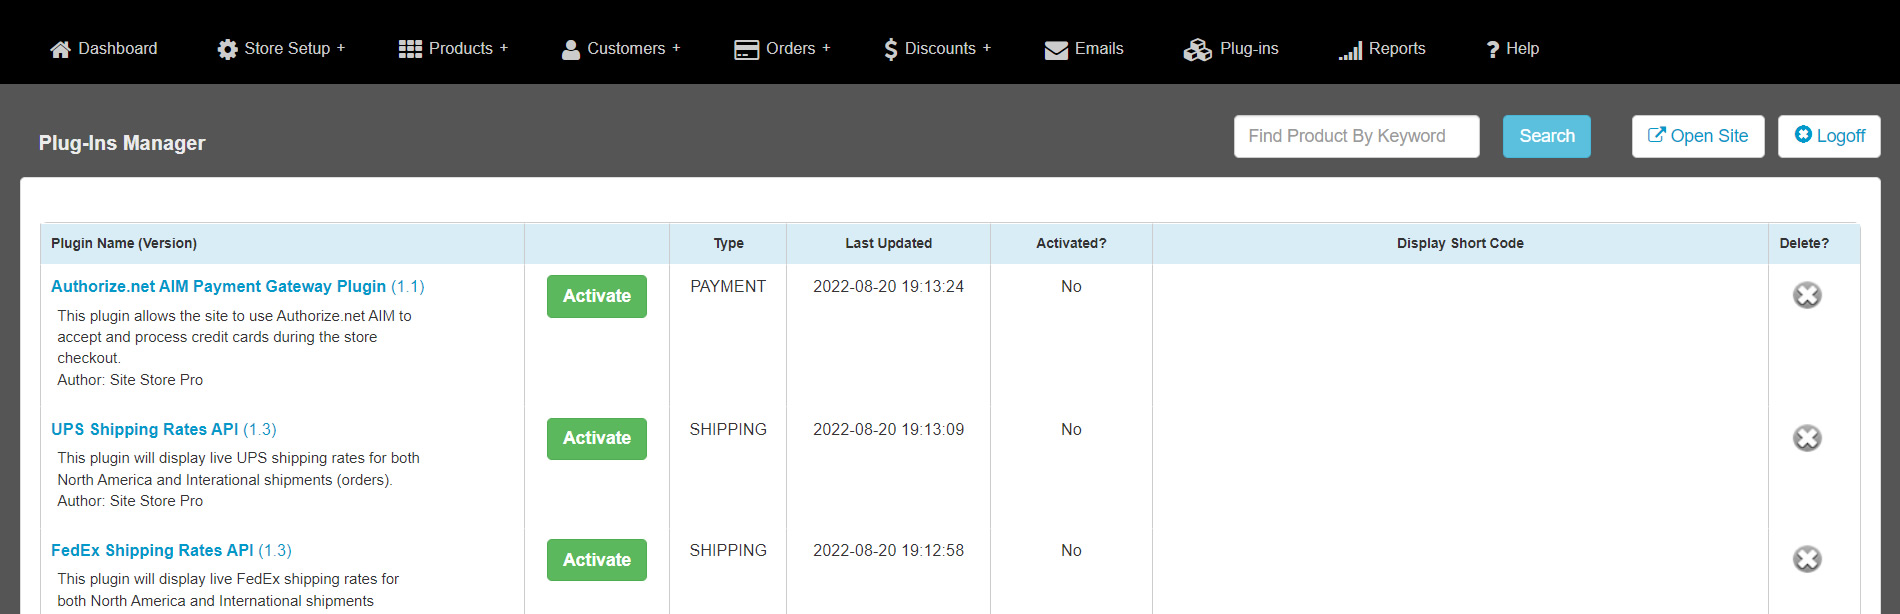
To activate your Paypal Checkout v2 plugin, login to your web-based admin and go to "Plugins". Scroll down the page until you locate the PayPal Checkout v2 plugin and click on the green "Activate" button as shown below:
After you click on the "Activate" button, you will be automatically redirect to the "Settings" page for the plugin as shown below.

Follow the instructions on generating your PayPal payments API credentials on the plugin settings page and enter them in the fields provided.
Note: you do not need to generate and enter in your PayPal Sandbox credentials if you don't want to test your checkout with PayPal's sandbox (testing) system.
When you have completed the plugin field setting (PayPal Checkout API credentials), click on the "Save Plugin Settings" button.
Select PayPal Checkout As Your Active Payment Method
After you have activated the payments plugin and entered and saved your payment provider settings, you will be redirected by to the main plugins listing page.
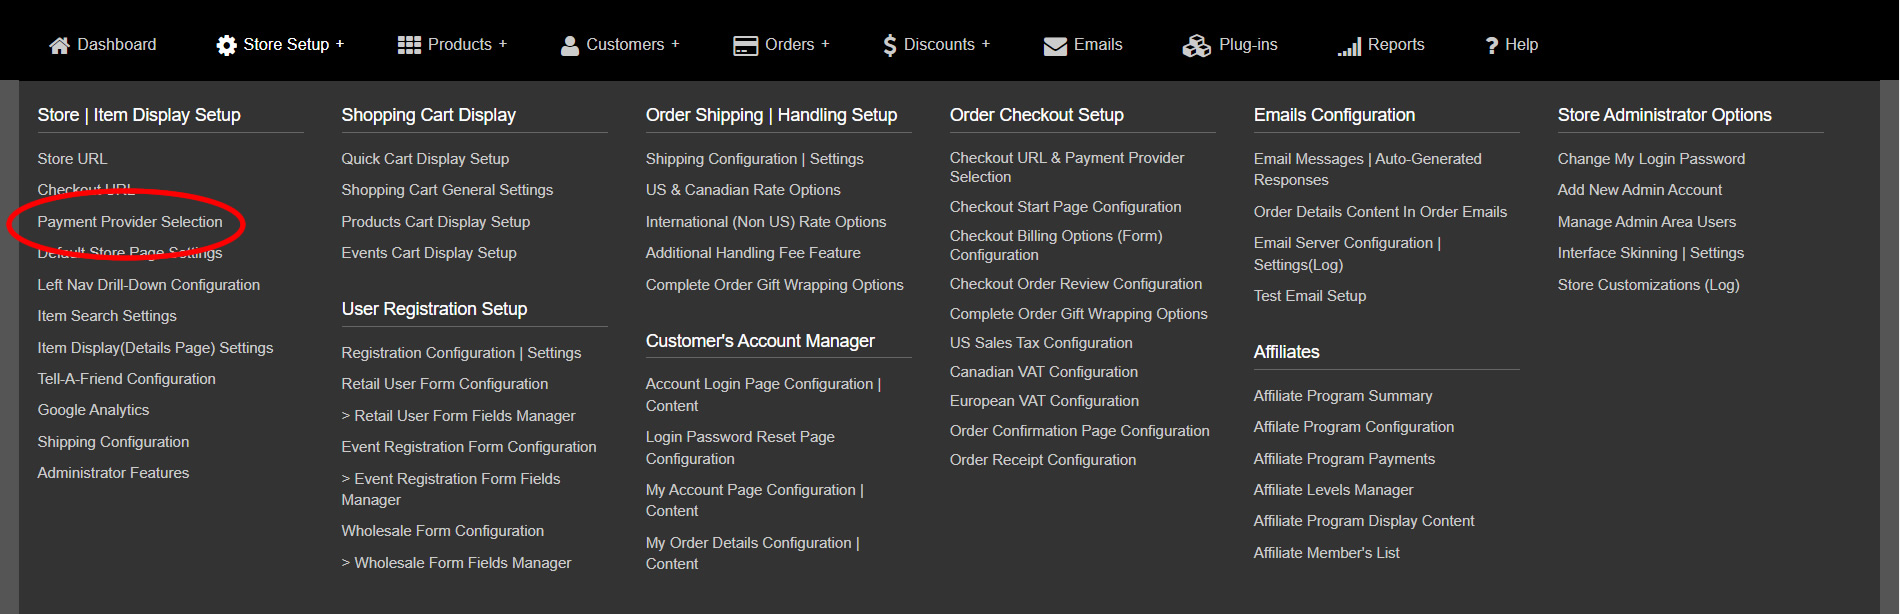
Click on the "Store Setup" menu tab on the top navigation bar and then click the "Payment Provider" selection link as shown below.
When the "Checkout URL, SSL (HTTPS) Settings & Payment Processing Setup" page opens, select PayPal Checkout v2 from the "Select Processor" drop-down menu as shown below:
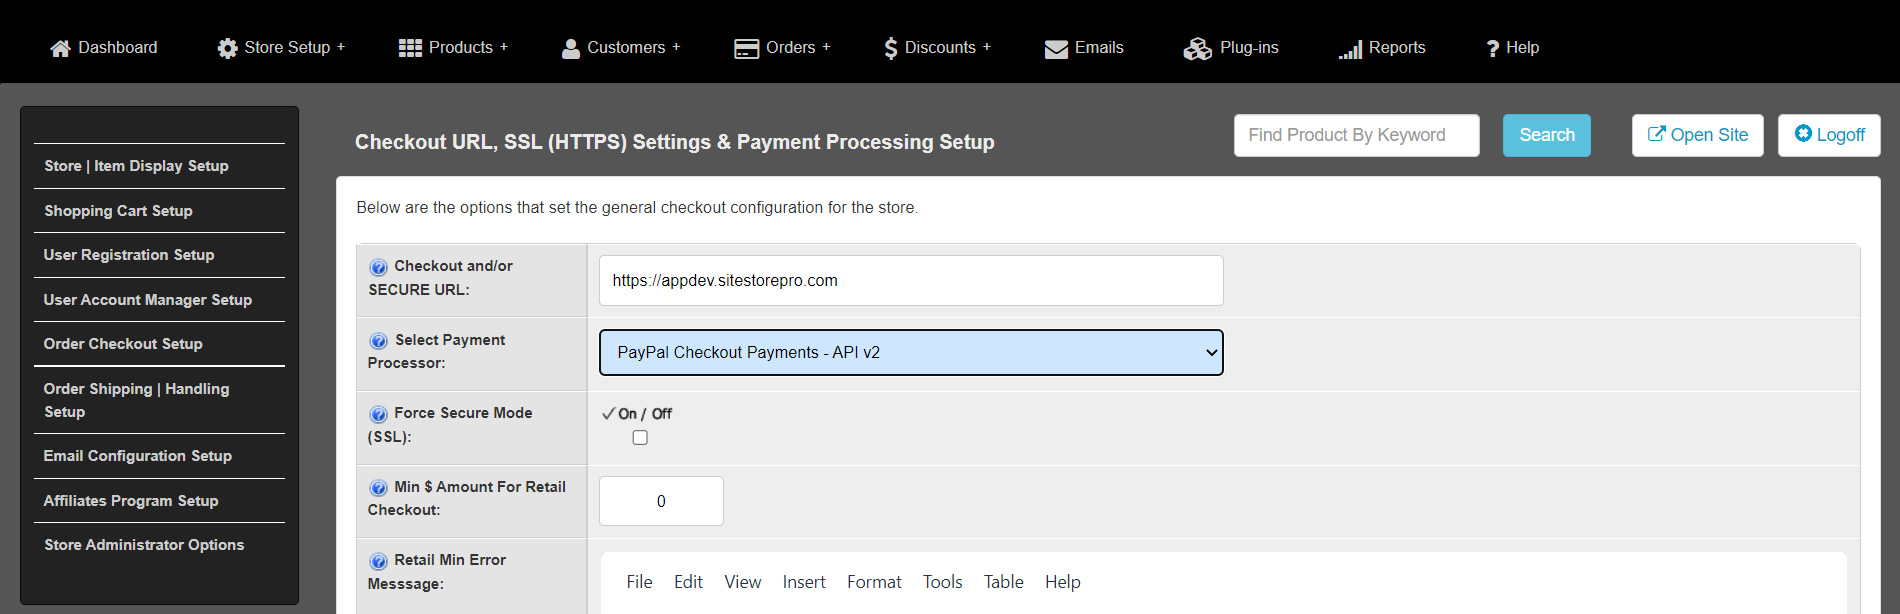
Save your payment processor selection change by clicking on the blue "Update Checkout Configuration" button on the bottom of the form.
Your site is now ready to accept payments credit/debit card and PayPal payments using PayPal Checkout!
Direct Entry Credit Card Payments (Paid Plans Only)
Unlike embedded payment solutions such as PayPal Checkout v2, Square and Stripe, where the payment form that is actually loaded from the payment provider, if you are using a direct-entry payment gateway (processor) such as Authorize.net AIM, First Data Pazeezy or PayPal Pro, the customer enters their credit card information directly into a form that is hosted on your server and that information is then sent to the payment processor for authorization.
Important: Even though the customer's credit card information is never saved and is only sent to the processor for authorization, if you are using a direct credit card entry method for payments, your server and website must be PCI-compliant. Since the credit card information is entered on your website and not through a form that is embedded from a payment provider, your site must pass a full PCI compliance scan and you must be prepared to submit a Self-Assessment-Questionnaire (SAQ) to your merchant provider every 90 days. Some merchant providers include PCI-compliance packages with their account, others require you to sign up with a 3rd party service. If you do not want any PCI-compliance burden and/or do not need to flexibility of completely customizing your credit card payment form, we recommend using a embedded payments solution such as PayPal Checkout v2, Square or Stripe.
This section uses Authorize.net AIM as a direct credit card provider example but the steps are identical for other direct credit card entry providers (except for the merchant account credentials that are entered into the specific provider's plugin settings page).
If you read the section on activating the PayPal Checkout payments plugin, this first segment of this section follows the exact same initial setup principles but there are additional options available for direct payment providers that follow.
To activate Authorize.net, go to the plugins page and click on the "Activate button" next to the Authorize.net payments plugin as shown below.
After you click on the "Activate" button, you will be directed to the payment provider's configuration screen where you can enter in your account credentials and specify if you want to process transactions in their test-mode status. Below is the Authorize.net configuration (plugin settings) screen:

Complete the required information and then click on the "Save Plugin Settings" button to return to the main plugin listing page.
Activate PayPal Express Payments With Your Direct Credit Card Payments (Optional)
Unlike PayPal Checkout, if you want to accept PayPal alongside your credit card entry form, you must activate the PayPal Express payments plugin in addition to your primary payment processor. (i.e. Authorize.net)
Accepting PayPal is not required. You can use the direct credit card payments provider by itself and you are not required to activate PayPal Express payments for your primary processor (ie. Authorize.net) to function.
Using the same steps that you did for your direct credit card payments provider, activate PayPal Express Payments in the "Plugins" section of the admin and then enter your specific PayPal credentials in the plugins settings page.
Important: if you were previously using PayPal Checkout v2 as your payment provider and now want to use a direct entry credit card form and PayPal express payments, the credentials you were using for PayPal Checkout v2 are not the same as for PayPal Express. Instructions for generating the proper credentials for PayPal express are located on the PayPal Express plugin settings page.
Configure Direct Credit Card Payment Form Settings
The primary benefit of using a direct credit card payment form is that you have more flexibility both on it's appearance but more importantly on what information is collected from the customer and sent to your processor. Depending on your business requirements, you may need to collect full address and business information in order to properly validate payments made for your products or services.
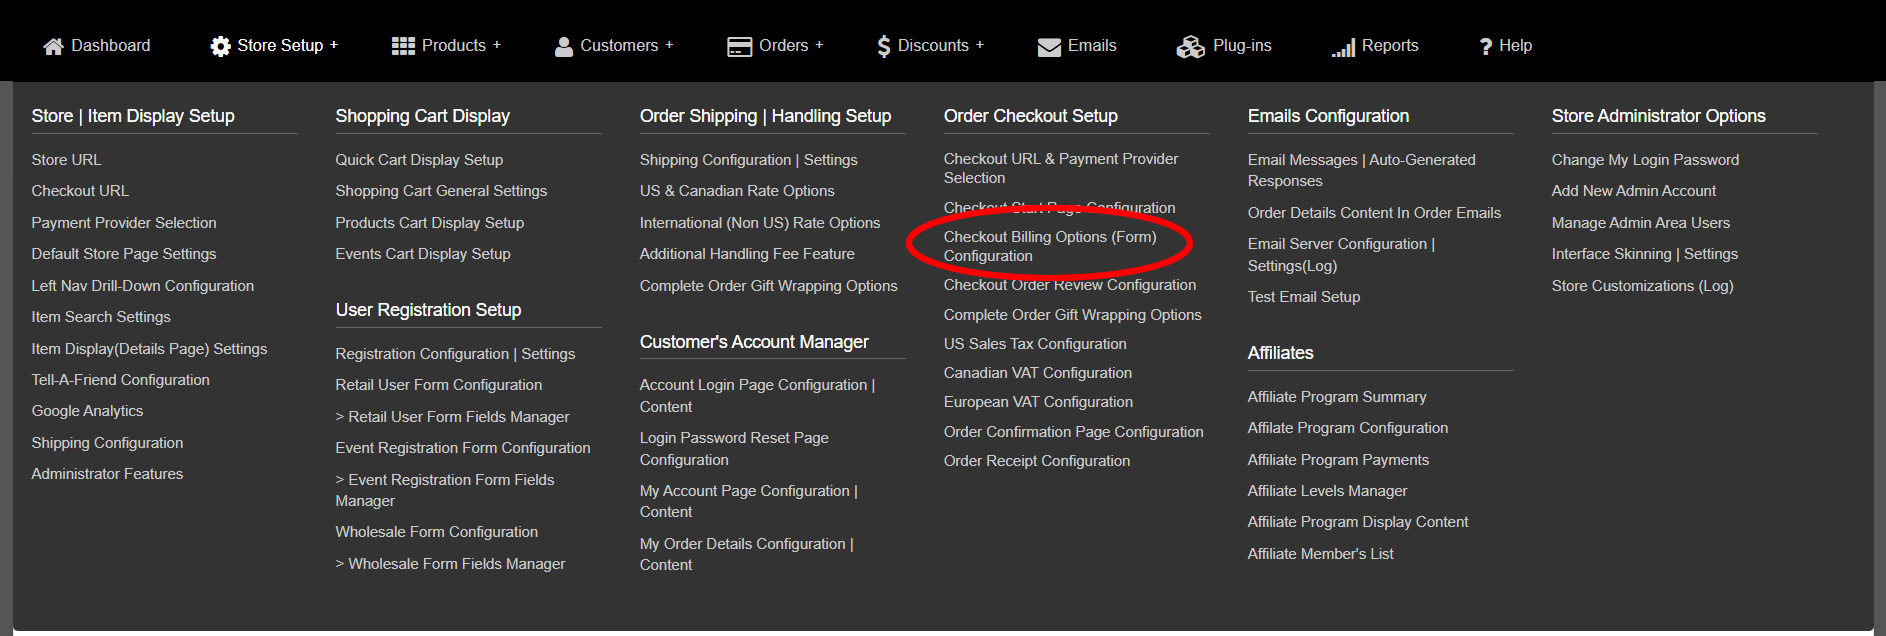
To configure what information is presented to the customer and what fields are displayed and required when using your direct credit card form, click on the "Store Setup > Order Checkout Setup > Checkout Billing Options (Forms) Configuration link from the top navigation as shown below:
The billing options form will open and you can configure / customize how your credit card form will be displayed and what information is required.
Important: if you activated PayPal Express payments and want to accept PayPal alongside your credit card options, please make sure that the Paypal option is turned on under the PayPal Express settings are on the billing options form.
Set The Direct Entry Credit Card Processor As The Active Checkout Payment Method
After you have configured the billing form content, you need to select the Direct Entry Credit Card Payment processor as the active payment method on the site.
Click on the "Store Setup" menu tab on the top navigation bar and then click the "Payment Provider" selection link as shown below.

When the "Checkout URL, SSL (HTTPS) Settings & Payment Processing Setup" page opens, select 'Authorize.net AIM Payment Gateway' from the "Select Processor" drop-down menu as shown below: (or whatever direct entry provider you are using)
Your site is now setup to use a Direct Credit Card Entry Payment Provider and optionally PayPal Express Payments!
Deactivate Unused Payment Plugins
Although not required, it is recommended that any payment provider you are not using anymore, should be disabled.
Example, if you were originally using PayPal Checkout and then switched to Authorize.net, you should turn off (de-activate) PayPal Checkout
To disable (deactivate) a plugin, go to the Plugins section of the admin and find the plugin you want to turn-off and click on the "Deactivate" button.
Important Site Setup Note: Even though payment provider plugins can be activated if you are not using them and it is not required to deactivate non-used payment plugins, shipping providers MUST be turned off if you are not using them. (i..e don't turn on FedEx, USPS, UPS, etc just because you see them in the plugins area if you are not using those providers on your store).
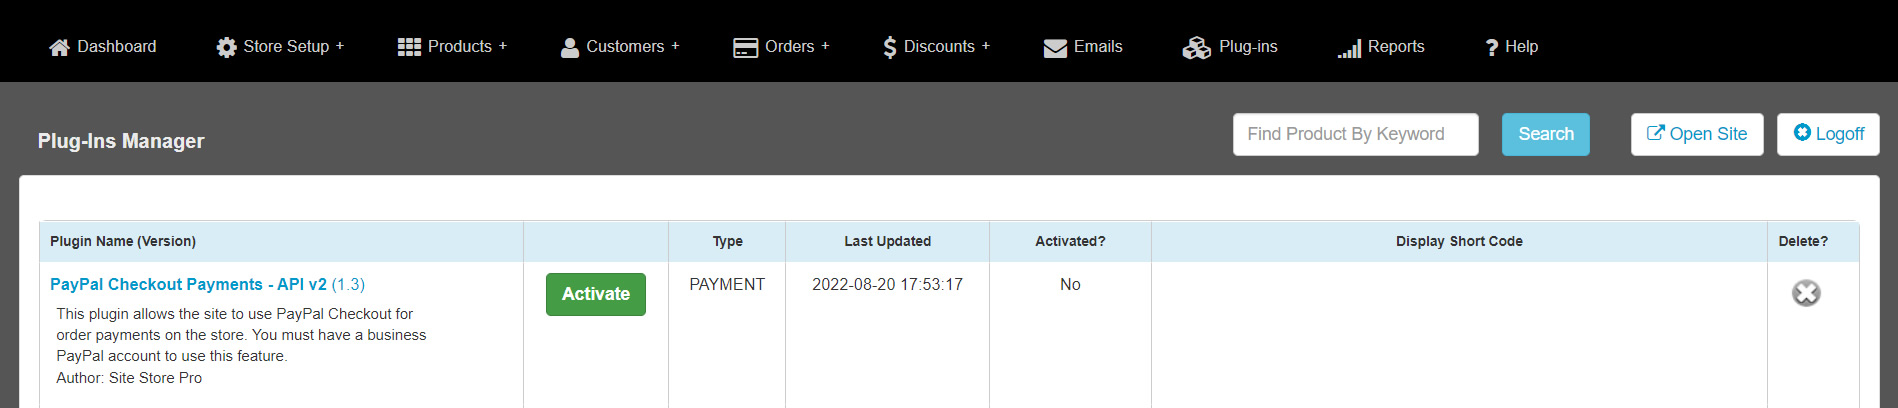
Below is a screen shot of the PayPal Checkout v2 plugin being deactivated since Authorize.net was enabled as the primary payment method: