Install Guide For Site Store Pro Dreamweaver | Designer Version Shopping Carts
Below is the self-install guide for the Site Store Pro Dreamweaver Version Shopping Cart and the Site Store Pro Designer Version Shopping Cart. However, if you prefer that our support team does the installation on your hosting account or server, please submit a ticket at https://www.sitestorepro.com/myaccount/ to schedule your free installation.
If this is the first time you are installing the Site Store Pro shopping cart, we recommend following the entire step-by-step guide below in sequence to avoid any installation issues. However, if you have previously installed Site Store Pro and are just returning to this page for a refresher, the quick steps are:
- Download Your Site Store Pro Version
- Extract Downloaded Zip File Contents
- Copy "New Installation" Contents To Design Folder
- Edit Database Connection File With Your MySQL Credentials
- Transfer All Shopping Cart Files/Folders From Your Design Folder To Your Web Server
- Activate the Installation | Auto Install Database at /estore_admin/
- Setup Your Master Store Administrator Account
Site Store Pro™ Introduction
Site Store Pro™ is a full-featured ecommerce application that includes a comprehensive range of online store functions and advanced merchandizing features. Site Store Pro™ provides website owners, designers and developers the freedom to use their existing website design with a powerful and easy-to-use shopping cart. Site Store Pro™ was created to work with virtually any website design and is not a traditional “template” ecommerce system that sacrifices site appearance for ecommerce functionality.
The Site Store Pro™ ecommerce application contains:
The Store-Front Files : The Site Store Pro storefront files , which include the main store page, product search & results, item details, shopping cart display , customer registration, order checkout and the “My Account” area, are built with a design-friendly combination of dynamic data driven content, CSS formatting, and Dreamweaver Template updatability. Design-specific elements such as page layout and formatting are not restricted when applying an existing website design to the Site Store Pro storefront files.
The Web-Based Administration System :The Site Store Pro ecommerce features such as products configuration, customers and orders management, payment providers, shipping preferences, emails and discounts are controlled through the Site Store Pro web-based admin system.
The MySQL Database: Site Store Pro is “powered” by a MySQL back-end database. In order to run Site Store Pro as your shopping cart engine, the Site Store Pro database must be setup on your webhost’s or development system’s MySQL server. The Site Store Pro database stores all of the categories, product information, customer data, order history, store configuration settings and usage stats. The database is automatically installed during the online (browser-based) setup process.
System Requirements
The following are the minimum requirements to run Site Store Pro™.
- PHP 8.0 Or Higher.
- MySQL 5.6 Or Higher.
- cURL enabled in PHP.
- PHP mail or access to SMTP mail server for outgoing store emails.
- GD2 or ImageMagic enabled in PHP For Automatic Product Thumbnail Creation.
- Min 150 MB For Store Files Installation On Hosting Account (300 MB Plus Recommended).
- Min 30 MB (100 MB Recommended) Available For MySQL Database.
Website Hosting Questions?
If you are unsure that your current website hosting account supports Site Store Pro or would like advice on a hosting plan prior to setting up an account, please email [email protected] for assistance.
SiteStorePro.com does not recommend any specific webhosting company for the Site Store Pro ecommerce application. However, we can inform you if your current or desired webhost is compatible and what specific plan would be best suited for running Site Store Pro.
Download Your Site Store Pro Version
To proceed with the install, you must download the shopping cart zip file first. Download the latest version of Site Store Pro via your email order confirmation, your online account manager or register for a new download at : https://www.sitestorepro.com/downloads/
Extract The Folders From The Zip File To A Directory On Your Local Computer
After you have downloaded the latest version of the cart, you will want to extract the folders from the zip file to a temporary directory on your local computer.
Using either the built-in zip file utility in Windows or Mac or a third-party program such as WinZip, extract all the files to a folder on your local computer from the SiteStorePro_XXXXX.zip file
Below is a similar screenshot of what the Site Store Pro folders will look like inside the installation zip file and these are the folders you should copy to your local drive:
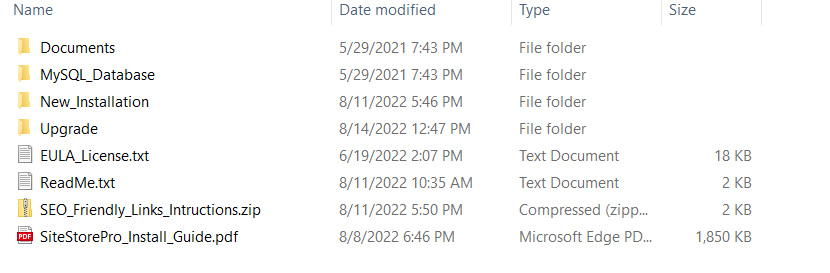
Folders In the Site Store Pro Installation Include:
- Documents: Site Store Pro Supplemental Reference PDF Documents
- MySQL_Database: The manual database installation scripts. These are provided for advanced users only and no longer required to setup the store. The store database is automatically setup online through a browser.
- New_Installation: This folder contains the complete sample store and all the required Site Store Pro shopping cart engine files and web-based admin system files that will be uploaded to your server.
- Upgrade: This folder contains the files/folders that will allow you to upgrade your current version of SiteStorePro to the most recent release.
IMPORTANT NOTICE: If you have already setup your Site Store Pro folder(s) and are UPGRADING from a previous version, please read the sections at the end of this document about upgrading. Failure to follow the proper upgrade procedures may result in loss of previous site design appearance.
Copy The Contents Of "New Installation" To Your Local Design Folder
When integrating Site Store Pro with an existing website or modifying the included sample store to create a new website, you will be editing the files on your local (desktop) system to integrate with your website design and then uploading the changed files to your web server to preview and test.
You will need to copy all the files (contents) inside the New_Installation folder that you extracted to your local computer in the previous step to a directory on your local computer where you can edit files with Dreamweaver or another HTML editor. (i.e. your local site design folder) For this example, we copied the entire contents of the "New Installation" folder into a new local directory called D: /OnlineStore/
If you will be upgrading a current website with Site Store Pro, you may copy the Site Store Pro installation files into the existing website design's folder on your computer instead. However, please take caution not to overwrite any files with the same name that are already located in your current website design folder (example /index.php)
It is highly recommended that if you are copying the files from the "New Installation" folder into your current local website design folder that you make a backup of your current design directory in case you accidentally overwrite some existing files with the same file names. This way you can easily restore any files that could be overwritten with the copy process. The files and folders in the Site Store Pro installation mostly have very unique names except for the index.php file(s) in root and in folders such as /store/ and /checkout/. To be on the safe side, making a full backup of your current design folder is advised before copying all the files from 'New Installation' to your local design folder and/or posting the files up to your website.
IMPORTANT: If your current website is already using the root /index.php as the home page, do not overwrite your existing /index.php file with the one from the "New Installation" folder. Simply exclude the root /index.php file when you copy all the contents from inside the 'New Installation' to your current local development | design directory.
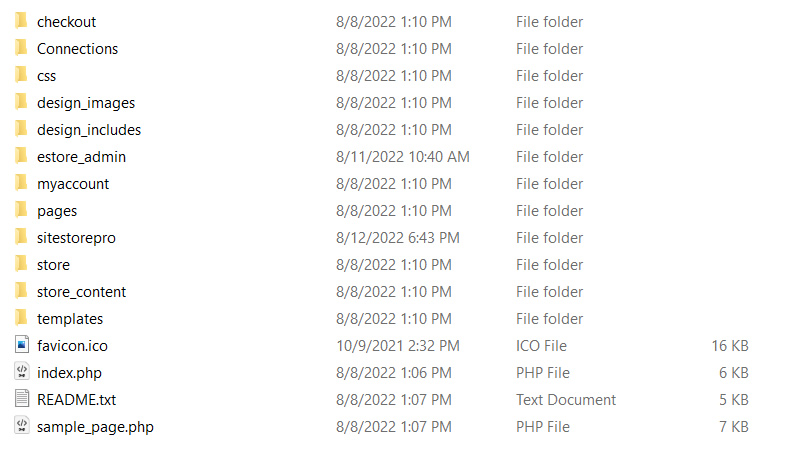
Below is a screen shot of the folders/files from the ‘New Installation’ folder coped to a folder on the local drive:
If you are replacing a current live website with a new Site Store Pro shopping cart powered site, we recommend copying the Site Store Pro files from the 'New Installation' folder into a new local design folder or a temporary development subdirectory in your existing design folder such as /teststore/ or /newsite/. Using a different design folder or a temp development directory will allow you to create your new site without affecting your current live site. You can preview and test the new site on your hosting account in a sub-directory as well. When you are ready to launch your new online store (website), you simply copy all the contents from the sub-directory down to your site root.
Edit The Database Connection File
The SiteStoreProDB.php database connection file is located in the ‘Connections’ folder from the files/folders you copied from the ‘New Installation’ extracted zip file folder to your local computer.
Open up the /Connections/SiteStoreProDB.php file in Dreamweaver, Notepad or any text editor and modify the default database login credentials with the values for the specific MYSQL database on your hosting account (or local server if running a local MySQL server). If you are setting up the store on your hosting account, you typically will create a new database in your cPanel for your online store. If you are unsure of your database credentials, please contact your hosting support department or we can assist you with the new database setup or help you find the credentials for an existing database that you have setup previously. (i.e. for WordPress etc).
The connection string will have the following info:
- $hostname_SiteStoreProDB = "localhost";
- $database_SiteStoreProDB = "database";
- $username_SiteStoreProDB = "username";
- $password_SiteStoreProDB = "password";
You must replace the 4 values in red with your specific MySQL database login information.
$hostname_SiteStoreProDB = The servername or IP Address of your MYSQL
$database_SiteStoreProDB = The name of the database provided by your webhost or entered when setting up the database.
$username_SiteStoreProDB = The username provided by your webhost or entered when setting up the database
$password_SiteStoreProDB = The password provided by your webhost or entered when setting up the database
(Most hosting accounts run the MySQL database server on the same server as the webserver (files) so usually you can leave the hostname as localhost or 127.0.0.1. However, if your MySQL database server is on a separate (remote) server, make sure that you can access it from your website. If you have issues connecting to your database after you complete the setup process, contact support for troubleshooting assistance).
Below is a screen shot of a sample edited connection file:
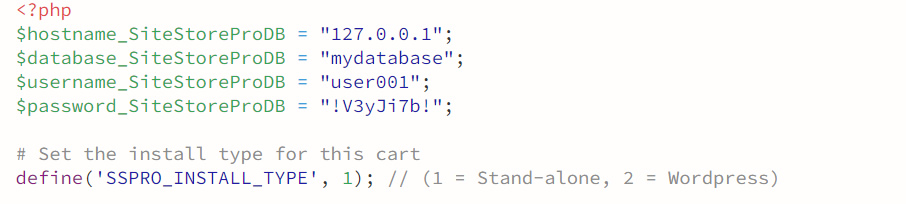
(Login credentials above are for demonstration purposes only and will not work for your specific installation.)
If you need assistance setting the correct MYSQL connection string for your Site Store Pro installation, please email [email protected]
Transfer |Copy the Files/Folders To Your Webserver
Now that the SiteStoreProDB.php connection file has been edited to reflect your specific MYSQL database information, you are now ready to transfer the Site Store Pro folders and files to your website.
If you will be running a local server version of the store with a local PHP webserver and MySQL database server (i.e. if you are running XAMPP or a local version of IIS with PHP and MySQL server), you do not need to upload the files to your hosting account at this point and can skip this section since the files will be running locally.
However, If you will be testing and/or running the shopping cart on a hosting account | server, you should upload all the files to the server at this point via FTP, SFTP or RDP.
Using a third-party FTP program such as FileZilla, CuteFTP or WS_FTP, the built-in FTP client in Dreamweaver, a SFTP client program or an RDP (Remote Desktop Connection) copy all of the files/folders located from your local system (D:\OnlineStore\ in our example) up to where you want to run the website (online store).
Important: If you are installing Site Store Pro on a live site and want to develop your store before having it viewable by the public, we recommend transferring the Site Store Pro files into a SUBDIRECTORY such as /teststore/ on your hosting account instead of the site root to avoid file conflicts. After completing the design integration and content additions, you can then simply copy the files from the subdirectory to the root directory when you are ready to replace the existing website with the new Site Store Pro enabled store and launch it to the public.
Below is a screen shot of all the files/folder from inside the "New Installation" folder, including your edited /Connections/SiteStoreProDB.php file selected and being uploaded to a hosted website (server):
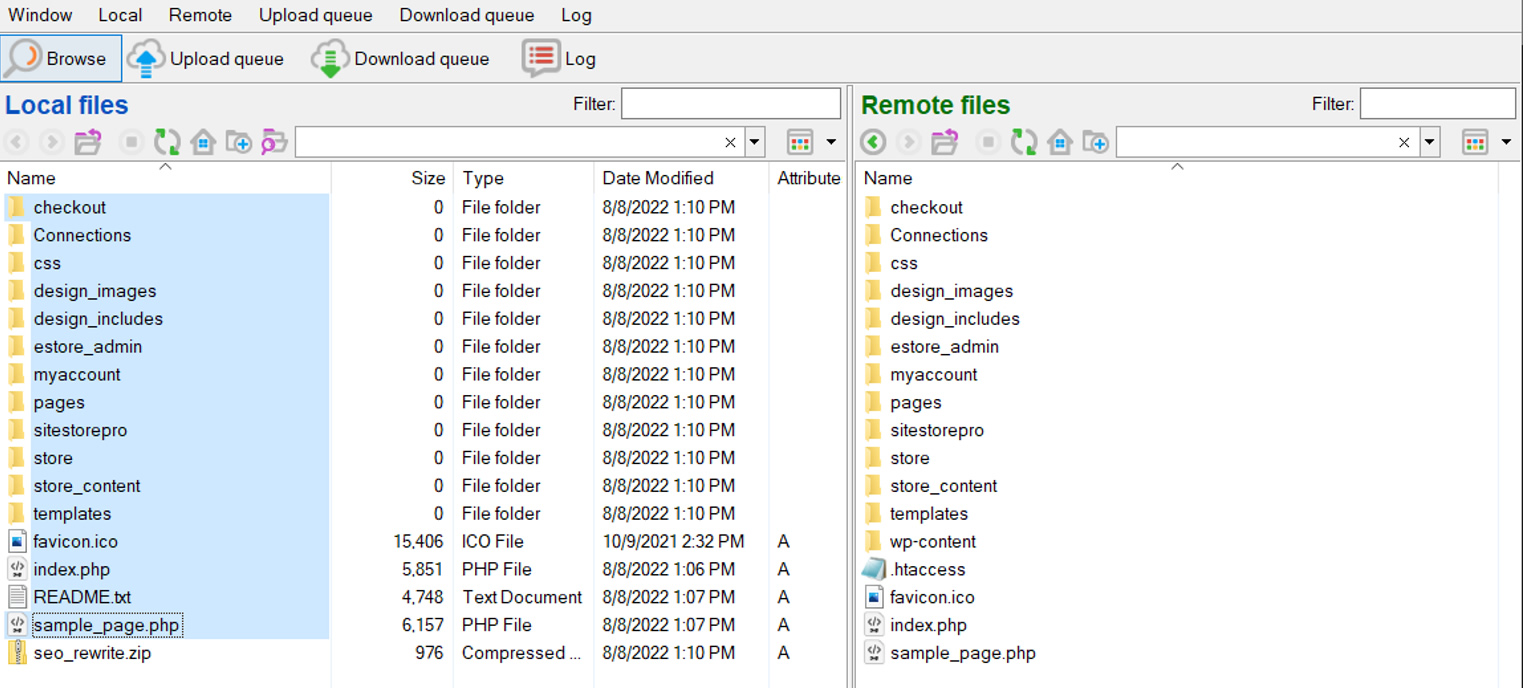
If you are transferring the Site Store Pro files to an existing “live” website, be careful not to OVERWRITE any active files with the same name that are already on your website (i.e. index.php in the root of the website directory). See text in blue above the FTP screenshot about using a temp directory for testing purposes on a live website.
Install The Online Store MySQL Database
Now that the Site Store Pro files have been transferred to your webhost and the database has been setup, you can now activate your store by installing the online store database and then setting up the Master Administration Account to manage the store.
To start the activation process, simply type in the URL in your browser of where you installed (copied) the store files in the previous setup followed by /estore_admin/
Example: https://mystore123.com/estore_admin/
You will be prompted with the following screen:
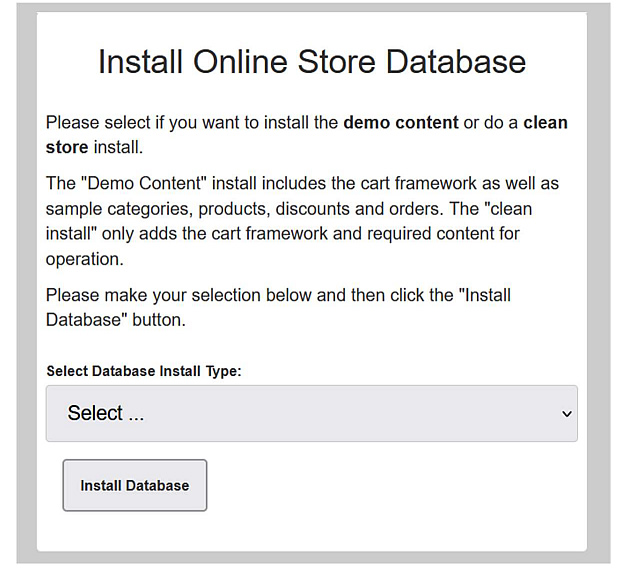
Select the type of install you want for your online store…
Demo Content: Includes the full cart framework plus sample products, categories, orders and other demo online store content to pre-populate the installation with usable test data.
Clean Install: Includes only the full cart framework and minimal required store content to run the shopping cart and will require you add your own products before using or testing the site.
Note: if this is the first time you are using Site Store Pro, it is recommended that you select the “Demo Content” option since it will allow you to learn the features of the shopping cart much more efficiently.
After you have made your database install type selection, click on the “Install Database” button.
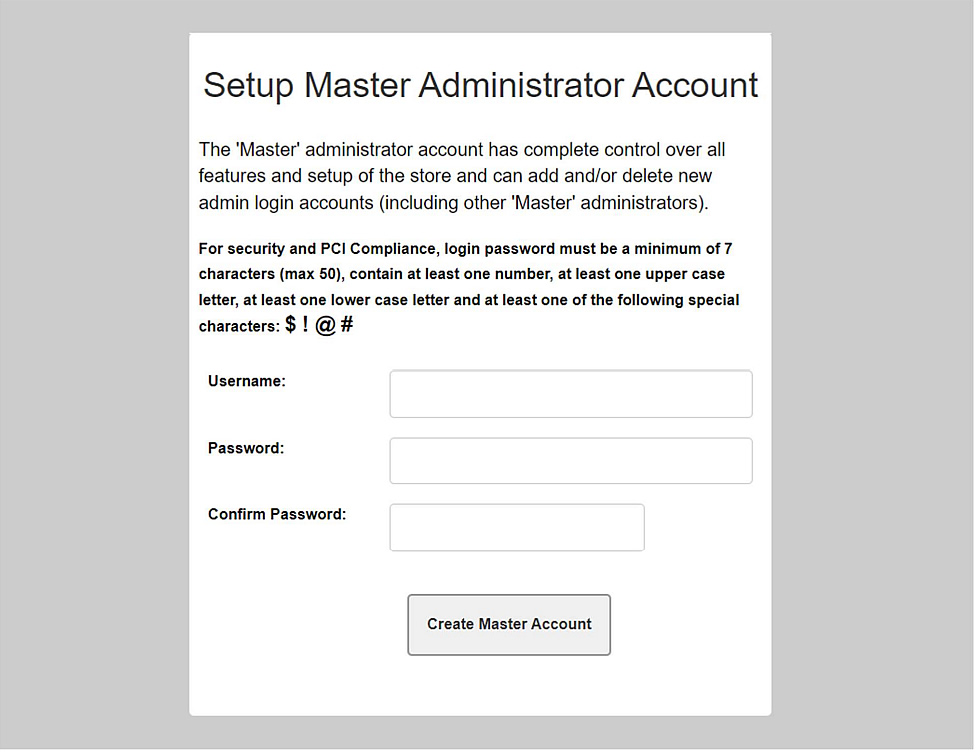
Then the database installation completes, you will be automatically redirected to a new screen to setup your Master administration login account.
Setup Your Master Administrator Account
New installations will be prompted to create a MASTER Administrator account for the store admin area. The Master Administrator can perform all store administration functions as well as create new administrator accounts and other MASTER administrators.
Below is the screen that will prompt you to create a new Master Administrator account.
After you have setup your Master Admin account, you will be logged into the admin and asked to verify your site URL and checkout URL settings (see next page).
Verify Your Store URL and Checkout URL Settings
After you setup your Master Administrator account, you will be redirected into the admin area and shown a screen similar to the one shown below. Your Store URL and Checkout URL values should be automatically set with the correct values. However, it is recommended that verify both values as the correct URL for your install. Both the Store URL and the Checkout URL values should be set as the same URL. (The only situation where you would have a different Checkout URL than your Store URL is if your checkout area would be setup as a sub-domain).
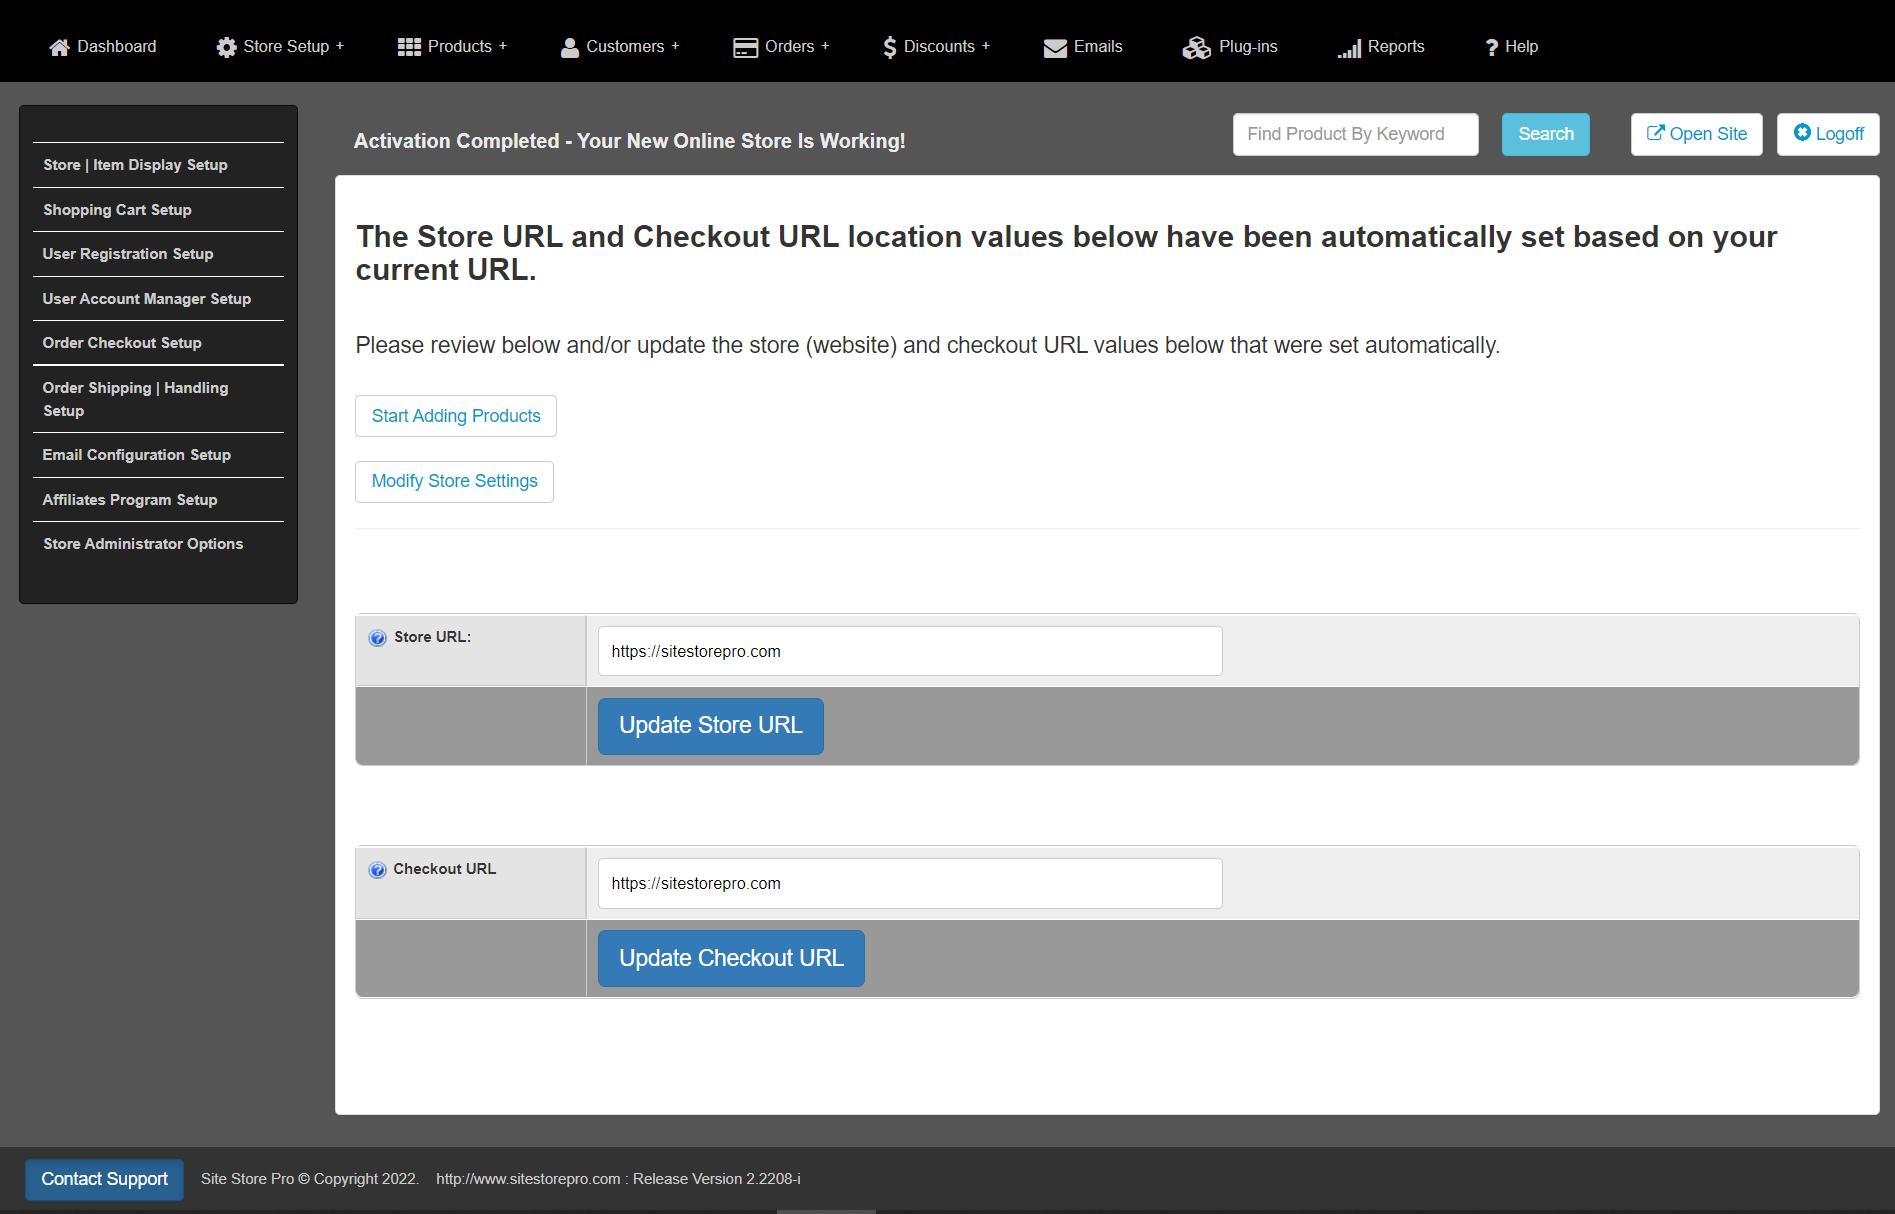
If you will be using SSL (https) on your site and the SSL certificate has already been installed and is working on your server, you should edit the Checkout URL from http:// to https:// at this time if your did your activation in non-secure mode and the values are showing http.
Do not enable https in the checkout URL field if you don’t have a valid SSL certificate installed on your hosting account/server or if you are running the installation on your local system for test purposes.
Please note that if you change either value (Store URL and/or Checkout URL), you must click on the 'Update' button for each specific value after modifying for the change to take effect.
The installation is now finished, and you can now start to add your products, store settings and ecommerce related content directly from inside your Site Store Pro admin area.
Setup A Dreamweaver Site Definition (Optional)
If you will be using Dreamweaver to modify the sample store design to match your existing website design, we recommend setting up a new DREAMWEAVER SITE DEFINITION instead of clicking on the files and editing them as stand-alone files (i.e. “outside” of a Dreamweaver site definition.)
Below are the steps to create a new Site Definition.
- Open up Adobe Dreamweaver
- Click on the ‘Site’ menu and select ‘New Site’
- Enter a name for your design site in the "Site Name" field (i.e. My Website)
- Select where you copied the folders and files from the ‘New Installation’ folder to your local computer as the “Local Site Folder”
In this example, we copied the files inside the “New_Installation” folder to a directory on our local system at D:\OnlineStore
Below is a screen shot of a sample Site Definition in Dreamweaver.
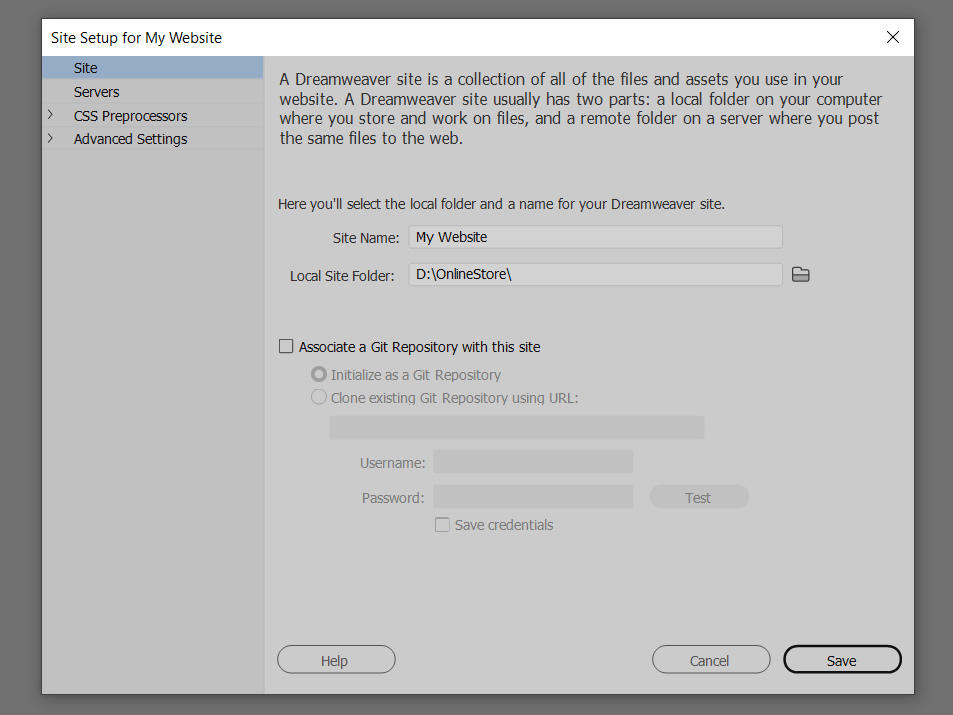
Click “Save” when you are finished entering your Site Name and Local Store Folder.
If you have issues when creating a new site definition in Dreamweaver, please consult the Adobe Dreamweaver help docs.
Set The Upload Folder Permissions On The Webserver
If you are having issues upload files from the admin area, you may need to manually set the permissions on the upload (content) folder on your hosting account / server.
The /store_content/ folder (and its subdirectories) are where all uploaded content for the online store including product images, category images, header, etc. are saved. The /store_content/ folder must be given read/write permissions.
- Most Linux hosting accounts will not require any permissions settings on the content folder. However, if you are having issues getting content to upload from the admin, you will need set the /store_content/ folder to "755" (CHMOD with Recursive). (Or set Read/Write Privileges to the /store_content/ with propagate to child directories using your web hosting control panel)
- Windows IIS 7 or Higher Servers : You will need to set the permission for the IUSR account to Read/Write/Delete for the /store_content/ folder.
The permissions can usually be via your FTP/SFTP software or your cpanel file manager (Linux Servers) or through your hosting account control panel or RDP connection (Windows Servers). Please contact your webhost’s support if you cannot set the permission from your control panel. (Note: The permissions must be set on the \store_content\folder to "propagate" or "inherit" to all subdirectories inside the \store_content\ folder. )
Setting Up SEO Friendly Links For Store And Product Pages
Site Store Pro includes the option to have dynamically generated content use friendly page names such as /items/my-product instead of /store/item_view.php?id=200292.
In order to use SEO friendly links on your store, you must turn on that option in the admin area and then add some rules to your .htaccess file or web.config.
To setup SEO friendly store links (page names), login to your /estore_admin/, then go to Store Setup and ‘Store URL’
Check the box that says “Turn On SEO” Friendly URLS (links) and save your settings.
If you are hosted your on a Linux server, you will need to add the following lines to your .htaccess file inside the rewrite rules area:
Your edited .htaccess file should look similar to the example below (plus your previous rules):
RewriteEngine On
RewriteRule ^(sitestorepro|store|estore_admin|myaccount|checkout)($|/) - [L]
RewriteRule ^items/([^/\.]+)/?$ store/item_view.php?itemlink=$1 [BCTLS,L]
RewriteRule ^featured/(.*)?$ store/store_results.php?Featured=1&Section=Featured+Items [L]
RewriteRule ^specials/(.*)?$ store/store_results.php?Special=1&Section=Special+Sale+Items [L]
RewriteRule ^favorites/(.*)?$ store/store_results.php?favorites=1&Section=My+Favorites [L]
RewriteRule ^brands/([^/\.]+)/?$ store/store_results.php?brandname=$1 [BCTLS,L]
RewriteRule ^section/([^/\.]+)/?$ store/store_results.php?mastercatname=$1 [BCTLS,L]
RewriteRule ^subcats/([^/\.]+)/?$ store/store_results.php?subcatname=$1 [BCTLS,L]
RewriteRule ^collections/([^/\.]+)/?$ store/store_results.php?collectionname=$1 [BCTLS,L]
RewriteRule ^occasions/([^/\.]+)/?$ store/store_results.php?shopoccasions=$1 [BCTLS,L]
RewriteRule ^styles/([^/\.]+)/?$ store/store_results.php?shopstyles=$1 [BCTLS,L]
RewriteRule ^(.*)/([^/\.]+)/?$ pages/index.php?title=$1/$2 [BCTLS,L]
RewriteRule ^(.*)/(.*)/([^/\.]+)/?$ pages/index.php?title=$1/$2/$3 [BCTLS,L]
RewriteRule ^([^/\.]+)/?$ pages/index.php?title=$1 [BCTLS,L]
If you need assistance setting up your SEO settings on your install, please submit a support request at https://www.sitestorepro/mysupport/
Upgrading Site Store Pro To The Latest Version
When upgrading Site Store Pro, you do NOT need to reinstall the entire application or database and you should never re-upload the "New Installation" folder contents to an active Site Store Pro installation.
You simply have to replace the /estore_admin and /sitestorepro/ directories with the folders of the SAME NAME located in the ‘UPGRADE’ directory from your downloaded application zipfile.
Replacing ONLY the ‘estore_admin’ and ‘sitestorepro’ upgrade files prevents the possibility of overwriting design files that were changed after your original install date.
The upgrade folder only contains the Site Store Pro core cart files and the current admin area files but it does not include any design files or CSS files.
Please note that you cannot update a 3rd generation platform install to the 4th Generation by simply copying up the contents of the upgrade folder. You must perform a complete upgrade and new skinning of the site since is is an entirely new file structure and code base.