Web Designer Version - Site Integration Tutorial - Gen 4 Platform
If you are creating a new website and using the include sample store (website) as your starting point, this tutorial will show you how to quickly modify the sample store design with your own custom design.
Note: If you are a paid support plan user, you are entitled to one FREE design integration. If you provide a working layout of your design in HTML, we will apply it to your store files and set it up on your host / server.
Install Your Site Store Pro Designer Version (eCommerce System) First
If you just downloaded the Site Store Pro Designer version and have not installed it yet on your hosting account or local server, please review and follow the Install Guide before proceeding with your design integration.
After you have extracted all the folders / files from the "New Installation" folder to your local design directory, open up your preferred HTML editor to view the copied files. In this tutorial, the screen shots will be created in Microsoft Visual Studio Code but you can use any other code editor such as Dreamweaver, NotePad++, Atom, etc.
Below is the directory structure of the copied sample store (website) folders/files:
The new 4th generation ecommerce platform install of the Site Store Pro Designer version comes with 9 folders and a root index (home page) file.
(All images can be opened in a modal zoom window by clicking).
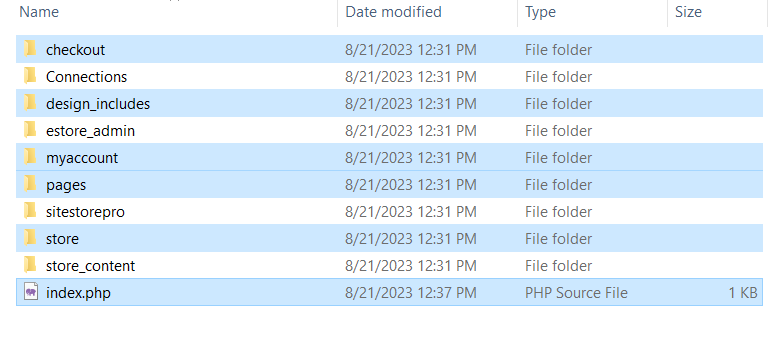
You will not be editing any of the files or folders in the /sitestorepro/ or /estore_admin/ folders and most likely will not be editing any of the other folders that are not highlighted above in blue.
Open The Sample Website Home Page (/index.php) in your HTML editor
Open up the root home page file (/index.php) in your preferred HTML editor to see the design structure of the page. Below is a screen shot of the HTML structure of the /index.php sample home page file.
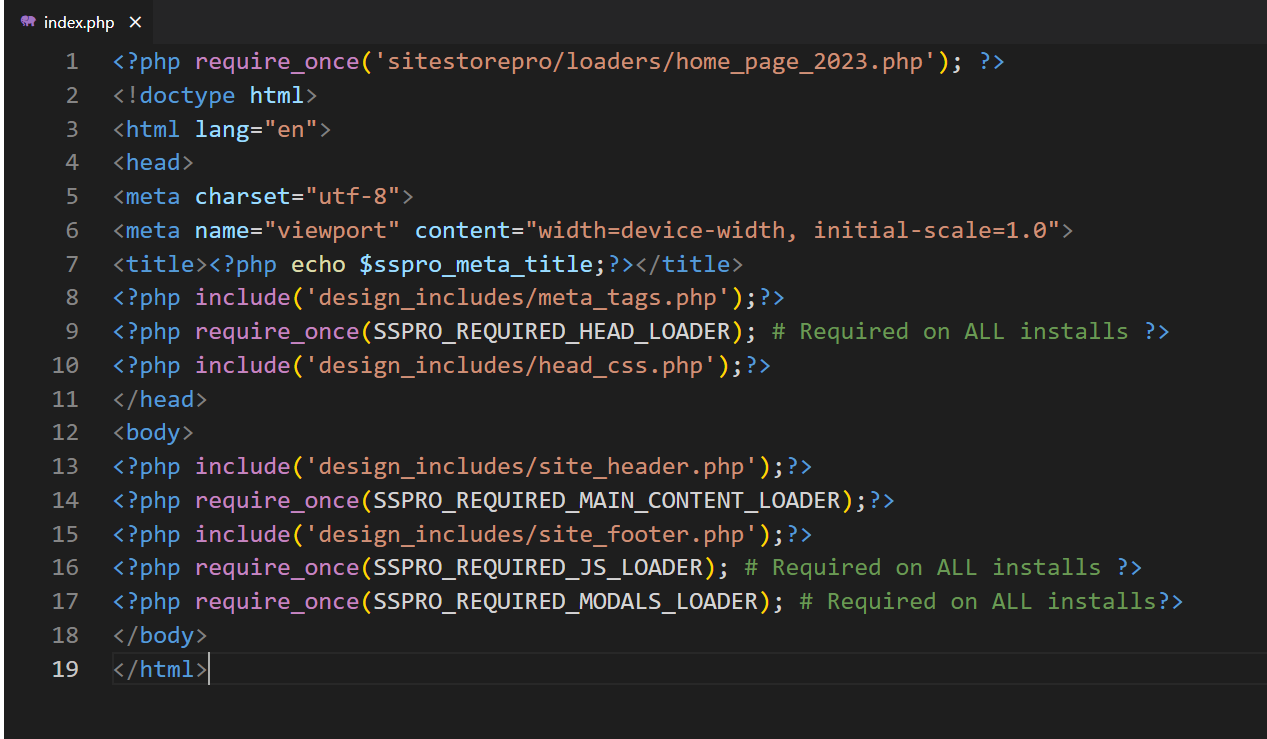
From top to bottom, in addition to the standard HTML page structural tags, the following design and dynamic content elements are included in the design layout:
Above the <!doctype> tag: Cart Framework PHP Include File (Required Content): The include file that is above the doctype tag is required and should never be removed. It loads the cart framework. Each of the shopping cart pages (i..e the cart display, product view, checkout, etc) has a specific loader file. However, if you are creating your own new page, you will want to use the generic cart loader file called /sitestorepro/loaders/framework.php. All file that run the Site Store Pro ecommerce system must include a framework or specific loader file on the top of the page since the include file sets required application variables, configuration settings and basically is the engine that runs the ecommerce application.
Dynamic Meta Title Tag: Site Store Pro dynamically assigns each page a title from the admin system. The <?php echo $sspro_meta_title;?> php variable echo in between the title tags set this value. You are free to remove the PHP code between the title tags and set the meta title tag value manually. However. it is not recommended that you remove/replace that code on any page except the root index.php file since the tag value will change based on the content that is being loaded on the page (i..e site page, product category, items, shopping cart display, checkout pages, etc).
Dynamic Meta Tags include file: The <?php include('design_includes/meta_tags.php');?> include file loads the page description and/or keywords tag if they are set in the admin. This file also loads the dynamic favicons loader system. You can edit this file if required and if need can disable the favicons loader if you will be manually posted your site's favicon image files to your server and do not want to manage those elements in the admin area.
Required Head Content Loader File: The PHP include statement (<?php require_once(SSPRO_REQUIRED_HEAD_LOADER); ?>) must be in the header of all front-end site files that use the Site Store Pro application. If you are modifying the core page structure, make sure that this file reference is not removed. If you are creating new pages from scratch, this loader file must be in the head section above the closing </head> tag.
CSS Loader Include file: The PHP include file (<?php include('design_includes/head_css.php');?>) is not a required element but highly recommended since it loads the dynamic CSS from the Unified CSS system which will be discussed in detail below. This include file should be on every front-end file unless you are hardcoded in a reference the site CSS file. (more info on this below)
Dynamic Header System Include File: The PHP include (<?php include('design_includes/site_header.php');?>) is not required but loads the dynamic header system. If you will be building your site header using the powerful online header builder tool, this include file must be on every front-end file. If you will be adding your own custom HTML header code to the site, you can replace this include with a reference to your custom header include file.
Dynamic Main Content Loader: (<?php require_once(SSPRO_REQUIRED_MAIN_CONTENT_LOADER);?>) This file reference is REQUIRED and loads the dynamically generated ecommerce content such as product information, checkout forms, content displays, etc. This include file is required on every file in the above highlighted folders that reference it. If you are creating your own custom page using hardcoded HTMLfor the main body content area, this file can be excluded. However, if the content is loads any data that is controlled from the web-based admin (which is every single page in the application), this include file cannot be excluded from the page structure.
Dynamic Footer System Loader: The PHP include (<?php include('design_includes/site_footer.php');?>) is not required but loads the dynamic footer builder content. If you will using your own custom designed footer and not managing the footer content in the web-based admin, you can replace this footer include with your own file reference.
Final Two Required Include Files: The two include files right above the closing </body> tag (SSPRO_REQUIRED_JS_LOADER, SSPRO_REQUIRED_MODALS_LOADER) are required on all front-end files and must be included on every page directly above the closing body tag. Do not place any custom JS code below these include files since they dynamically load required JS content based on the specific page type and display requirements.
Changing the Page Layout (Structure)
Now that we have gone over the default file structure and the required elements for any site design page, let's do some some basic design modifications to demonstrate a simple 'reskinning' of the sample store design.
Please note that the 4th GEN Site Store Pro system includes a FULL CMS and site builder features including a dynamic header and footer builder.
Unless you specifically require your own custom header, we recommend setting your header configuration in the admin using the dynamic header builder since it has not only been optimized for all device types but it includes support for multiple header configurations based on screen size as well as the ability to instantly embed dynamic plugin content inside the header.
You are not required to use the dynamic header builder (or any of the site builder elements) but the header builder is an extremely powerful and versatile tool that will usually streamline your site development.
- For this basic tutorial, we are going to move some elements aroound in sample store's default configuration using the web-based admin header builder interface and then upload a new site logo.
- Then we will modify some site skinning elements using the web-based Unified CSS manager.
- Then we will replace the included dynamic footer system with a hardcoded footer so you can how modifying the included footer include file will automaticcally change the all pages on the front-end website
- Finally, we will show how you can optionally export the online CSS and use your offline CSS editor instead of using the online Unified CSS Manager.
Login to Your Web-Based Admin To Modify The Default Header Configuration
We are going to assume that you have a functioning install of the demo store at this point either on your hosting account or via a local development site that is running XAMPP or similer (if you are not familiar with setting up a local server, we recommend just installing the application on your hosting account for development. If you are developing your site on your hosing account and you don't want anyone else to see it, you can set the install in development (offline) mode under Setup > Store URL | Store ON-OFF | SEO URL. Note: If you selected the "Clean Install" option during installation, the screen shots may not apply to your specfic install but the steps are the same.
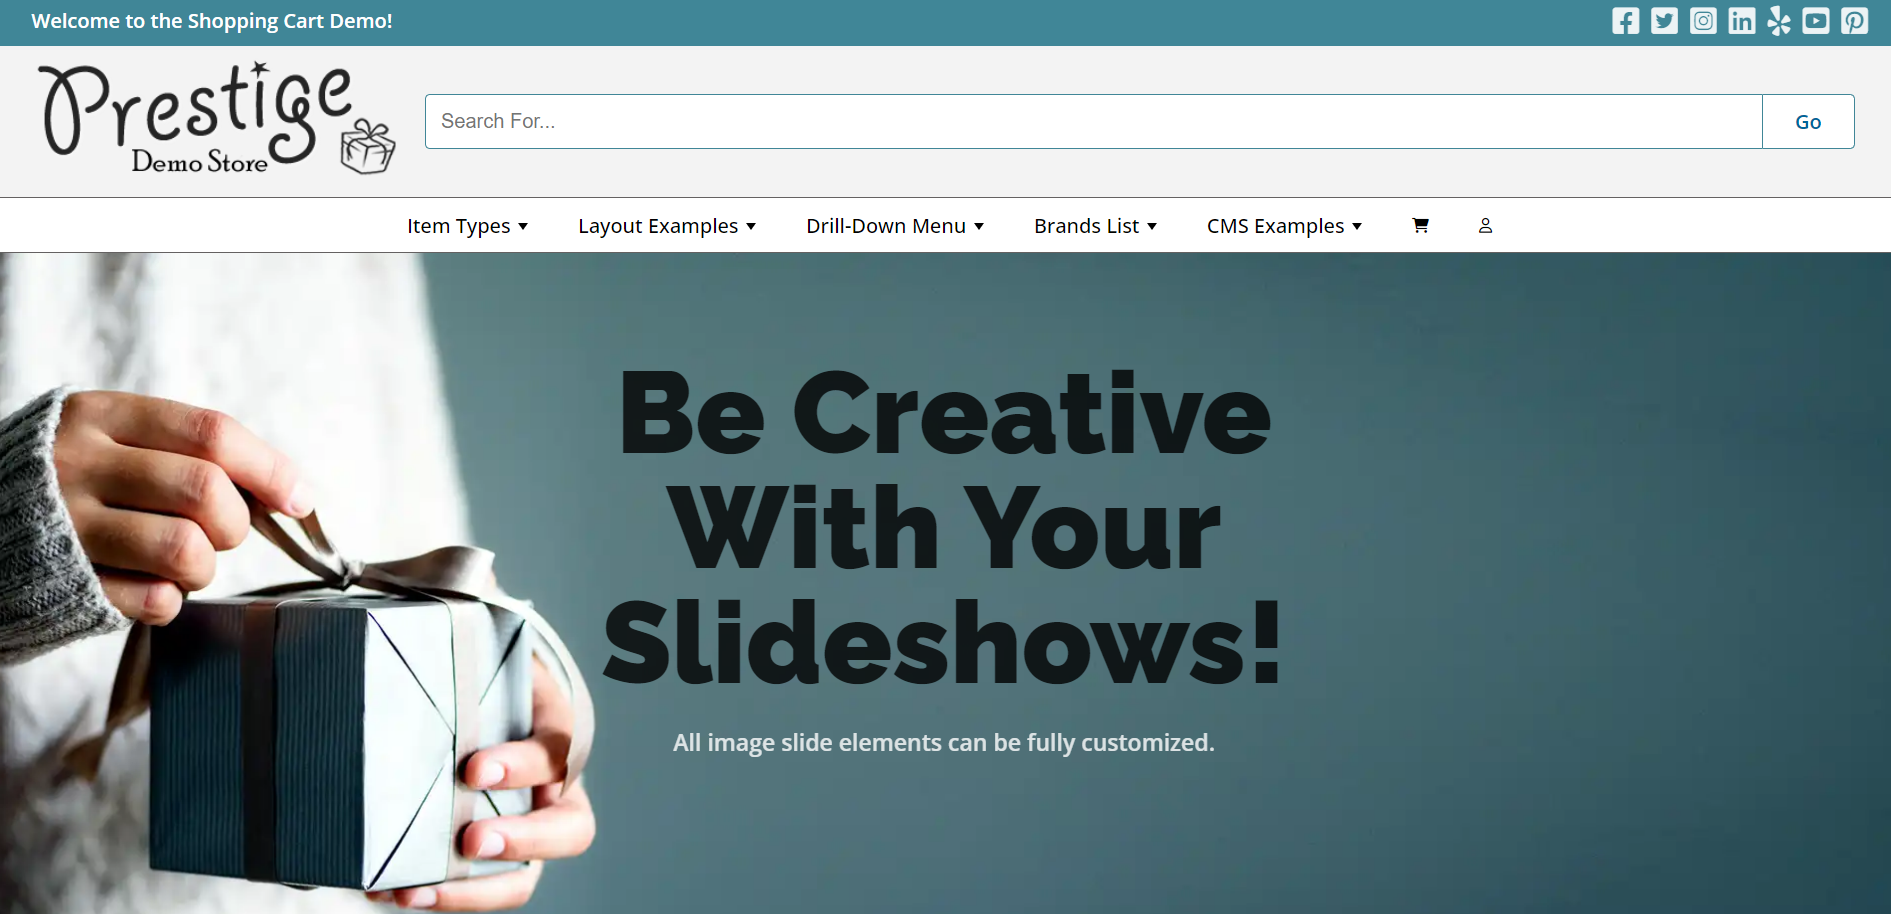
Below is a screen shot of the starter website (sample store) header that comes with Site Store Pro when it is viewed in a browser in it's default configuration.
Let's login to the web-based admin at /estore_admin/ and then move the navigation bar to the top of the page and also change the install from using a multi header configuration (default) to the single configuration setup. The mulitple header configuration feature is useful if you want to display different content elements or position elements differently based on the screen size. Howver, most installs will only require one header configuration for all screen types. (Both single and multi-layout setups are responsive).
After logging into your admin, go to CMS > Header, Navigation & Footer ---> Header Builder | Content Manager and you will be shown a screen like below:
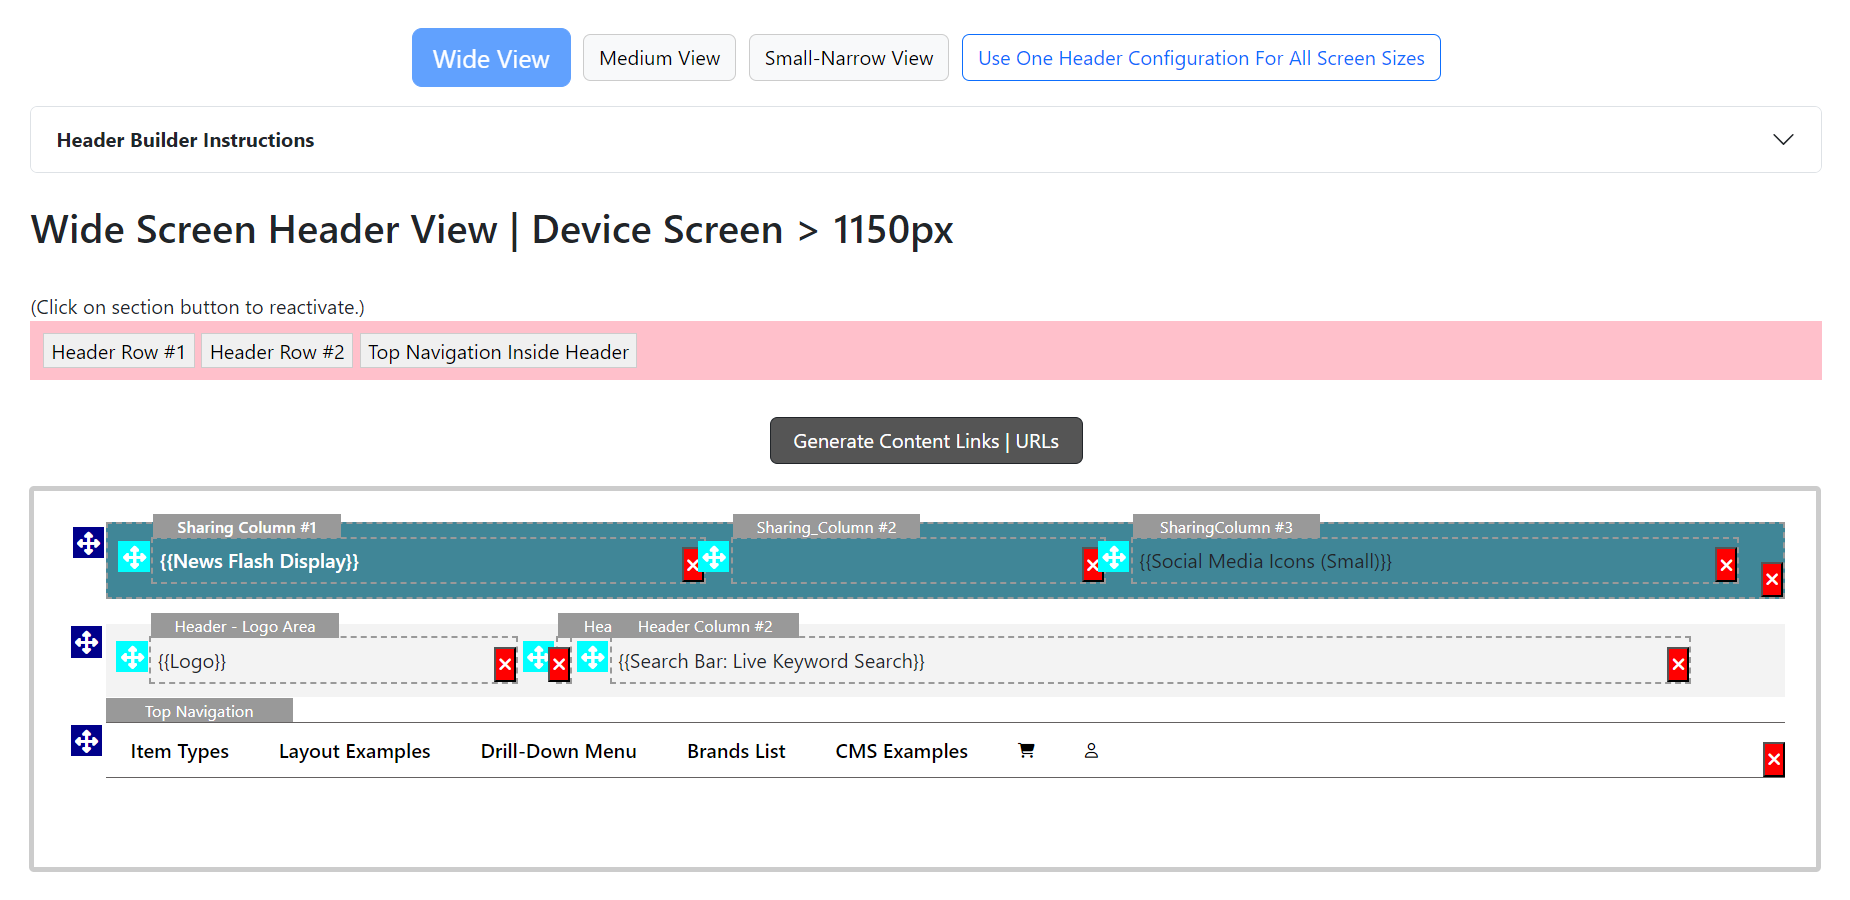
For this demonstration, we are going to drag and drop the 'Top Navigation' section using the blue arrows icon (drag handle) to the top of the display and then move (drag) the top 'Sharing Row' to the bottom of the display . After moving the two header sections, click the 'Save Changes' button and your modifed header will be shown below the configuration area in the real-time preview (or you can just go to the site and see the change there as well).
The top header will now look like this...

For future usage... If you change the header screen width size (by clicking on the 'Medium View ' , 'Small View' buttons on top of the header builder), you will notice that the header configuration and elements change based on screen size and the preview window shows you the rendered elements in that screen width.
Howevr, for this example and simplicity, we are now going to set the site to use only 1 (one) header configuration instead of the default 3 and then we are going to upload a new logo to replace the 'Demo Store' logo.
First, click on the bottom that says 'Use One Header For All Screen Sizes' as shown below..

Next, click on the CMS tab again but this time select "Logo Upload"
Select a new site logo image from your computer for the field named 'Wide View (Default) Site Logo:
Screen size > 1150px' (the first one) and then click 'Update Content | Configuration' button when you are ready to upload your new logo.
(You can also select a new fixed menu icon as well now if you want to but for this tutorial, it is not required.)
The new logo can essentially be any dimensions you want but if you want to keep the same layout and header formatting just with a different logo (without having to modify the header CSS min-height, etc), then upload a replacement logo with a size of 325 pixels wide and 125 pixel high.
For our example, we are going to replace the demo logo with the following sample logo. You can use it for your tutorial ("Save image As") if you don't have a logo right now and just want to follow-along with a sample replacement image).
![]()
After uploading the new logo, you can click on the 'Open Site' button in the top right corner of the admin screen to open up the site home page in a new browser tab (... or you can go back to the "Header Builder" section and the new logo will also show up in the realtime preview window.
Now that we have done some basic header restructuring, let's now do some basic site color modifications using the Unified CSS Manager.
Change Site Colors, Fonts and Basic Skinning With The Unified CSS Manager
One of the main benefits of the online CSS manager is that whenver you save a change to your CSS rules, it create a revision record and allows you to name the saved record so that you can easily revert back to a previous CSS configuration if required.
Click on the CMS tab on the top menu again and this time select 'CSS' from the left-side (second link from the top) of the mega-menu as shown below...
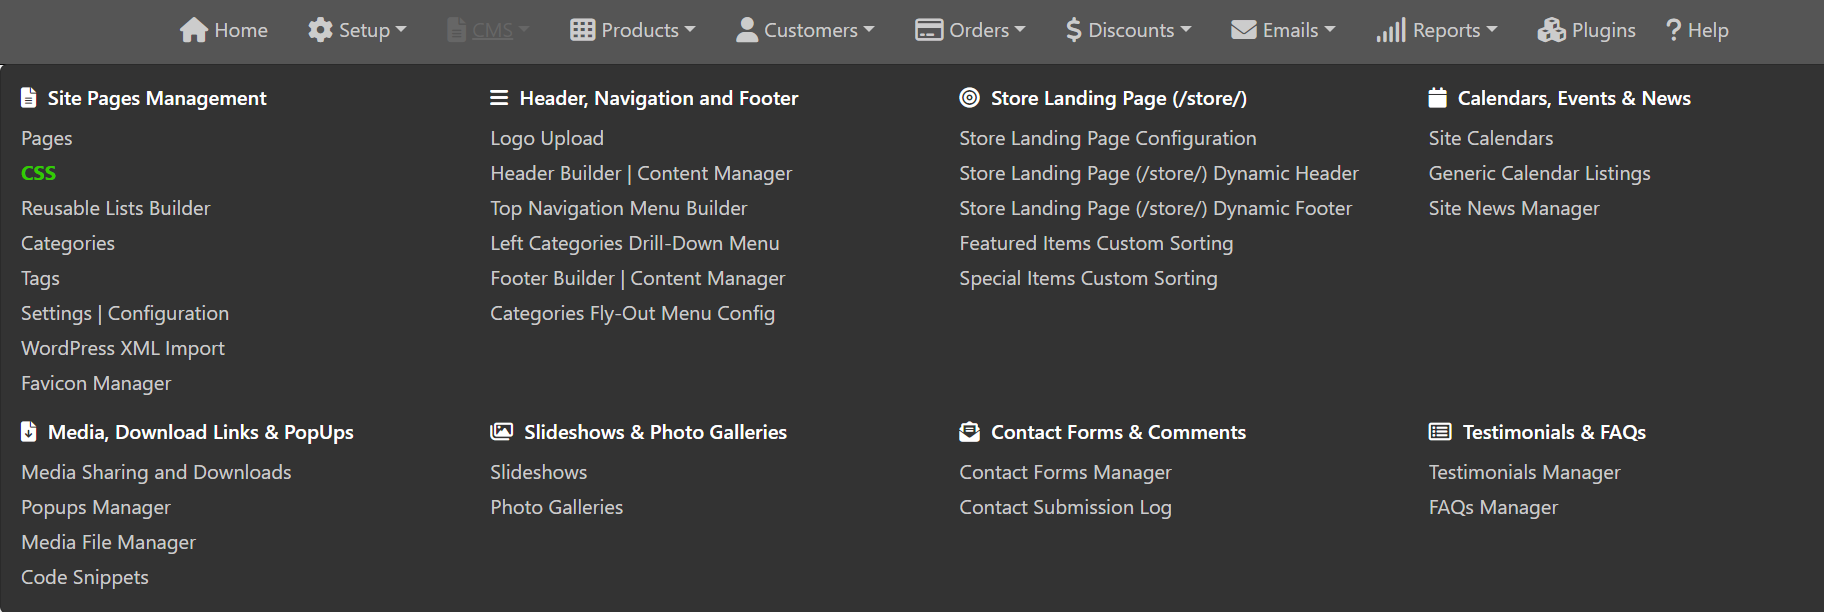
Once the page loads you will see all the different sections / areas of the site under the 'Site and Online Store' section
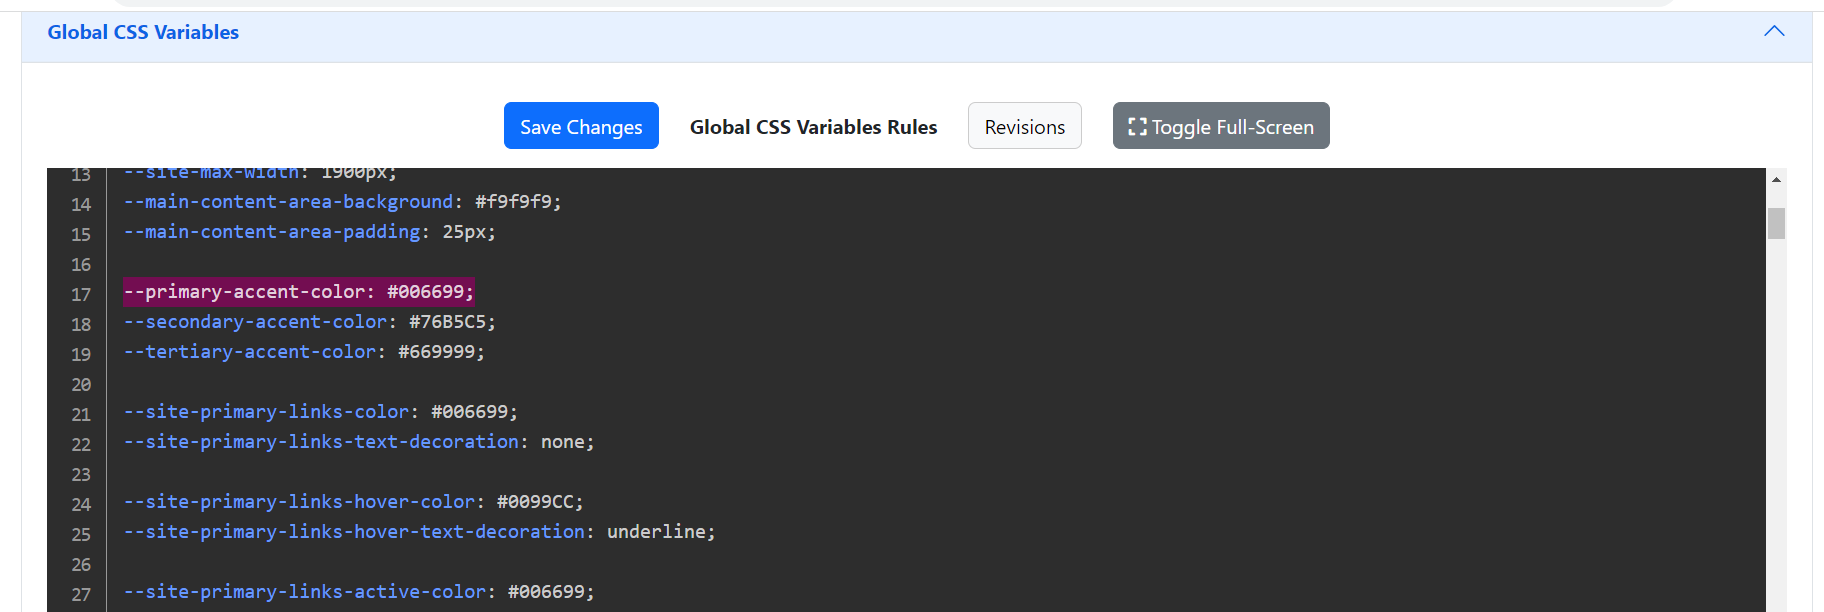
Click on the header bar for the section called 'Global CSS Variables' to expand the CSS rules for the site global CSS settings.
The Global CSS Variables are the fastest way to do a general skinning / modification of the major formattting rules for the site. However, the rules in all the other sections can be modified to fine-tune your specific install to display exactly how you require.
For this example, we are going to modify the top-navigation display background and font colors as well as the primary site access color which coincidently changes the background color of the top-sharing section which you moved in the previous section.
With the 'Global CSS Variables' rules accordian display open, scrolll down to line # 17 and replace the font color code with #006699 (or whatever color you want) as shown below:
(Make sure that when editing the CSS rules, you don't accidently exclude the closing semi-colon just like you wouldn't leave that out when editing in your preferred offline code editor.)
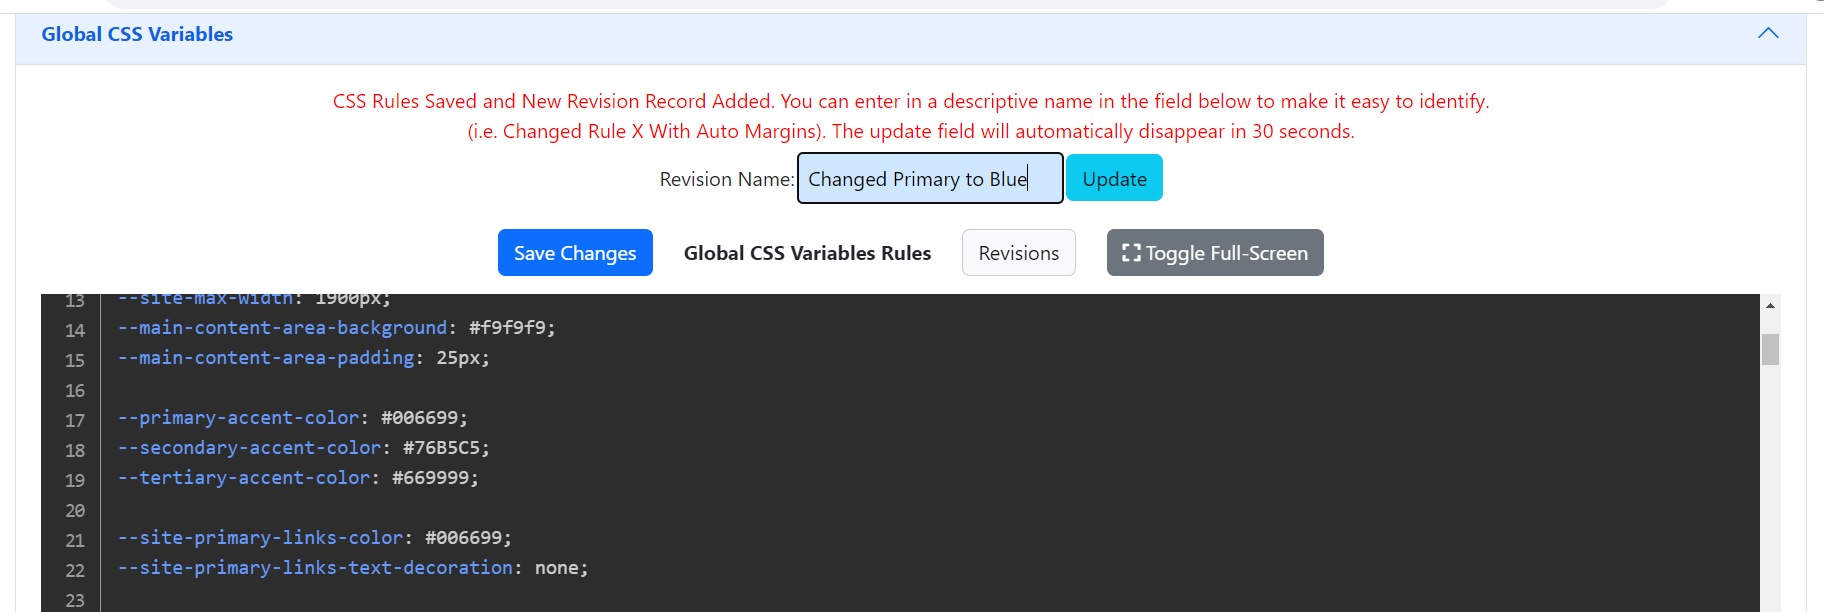
After making your primary-accent-color change, click on the 'Save Changes' button and then enter in a name for the revision record that is created (i..e Changed Primary Accent Color to Blue). Adding a custom revision record name is optional and the save dialog will automatically close if you don't enter and save a custom label but giving the revision record a non-default name can make it easier in the future if you are doing tons of CSS edits and you want to revert back to a specific configuration .. OR .. if you have a CSS configuration that you use for specific situations such as a holiday or sale.
After clicking the "Save Changes' button, a dialog will appear giving you the option to name your saved revision record as shown below. Enter in your revision record name and then click the 'Update' button to save your revision name and replace the generic auto-created revision name.
After you save your record, click on the "Revisions' button and a list of revisions for that specific CSS section will slide out from the left-side of the screen and you can see all revisions that you have made for that specific section as well as copy a previous revision's rules and replace the current live ruleset.
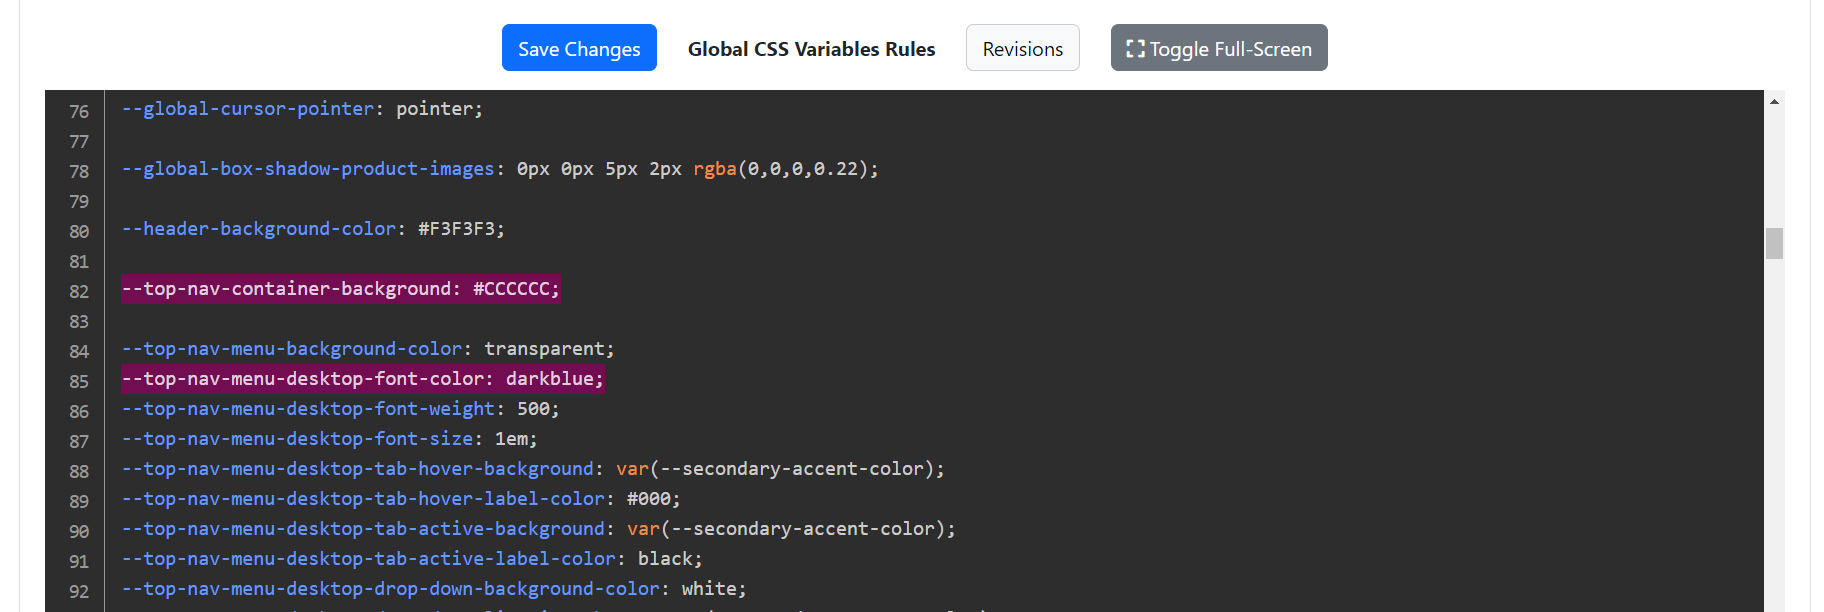
Next, scroll down to line # 82 and change the top-navigation-container-background from #FFFFFF to #CCCCCC (or just #CCC) and then change the desktop font-color on line #85 from 'black' to 'darkblue' as shown below and then save your changes.
Open up your sample site now and the top header will have changed to the new layout, new logo and the new colors:

Even though this was a basic and limited skinning example, ALL elements of the site header and all the site formatting from video backgrounds to full-width header images to embeded media can be applied to the site using the online tools.
We have yet to see a site that could not be completely built using the new Site Store Pro 4th Gen CMS and CSS tools in the admin area.
That being said, there are situations when the designer/developer wants to use their own custom menus, wants to build out a page manually or they prefer to edit the CSS in their HTML editor since they are familar with that type of development workflow.
Therefore, using custom code on the site structure file(s) and editing the CSS externally segways nicely into the next two parts of the tutorial..
Modifying the site structure directly by replacing or editing the default /design_include/ files
Open up the /design_includes/site_footer.php file with your HTML editor and remove the default content loader (<?php require_once(SSPRO_FOOTER_CONTENT_LOADER);?>) (and replace it with some hardcoded HTML code such as:
<div style="text-align: center; font-weight: 600; padding: 15px; font-size: 1.5em">Copyright 2023. <a href="https://sitestorepro.com/">Site Store Pro eCommerce. </a>All Rights Reserved</div>
Example:
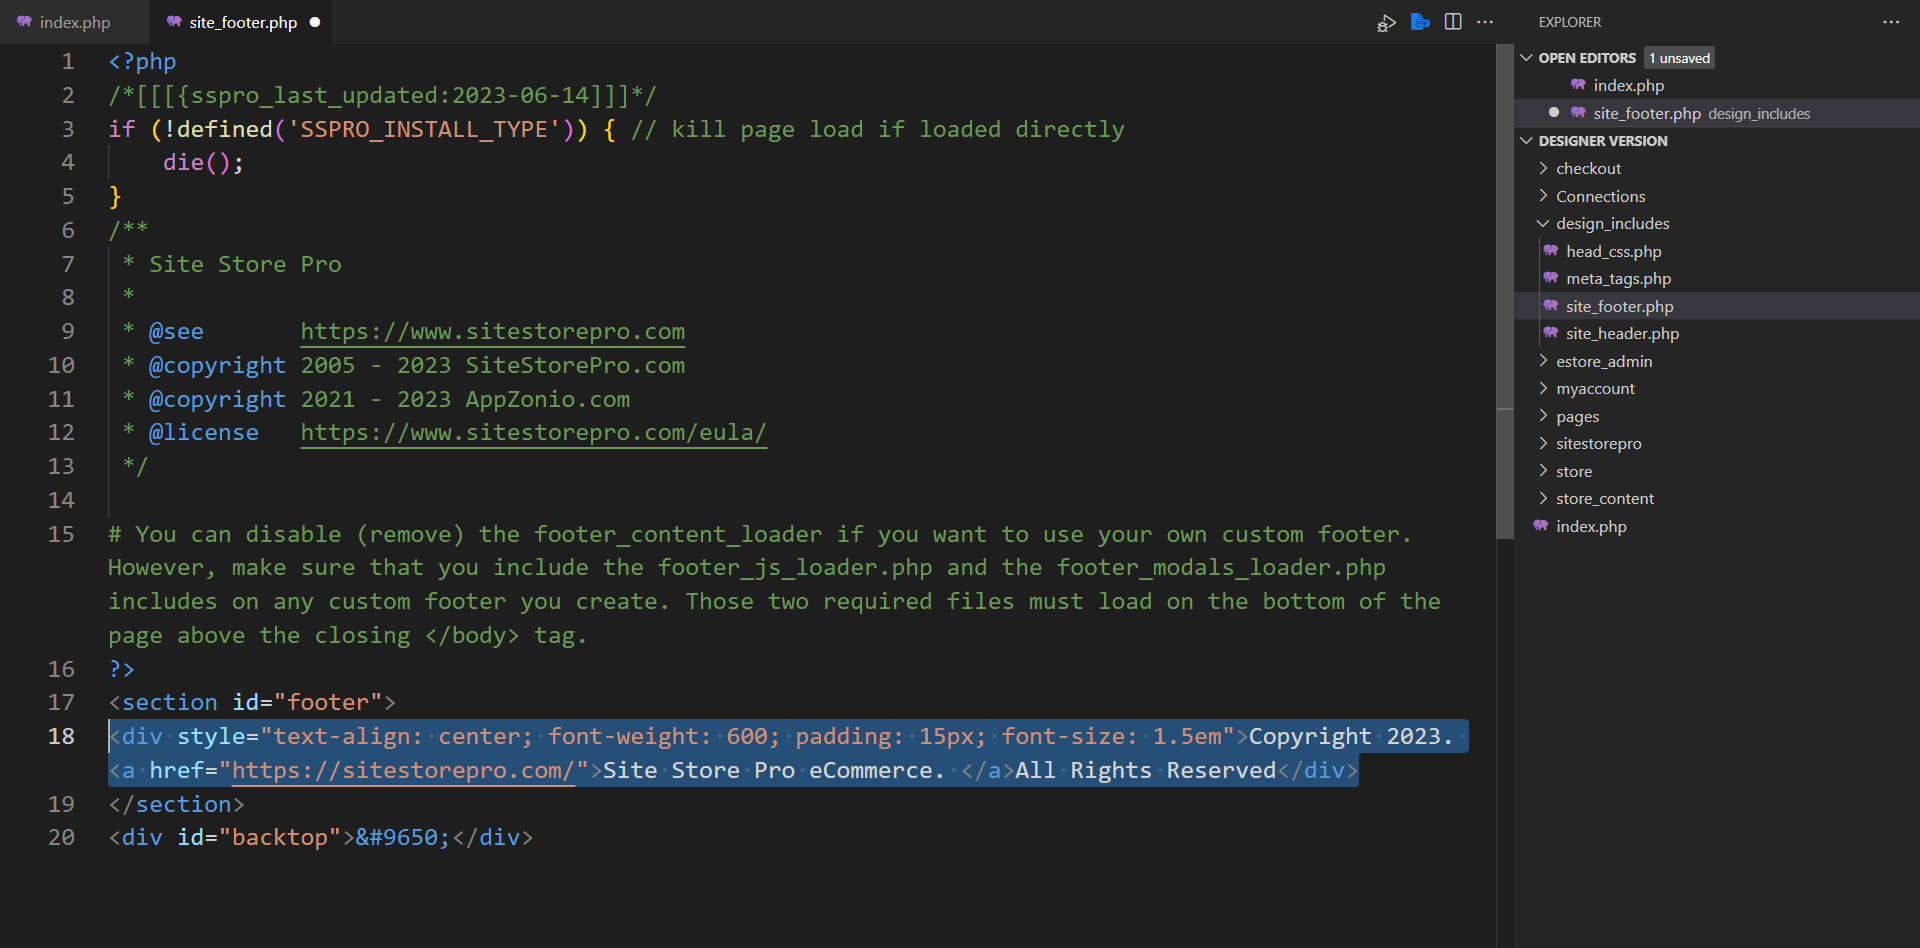
On a live site, we would typically not include the CSS inline on the div but for this example, it wil be a quick and simple formattting option.
Save the and post up the modified /design_includes/site_footer.php fille to your install and you will see that the default dynamic footer content has been replaced side-wide with the hard-coded HTML you added to the file.
Note: instead of editing the include /design_include/site_footer.php file you can also replace the reference to the file on the design_include files with your own custom file path.
However, if you replace the default file name (ie../design_includes/site_footer.php) with a custom path and file name, you will need to modify that reference on all the front-end files in the /store/, /checkout/, /myaccount/ and /pages/ folders so it is much easier (and faster) just to add your custom code to the default file.
(You can follow the same principles with the header if you do not want to use the dynamic header system.)
We do NOT replace any files outside of the /sitestorepro/ or /estore_admin/ folders with application updates so your custom code will not be overwritten if you modify any file that is not located in /sitestorepro/ or /estore_admin/ folders after your initial install. (Although the vast majority of installs never need to modify any of the core ecommerce code (i.e. non design-related files), you can also modify application files in the /sitestorepro/ and /estore_admin/ but those modifications would have to be recorded as code file customizations in the admin area file log so that they are not replaced during an upgrade. However, as stated above, design integration files are not modified or replaced during the platform auto updates or manual application upgrades so you are free to make any design file mods ... just be sure to not remove or include the required files that are described in the first section of this tutorial)
Export Complete CSS From Admin For CDN or Local Editing
There may be situations where you prefer to edit the CSS offline in your HTML editing software instead of online.
Usually, it will be due to the familiarity factor of editing CSS in your specific program (i..e Visual Studio Code, Dreamweaver, etc) .
Regardless of the reason, the one thing you need to know is that if you start editing the CSS rules offline, you will not be able to use the revision feature of the online CSS manager unless you add any changes/additions you make offline to the corresponding online rule sections.
For many developers, including our worklow since we started using the 4th gen system exclusively, we keep the CSS inside the Unified manager until the site is ready to launch but we use Adobe Dreamweaver very frequently to modify the CSS rules offline and create new custom styles.
However, we copy and paste the CSS code from Dreamweaver into the correponding section in the online CSS Manager and save them there. We prefer the way Dreamweaver works with CSS, especially since it will alert you to invalid CSS syntax, duplicate rules, etc. but having the CSS online makes it much easier to work with teams on the site as well as keep track of specific cSS changes without having to use an external revision tracking system.
Even though you can edit the CSS entirely offline and then post it up to the server just like a normal site design, the main reason most developers export the CSS from the online UNIFIED CSS manager is not to edit it exclusively offline but to export the FINAL CSS rules for a completed LIVE site to be distributed via a CDN.
If you will be only editing specific sections offline, we recommended just copying that section from the online manager and then replacing it after editing.
If you want to either edit the entire site CSS content offline and/or post the LIVE complete site CSS up to a CDN however, the process is the same.
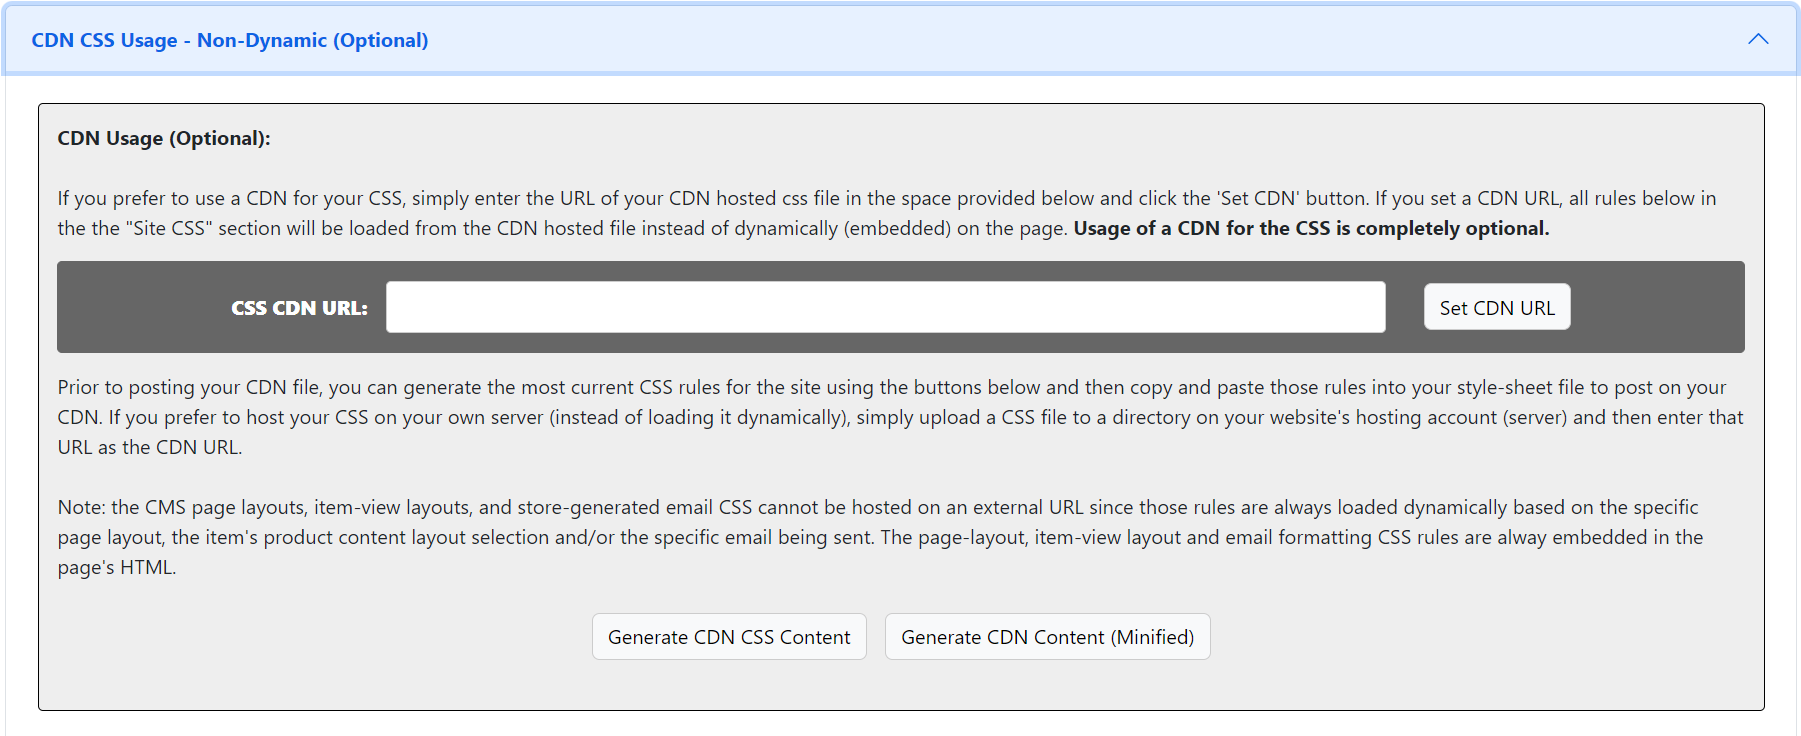
To export the entire CSS contents, you simply go to CMS > CSS and click on the CDN CSS Usage (Optional) Panel and then click on either the ' Genrate CDN CSS Content' or 'Generate CDN Content (Minifed)' button on the botom of the panel as shown below. (The only difference between the two buttons is that one exports the CSS the full format with comments, spacing, etc while the other exports a minified version) . Clicking on one of those two choice will load an new window with the CSS files on the page and if you click anywhere on the page, it will select all the content of the page.
Once you have copied the complete CSS rules, you can open up a new CSS document in Dreamweaver and then save it locally.
The local .css file can then be uploaded to a CDN provider such as Amazon Cloudfront (s3) or you can upload the saved .css file to a directory on your install (server).
To load your external file automatically on the site without specifying it on the html pages simply requires that you enter the URL where it was posted in the field labeled CSS CDN URL on the same panel where you exported the file. After entering your "CDN" URL (which can be just a URL to your own server's CSS directory), click the set CDN button to save it.
IMPORTANT: Once a CDN CSS URL is entered and set, the online rules will not be loaded and the site CSS will be loaded from the external file instead.
Note: even though the main site CSS can be loaded via a CDN, some css rules are always loaded directly from the database since they are dependent on the content. Those rules are the site page column layouts and the product page column layout CSS rules. Since each site page, store section and item can have it's own independent layout, those rules have to be always loaded dynamically since they can change from page to page and item to item.
We hope this tutorial get's you started on your custom site design integration. If you have any questions, need assistance configuring a feature, can't figure out how to integrate a specific element into your site or just need advice on the best way to develop your new site, please submit a support ticket.