Dreamweaver Design Integration Tutorial – NEW Site Design - Previous Platform
Note: This tutorial is for the previous plarform of Site Store Pro. If you have downloaded Site Store Pro after August 1, 2023, please view the new 4th GEN version tutorial.
If you are creating a new website and using the include sample store (website) as your starting point, this tutorial will show you how to quickly modify the sample store design with your own custom design. If you have an existing website and want to integrate the shopping cart into your current site, please follow the steps in the "Existing Site Design" tutorial.
Note: If you are a paid support plan user, you are entitled to one FREE design integration. If you provide a working layout of your design in HTML, we will apply it to your store files and set it up on your host / server.
Install Your Dreamweaver Shopping Cart First
If you just downloaded your Site Store Pro Dreamweaver Shopping Cart version and have not installed it yet on your hosting account or local server, please review and follow the Install Guide before proceeding with your design integration.
If you will be using the Dreamweaver DWT template feature for the fastest design integration, your site must be setup inside a Dreamweaver site definition so make sure that you follow the steps in the optional Dreamweaver site definition setup section.
After your have created a new site definition in Dreamweaver for your new online store and copied all the files from the "New Installation" folder into your site definition's folder, open up your Dreamweaver site.
How Dreamweaver Modifies the Sample Store Design
The included sample store design is modified by editing the Dreamweaver DWT files included with your install and/or fine-tuning the appearance of your new design by editing the CSS files located in /css/
Site Store Pro comes with 12 folders and a few root files but only the highlighted folders and files will be modified during the design integration process.
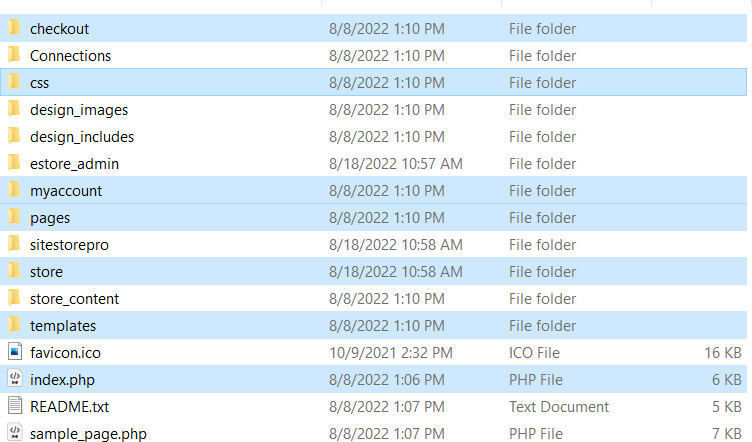
You will not be editing any of the files or folders in the /sitestorepro/ or /estore_admin/ folders and most likely will not be editing any of the other folders that are not highlighted above in blue.
The pre-skinned sample store pages are located in the /checkout/, /myaccount/, /pages/ and /store/ folders as well as the root /index.php and sample.php files.
The sample store online store pages are all associated (linked) to a specific Dreamweaver DWT file that is located in the /templates/ folder. If you change the design of the DWT templates that are included with the cart installation by replacing the sample store design in those templates with your website’s design, it will automatically apply your design to the entire shopping cart system.
Changing the Page Layout (Structure)
Modifying the layout of the included sample store is quickly accomplished by editing the Dreamweaver Template (DWT) files in /templates/
Since we can't know how you want your new (modified) store to look, we will just do a basic layout modification and modify some features on the sample store design to demonstrate how you can move design elements around in Dreamweaver and then save the changes and it will automatically update all the associated pages in the online store.
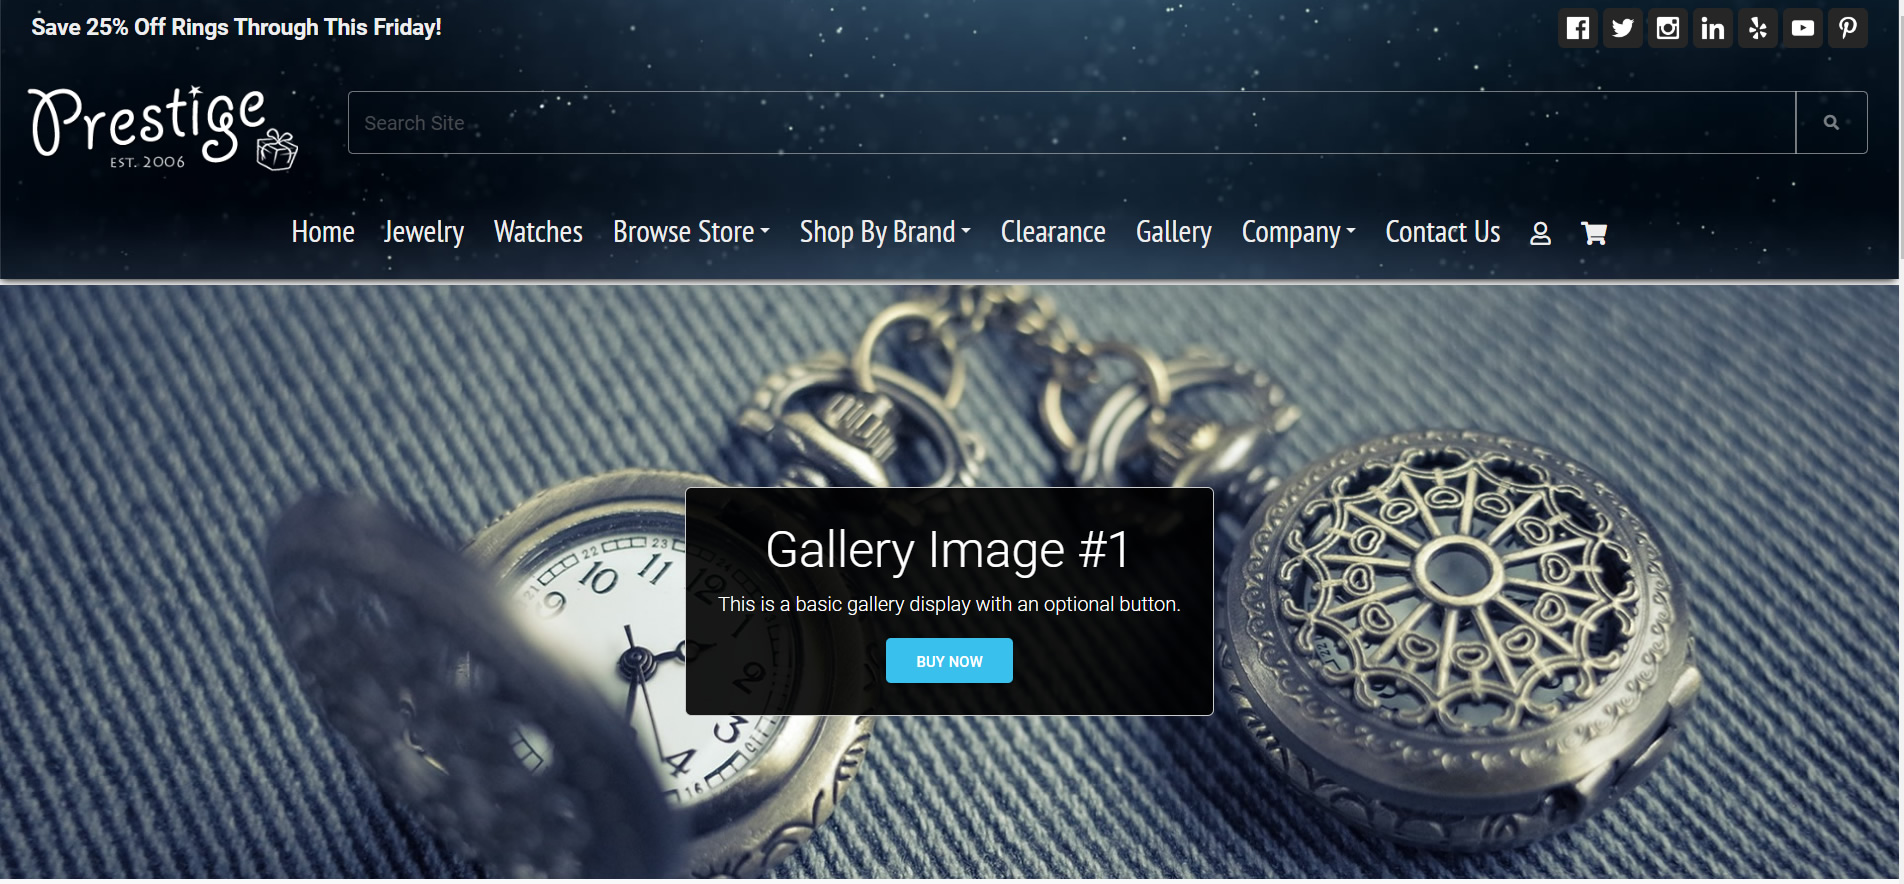
For the first example modification, we are going to move the navigation bar from the bottom of the site header to above the site header. Below is a screen shot of how the header and navigation looks now on the sample store home page.
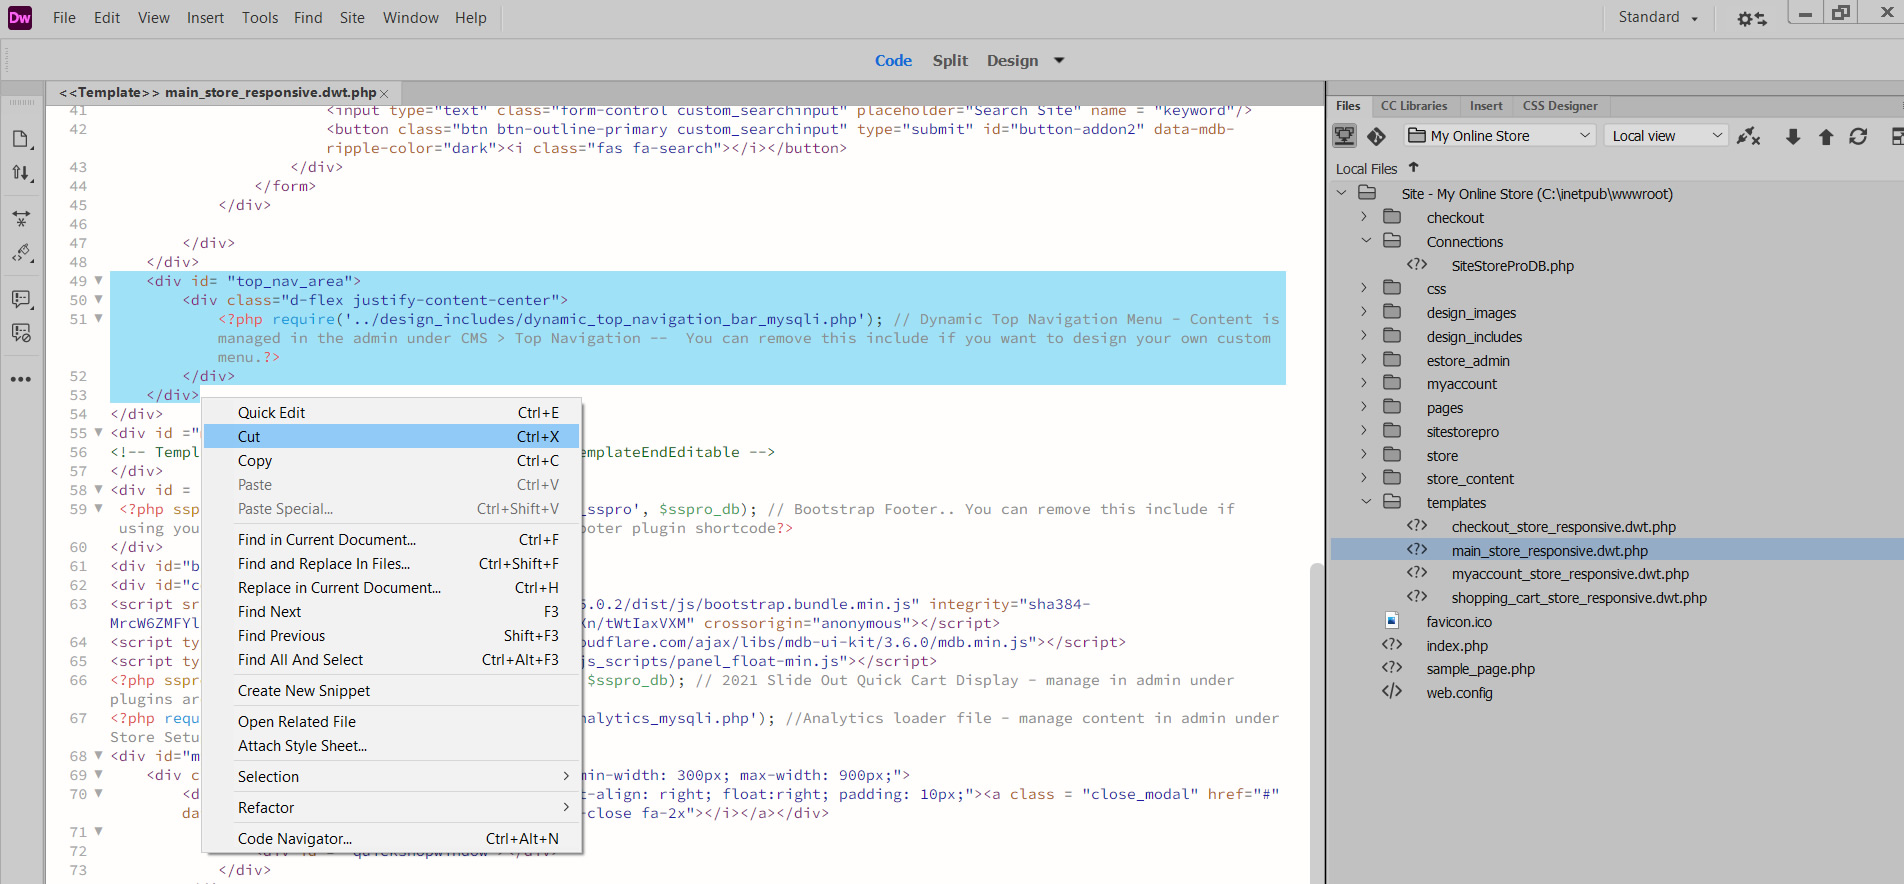
Open up the site definition you setup in Dreamweaver with all the files and folders in the "New Installation" folder and then open up the main_store_responsive.dwt.php file in code view and scroll down to the navigation div section and cut it out by highlighting it and then right-clicking and selecting 'cut' as shown below:
Important: You can edit or remove any element in the site design templates except the required DWT regions in the header, the required CSS and JS include files and most importantly the required main_content_area div where the dynamically generated cart content such products display, checkout forms, etc is automatically loaded.
Do not remove the following content from the page head content from any template and/or any page.
Do not remove the following main_content_area from any template and/or any page.
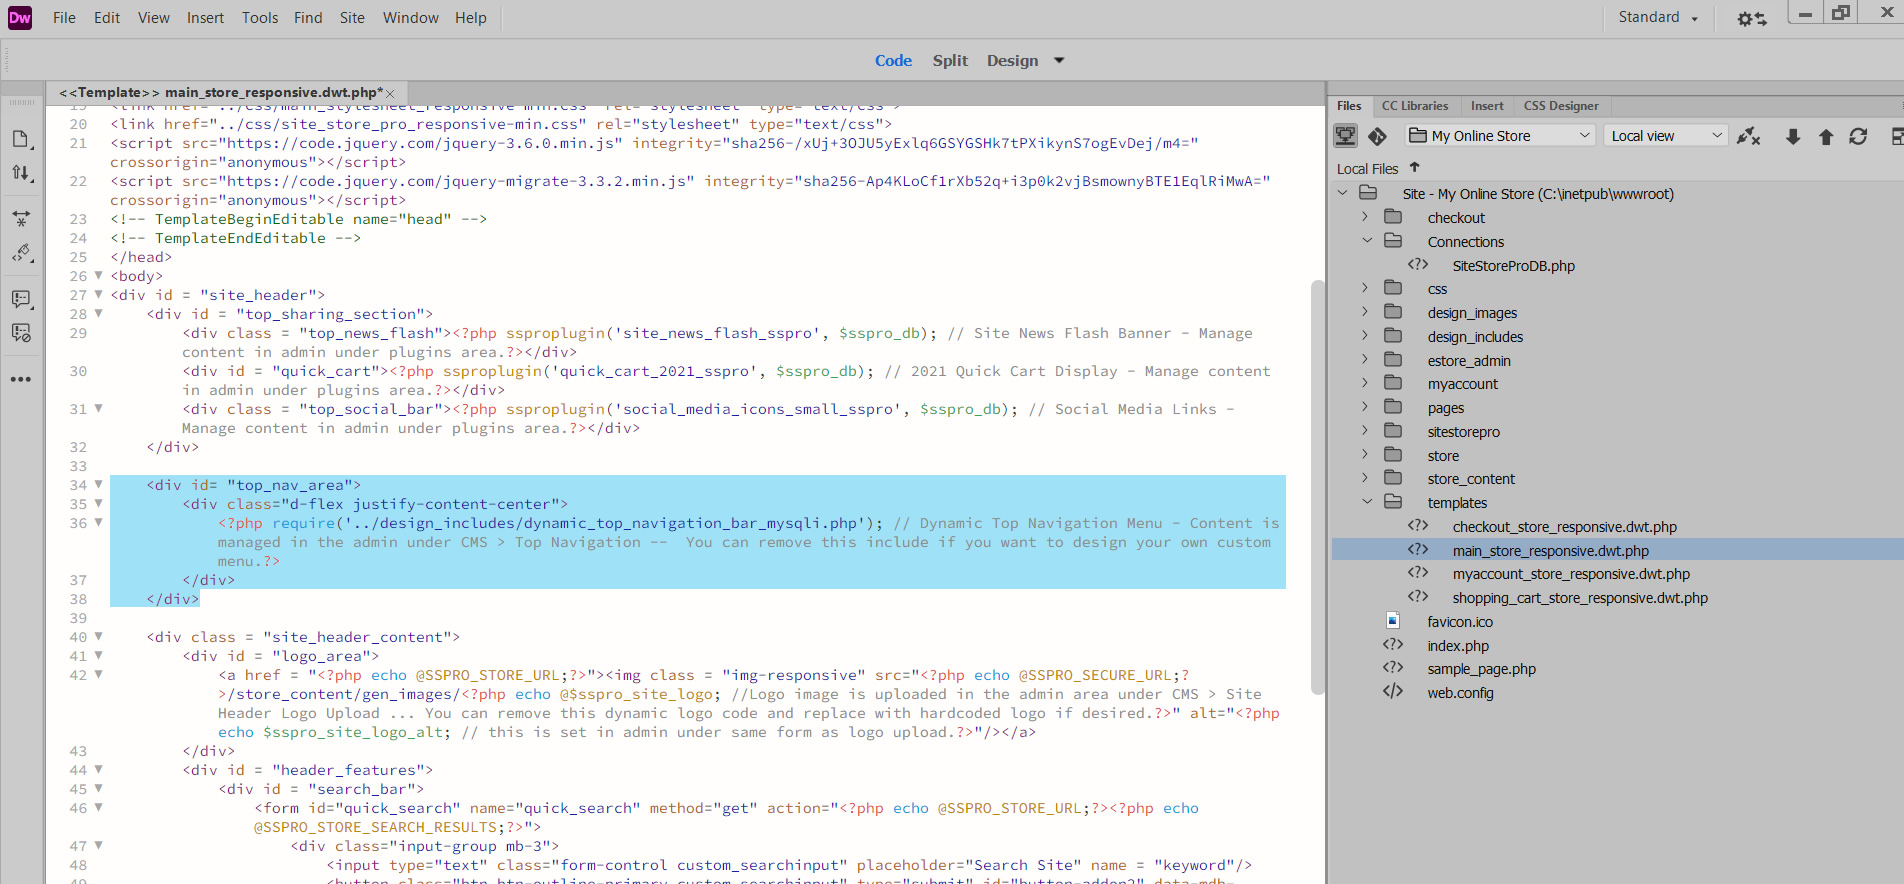
Scroll up the page in code view and paste the navigation div code that you cut out of the page HTML code previously above the "site_header_content" div and below the "top_sharing_section" div as shown below:
Save your file (File > Save) and you will be prompted by Dreamweaver to update all pages that are associated with this template as shown below:
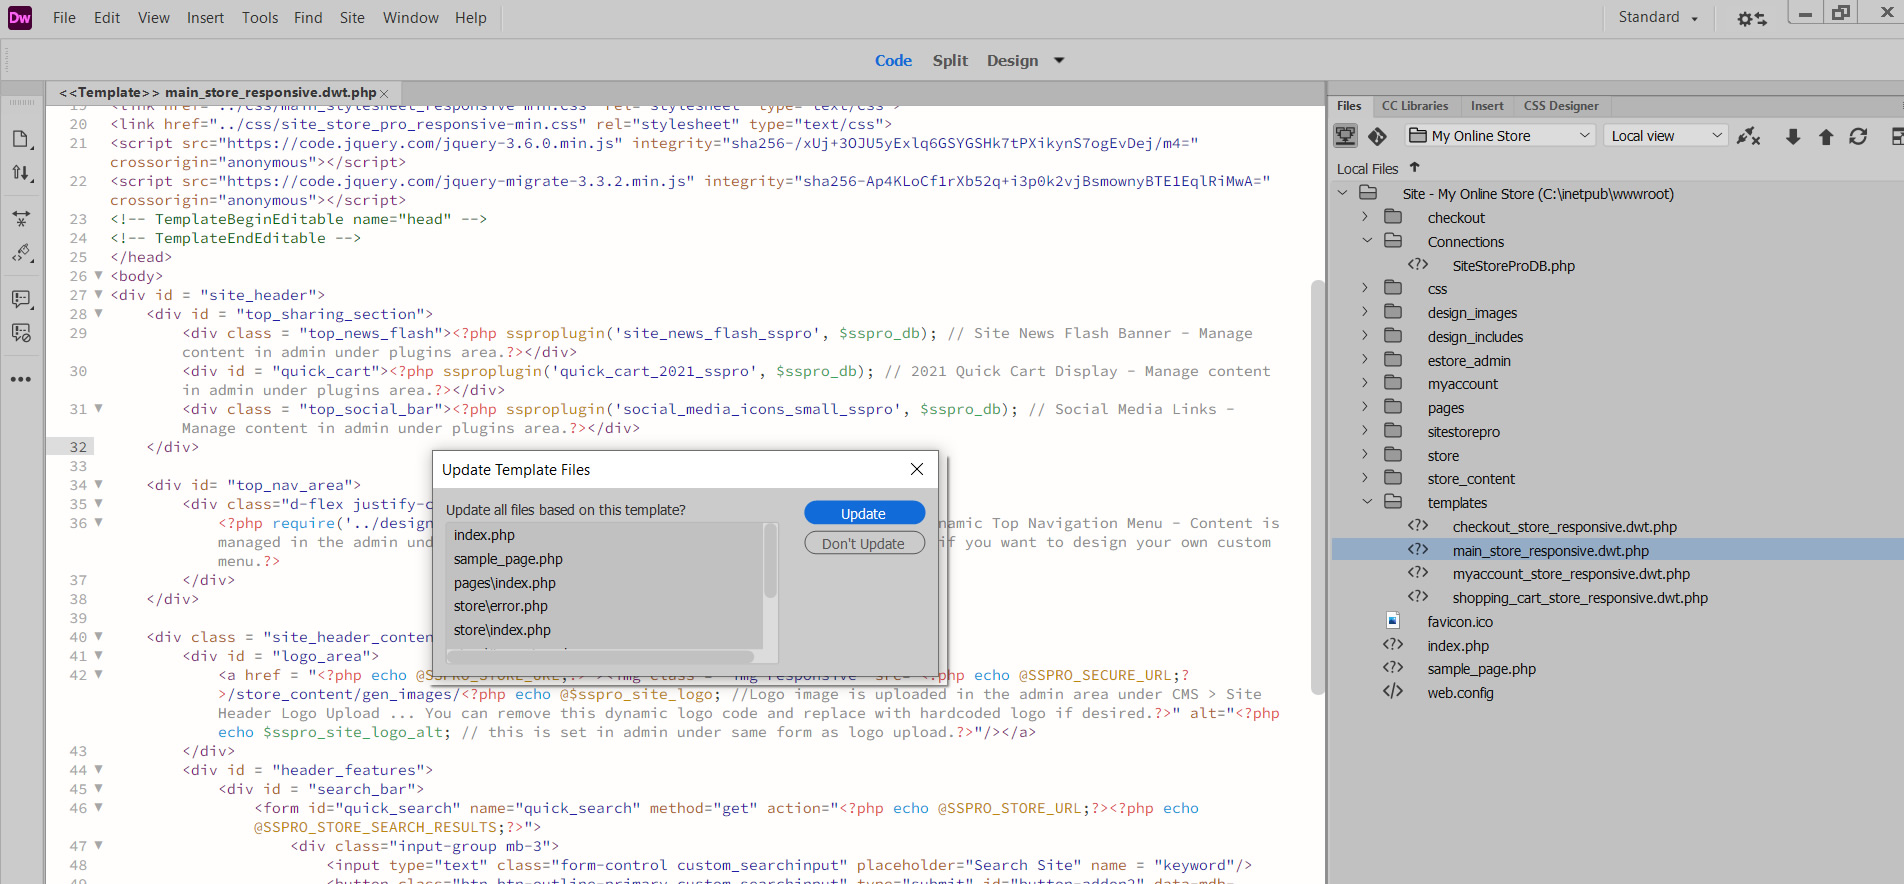
Click on the “Update” button and viola!, your page layout change has just been applied to all the store pages that are associated with that template.
if you are not prompted with an alert identical to the one above, it either means your are not working inside a Dreamweaver site definition or your site definition cache need to be rebuilt so Dreamweaver knows which templates are associated with which files. If you are working in a Dreamweaver site definition and you do not get the above alert to update the files, click on Site > Advanced > Recreate Site Cache and then repeat the steps above where you make a space on the template file and save it. You should now be prompted with the above update alert it you were not the first time.
After the template update process completes, click on the “Close” button that appears as shown below:
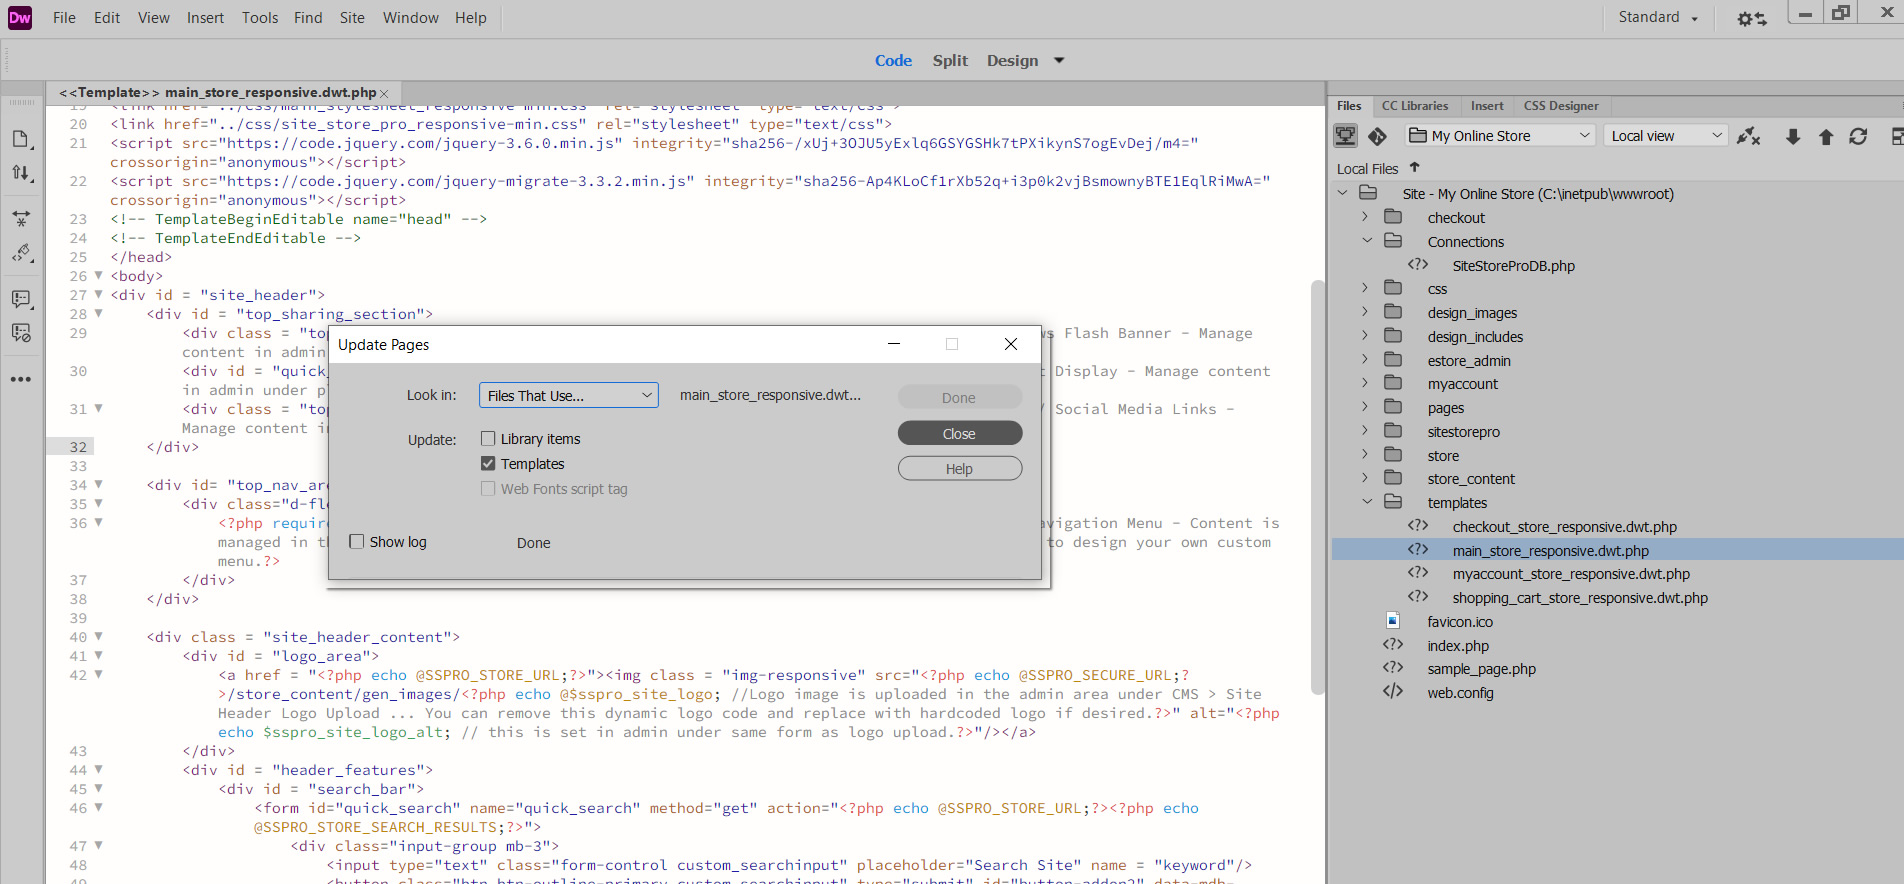
Now that you have updated some of the store pages with your layout, you need to repeat the process for the other 3 DWT files in the /templates/ folder so that it applies the same layout change to the rest of the sample store files..
Click on File > Save As and overwrite the checkout_store_responsive.dwt.php file with the main_store_store_responsive.dwt.php file.
When you are prompted with the alert that the file already exists and would you like to overwrite the file, Select "Yes" as shown below:

When the new version of checkout_main_store_responsive.dwt.php is opened on your screen, switch to code view (if not already in code-view) and click anywhere on the file that does not contain code i..e whitespace (example at the end of a CSS include line), and then hit your space bar.
Or you can remove some white space in the file by clicking somewhere without content and then your backspace button. Just be careful not to delete any content or accidentally add some text to the file. All you are doing with this trick is marking the DWT file as edited. This will make Dreamweaver think the file has changed but will not actually add any content to it.
The reason we need Dreamweaver to think that the file has changed is that it will not update files associated with the template unless it records that the file has changed. When you overwrote the checkout_main_store_responsive DWT file with main_store_responsive DWT file, it obviously changed it but Dreamweaver will not recognize that that it has changed unless we make some type of small edit to the file again.
Now that the template has a small pseudo change on it, click File > Save and you will be prompted to update all the files associated with the checkout template. Click the "Update" button as you did previously and then the "Close" button.
Repeat the same process for the shopping_cart_store_responsive.dwt.php and my_account_store_responsive.dwt.php file so that you update all the online store pages with your layout. Each overwrite of a template must prompt you to update the associated pages to apply the layout change to all the files in the sample website.
Now that you have modified the layout you just have to upload the files to your website to test your design (or test it on your local server if you have a local webserver and local MySQL server configured already. ie. XAMPP, IIS/MySQL)
Upload The Online Store Files With The Layout Change
To verify that your install is working with the new layout, you will need to post the files that were changed (updated) by the DWT templates to your running cart installation on your web server. (or view your installation on localhost if you have previously setup XAMPP, IIS/MySQL on your local system)
The following folders such be posted:
- /checkout/
- /pages/
- /myaccount/
- /store/
and the root /index.php page.
Once the folders have been uploaded to your web server, go to installation URL and you should see the new layout with the navigation moved up the header and right below the top newsflash / social icons bar as shown below:
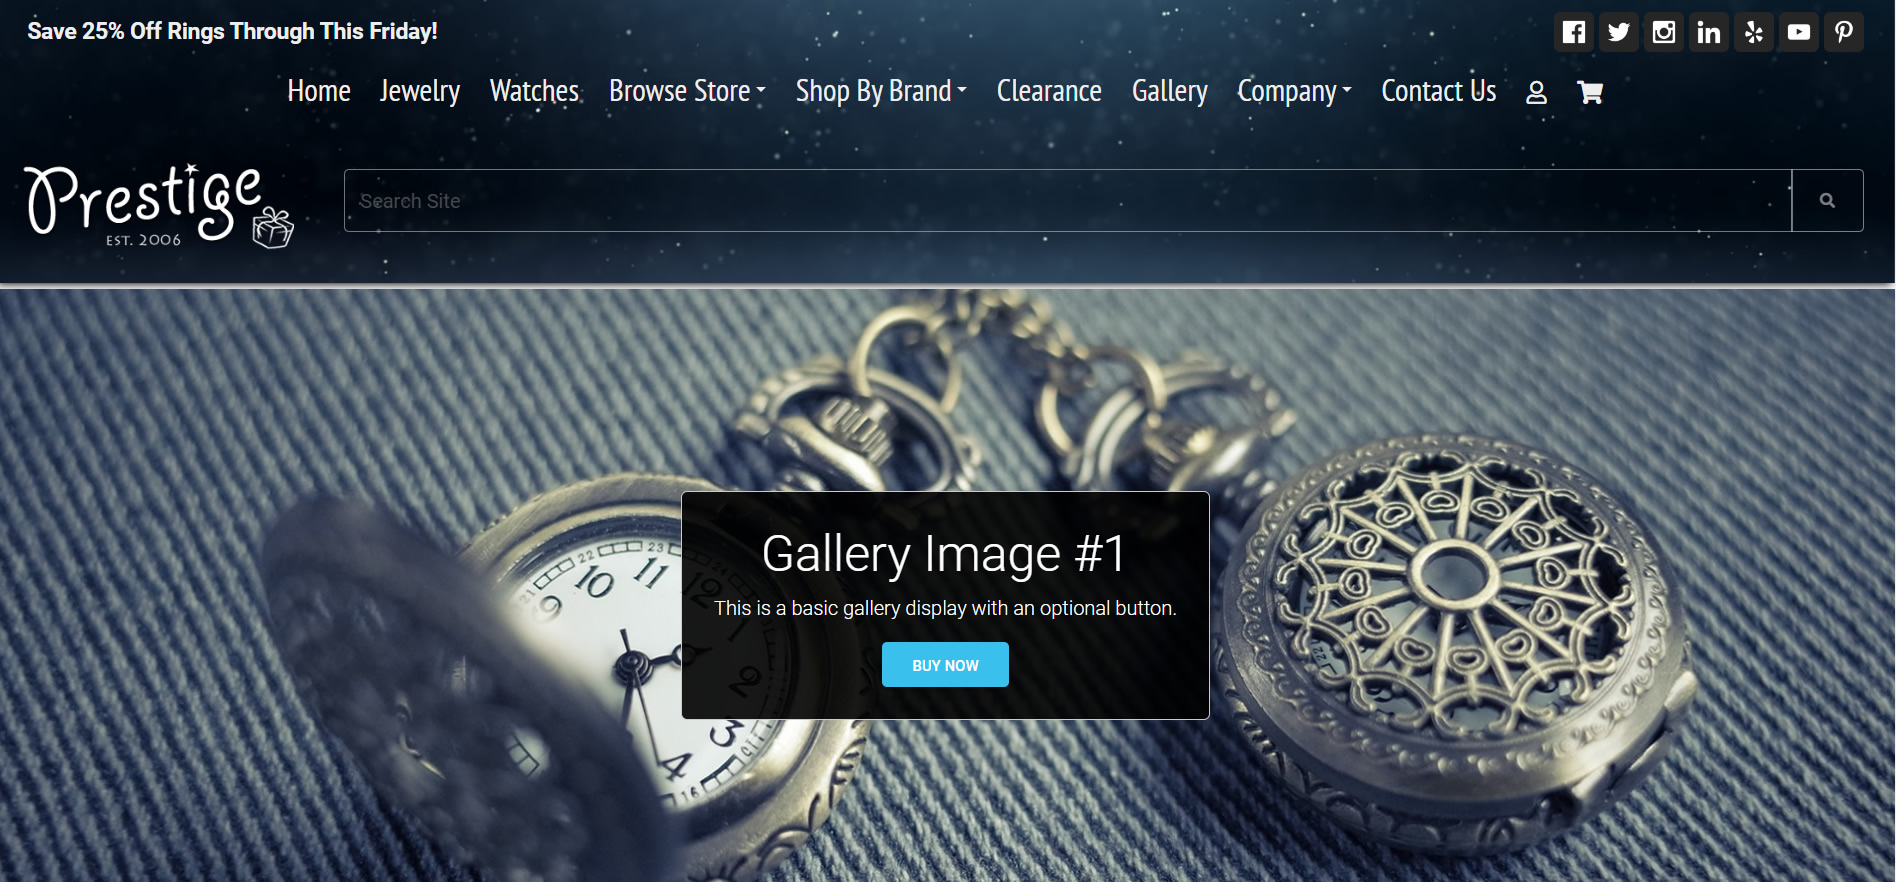
If you do not see your site design, make sure that the files in the above folders were updated with your new layout and that they were uploaded correctly (i.e open a file in Dreamweaver like /store/index.php or /store/shopping_cart.php and you should see the layout changes on the file when viewing it in either code or design view. Then confirm that the file on your web server is the same version as the one that has been updated with your design).
Edit CSS To Change Visual Appearance
Now that we have demonstrated a basic page layout (structure) change using Dreamweaver templates, we will make a couple of quick CSS edits to the sample store to change the appearance of the header.
Site Store Pro now loads minified versions of CSS files to increase page load times. Every CSS file in the sample store includes both a regular CSS version and a minified version that ends with -min.css
During development, it is easiest just to copy the contents of the non-minified version of a file and replace the minified CSS content so it is easier to edit. If you want to minify the content later for production use, that is a very simple. (If you don't know the difference between a minified CSS file and non-minified CSS file, simply open up both versions and you will see the minified version doesn't have any comments and white-space)
Open up /css/main_stylesheet_responsive.css and copy all the contents of the file by clicking on Edit > Select All (or Ctrl-A) and then right click and click 'Copy'
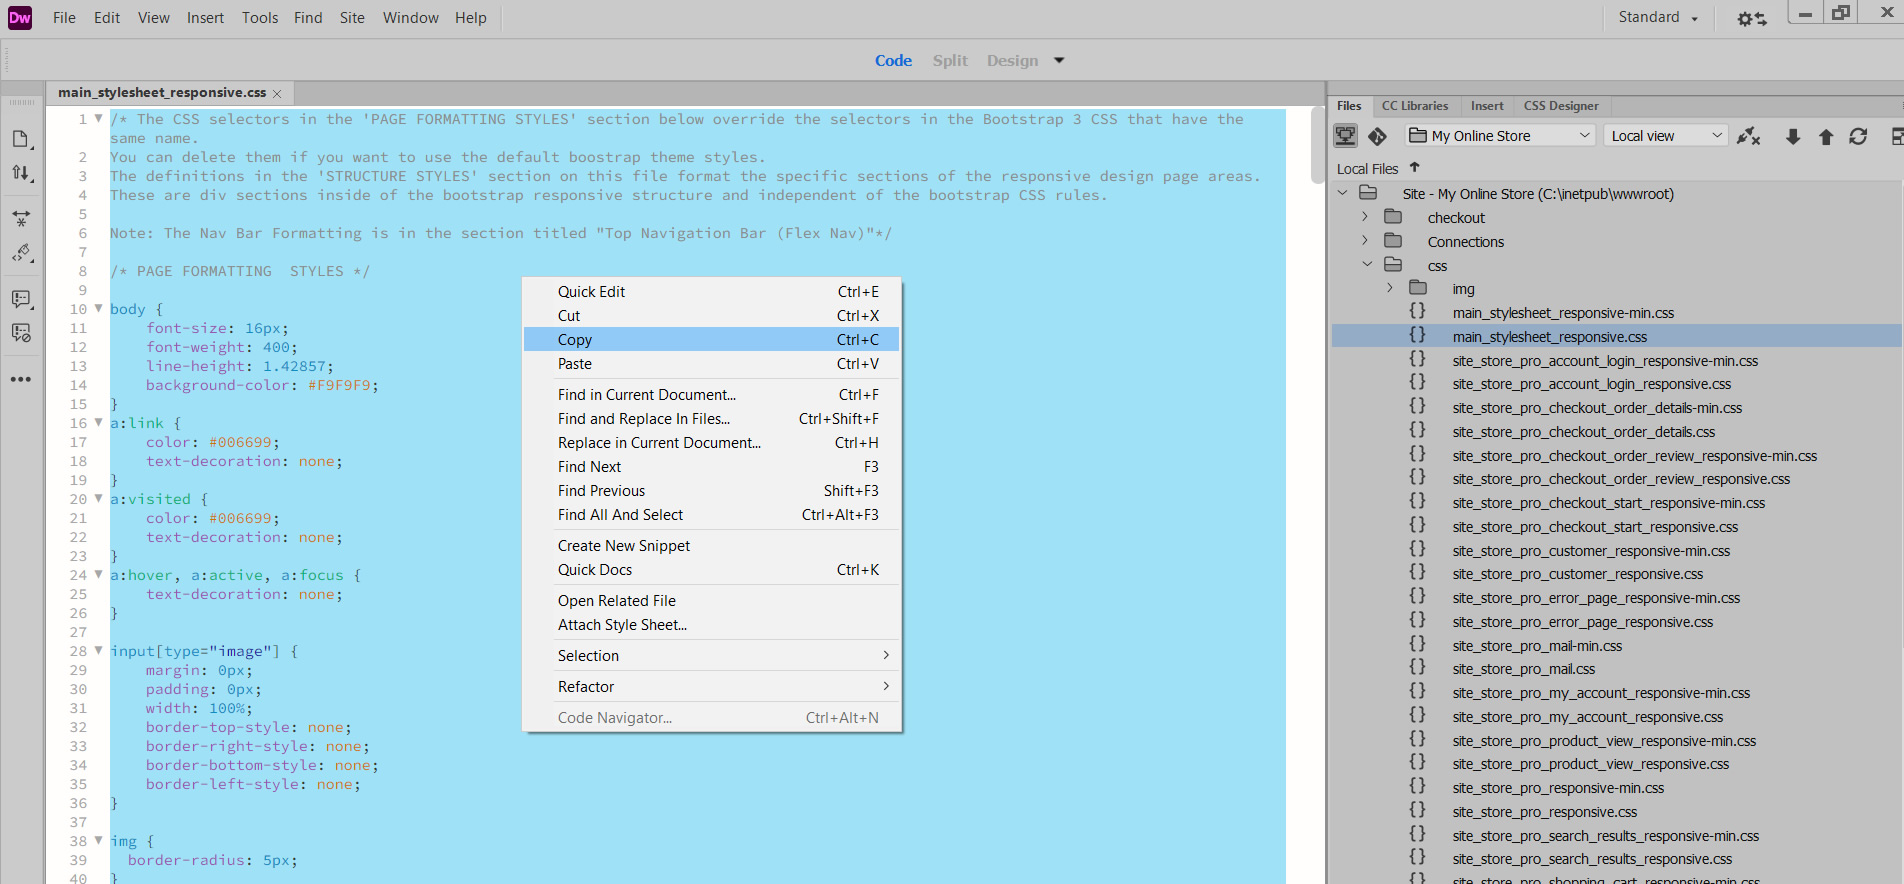
Next, open the minified version of that file (main_style_sheet_responsive-min.css) and select all the content in that file and paste (replace) the content with the non-minifed CSS. (you could have also just over-written the -min file version with the regular one instead.. end result is the same.).
You now have two identical main_style_sheet_responsive CSS files. Close out the first file that does NOT end in -min.css so you don't accidentally edit the wrong copy of the file.
The "new" version of the main_stylesheet_responsive-min.css should still be open in Dreamweaver. Scroll down the file until you reach the section commented as STRUCTURE STYLES.
Modify the #site_header CSS rules shown below:
#site_header {
  background: url('../design_images/sample_header_background.jpg') no-repeat;
  background-size: cover;
  z-index: 2;
  width: 100%;
  box-shadow: -1px 3px 7px -2px rgba(0,0,0,0.94);
  margin-bottom: 5px;
}
By removing the two background image lines and adding a new rule to set the background-color to black (#000).
#site_header {
  background-color: #000; /* add black background color to top sharing section. */
  z-index: 2;
  width: 100%;
  box-shadow: -1px 3px 7px -2px rgba(0,0,0,0.94);
  margin-bottom: 5px;
}
Next, modify the #top_sharing_section CSS by adding a background color to the current rules as shown below:
#top_sharing_section {
    width: 100%;
    display: flex;
    background-color: #3399CC; /* add blue background color to top sharing section. */
}
Below is are both modifications applied to the /css/main_stylesheet_responsive-min.css file

Save your CSS file changes (File > Save) and then post the modified file to your webserver and view one of your pages at your installation URL and you will see the modifications. (if you don't see the modications, refresh your browser a few times or clear your cached content so you force a refresh of the CSS file in your browser's cache)
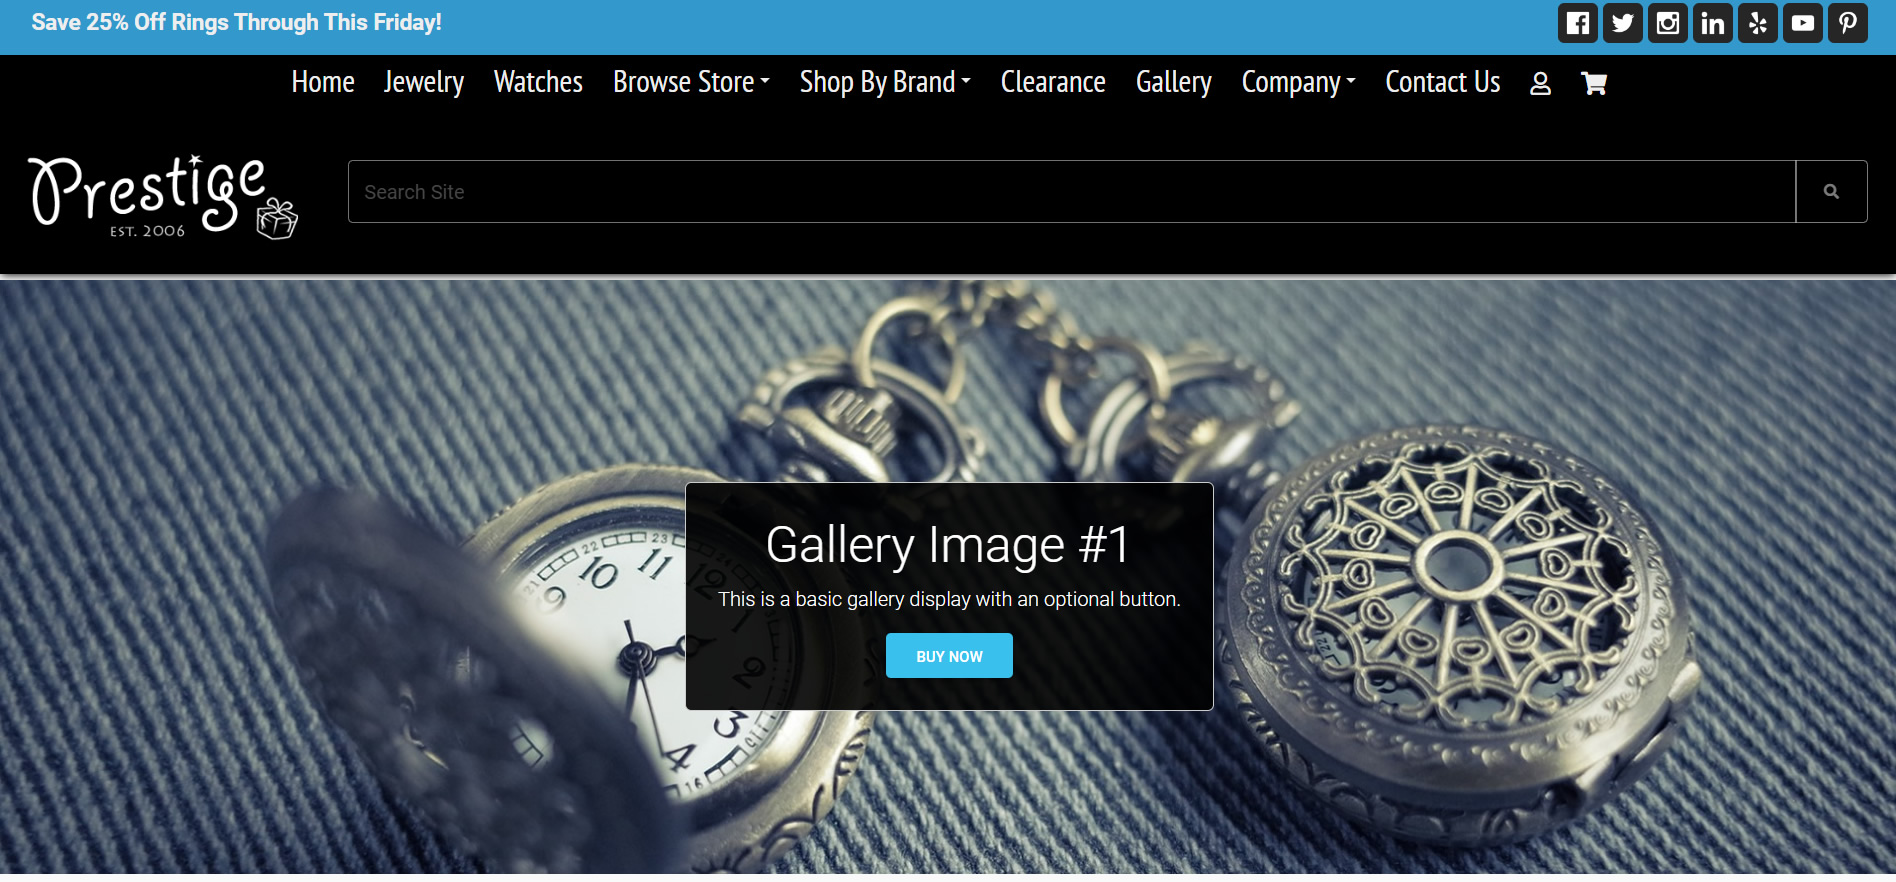
Below is screen shot of the changed header design:
Upload a New Dynamic Logo Through Your Admin Area
The sample store, by default, includes a dynamically generated header system where content is controlled through the admin and the appearance (formatting) is controlled via the CSS as per the above example. The header system is loaded into the page content by plugins shortcode, php include files and a dynamic logo variable. The various dynamic sections in the page are commented in your Dreamweaver template to assist you in learning what they are and how you manage them.
Even though the sample store contains dynamic features such as the header and footer, all sections can be replaced with static content if you prefer to manage the page content through Dreamweaver instead of the "hybrid" sample store design which is combination of both static and dynamic content.
For this final example of modifying the sample store design, we will upload a new logo through the web-based admin and it will replace the current one dynamically.
Login to your web-admin area at /estore_admin/ and go to CMS > Site Header Logo Upload as shown below.

When the logo upload page opens, select a new logo from your local computer with the "Choose File" button and then click on the "Update Configuration " button as shown below:
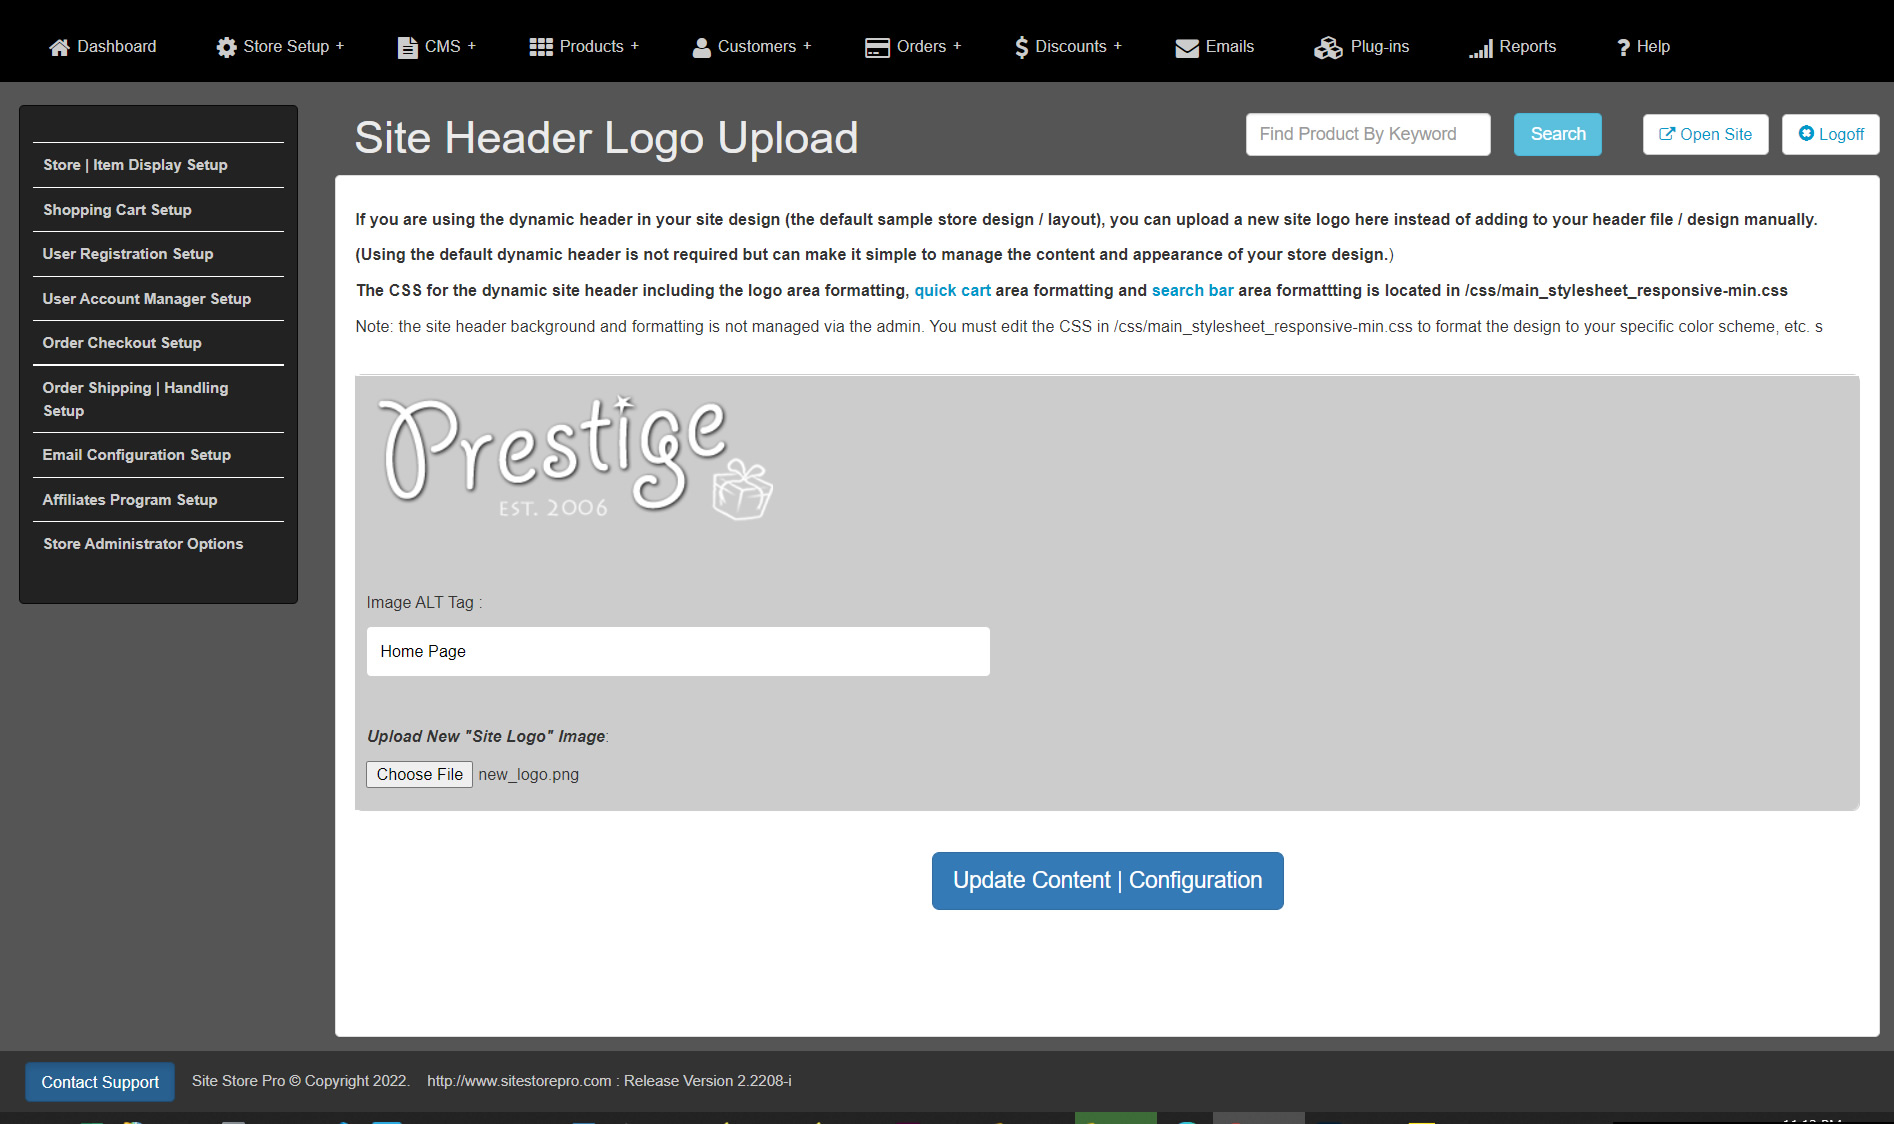
After you click on the "Update Content | Configuration' button, your new logo will be instantly visible on the page and it will be changed in real-time on the site. Unlike site design / layout changes and CSS modifications, ALL changes made through your web-based admin are real-time and instantly viewable on the site. If you don't like the logo you uploaded, you can simply upload a new one and it will automatically replace the content.
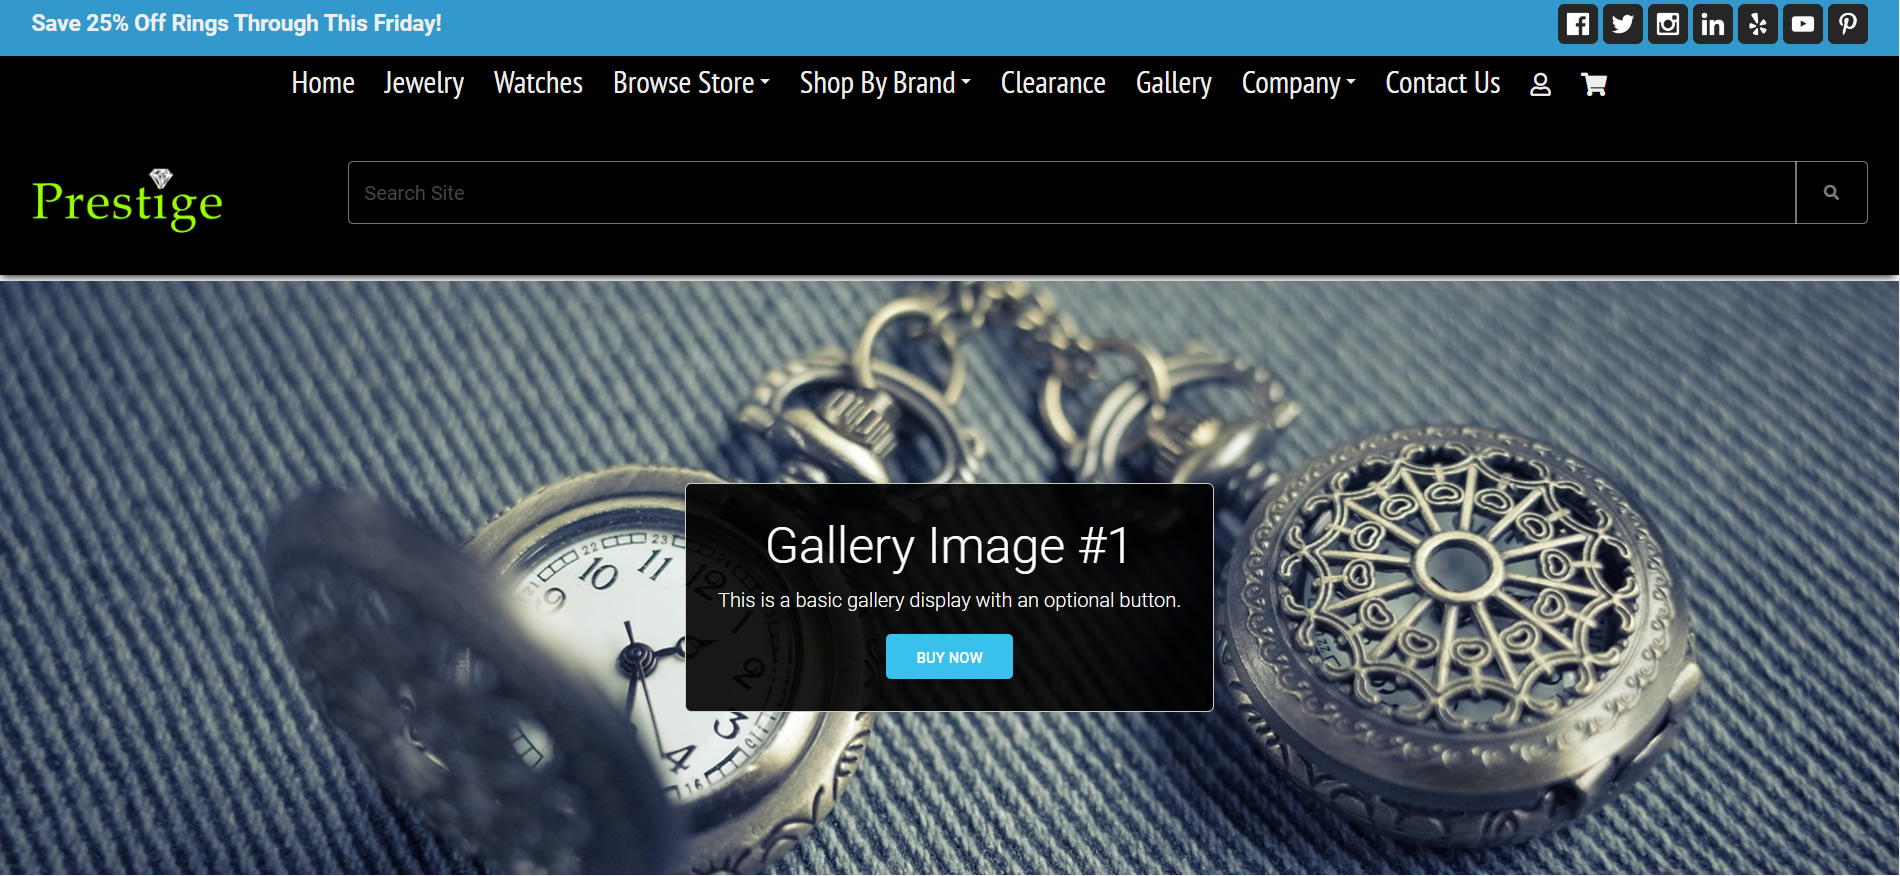
Below is a screen shot of the sample store with the new logo . (Your sample store will look a little different unless you upload the same demo logo. If you want to upload the same logo we used in this example, click here)
Congratulations! You have modified the sample store HTML layout code and changed the website's appearance with some CSS edits in the main website style sheet. Hopefully, with the methods presented in this tutorial, you will have a good starting point to customize the sample store with your specific design vision.
If you need any assistance with your shopping cart design integration, please do not hesitate to contact support. Don't forget that with paid support plans, we offer a free design integration for your site if you provide a working HTML example of your design.
Dreamweaver Live Preview (Optional)
The following section is completely optional and may be considered "advanced". It is not required for any type of Site Store Pro design integration and functionality.
Note: Many developers spend a lot of time trying to get a localhost webserver/database server configured and a local Site Store Pro application running and working inside Dreamweaver's live preview feature and sometimes it is a futile endeavor. You do not need to test anything locally and will finish your design integration FASTER without trying to setup a local version of your installation. That being said, we get asked how to setup this feature a lot so have included it this tutorial as an addendum only.
Instead of posting each content change up to your web server when you are editing site layouts and CSS, Dreamweaver has the ability to preview your design changes in real-time directly from inside Dreamweaver using the Dreamweaver Live feature. (even for most dynamically generated content). The Dreamweaver live feature can benefit designers who make a lot of changes via CSS since the modifications can be seen inside of Dreamweaver instantly.
In order to use the Dreamweaver's Live preview feature with dynamic PHP content, you will need to setup a testing server in your Dreamweaver site definition.
The easiest way to view and test content directly inside of Dreamweaver is to use a local web server and database server (i.e.. AMP stack on Windows or MAC (Apache, MySQL, PHP) or IIS/PHP/MySQL server on Windows). (You can also live preview your files on your remote webserver (host) through Dreamweaver but your host must support remote MySQL connections and it sometimes won't work on remote web servers without a lot of trial and error).
If you are running your Site Store Pro install on localhost instead of uploading content to a remote server to view and test, you need to setup a "testing" server in Dreamweaver. Setting up a testing server in Dreamweaver is very similar to setting up a remote server for FTP.
Open up your site definition in Dreamweaver (Site > Manage Sites and then click on the pencil icon to open up the Definition properties)
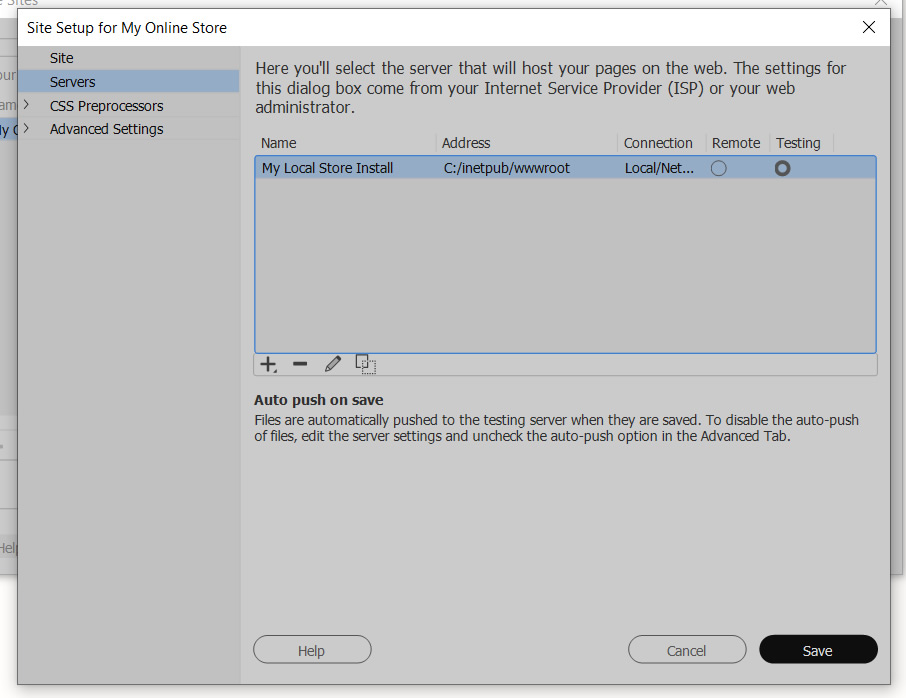
When the Site Definition Window has opened, click on the "Servers" option in the left panel and then click on the (+) button on the lowerr portion of the window and the server dialog screen will appear.
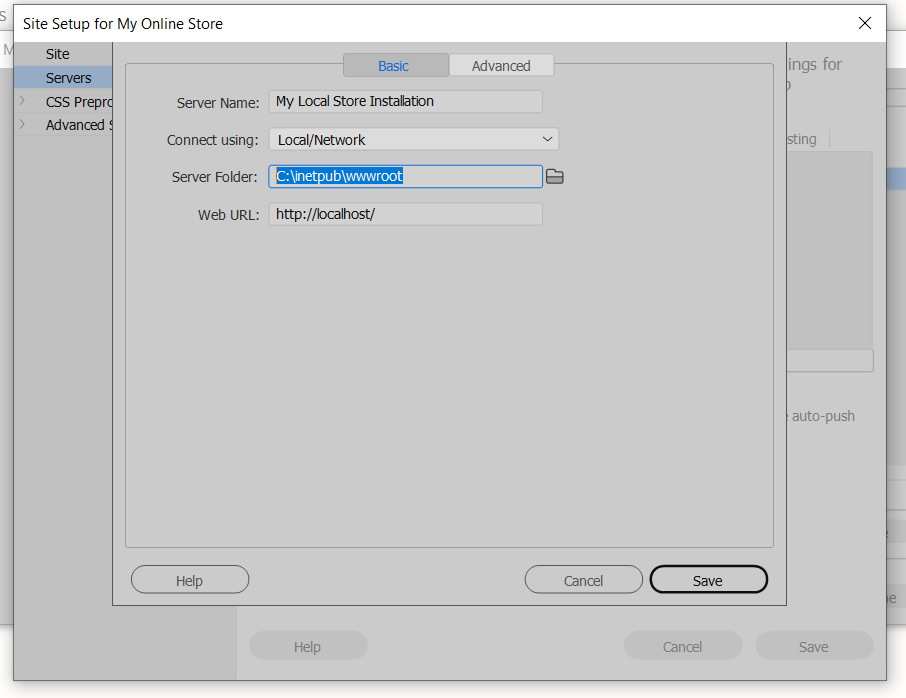
- Give your local server a name such as "My Local Store Install"
- Select "Local/Network" in the "Connect using" drop-down.
- Browse to where your site definition folder is located in the "Server Folder" field. (if you click on the folder icon, it should default to your site definition folder).
- Finally, enter the URL of your localhost server. (usually just http://localhost but if may be different if you installed your site in a sub-directory of the local server)
Below is a screen shot of the server settings panel correctly configured when the local server type is IIS with PHP and MySQL and the installation was installed under the default IIS webserver location C:\inetpub\wwwroot. If you are using and AMP Stack (Apache/MySQL/PHP), your values will be different but the concept is the same.
Click "Save" to record the server in Dreamweaver and you will be redirected back to the previous servers panel.
Make sure you then select the "Testing" option on the screen since it will default to "Remote".
After selecting "Testing" as shown below, Click "Save" again to complete the setup.
If everything is setup correctly on your local server and your settings are correct for your testing server in Dreamweaver, you can now view most design changes in Dreamweaver in real-time using the Live function.
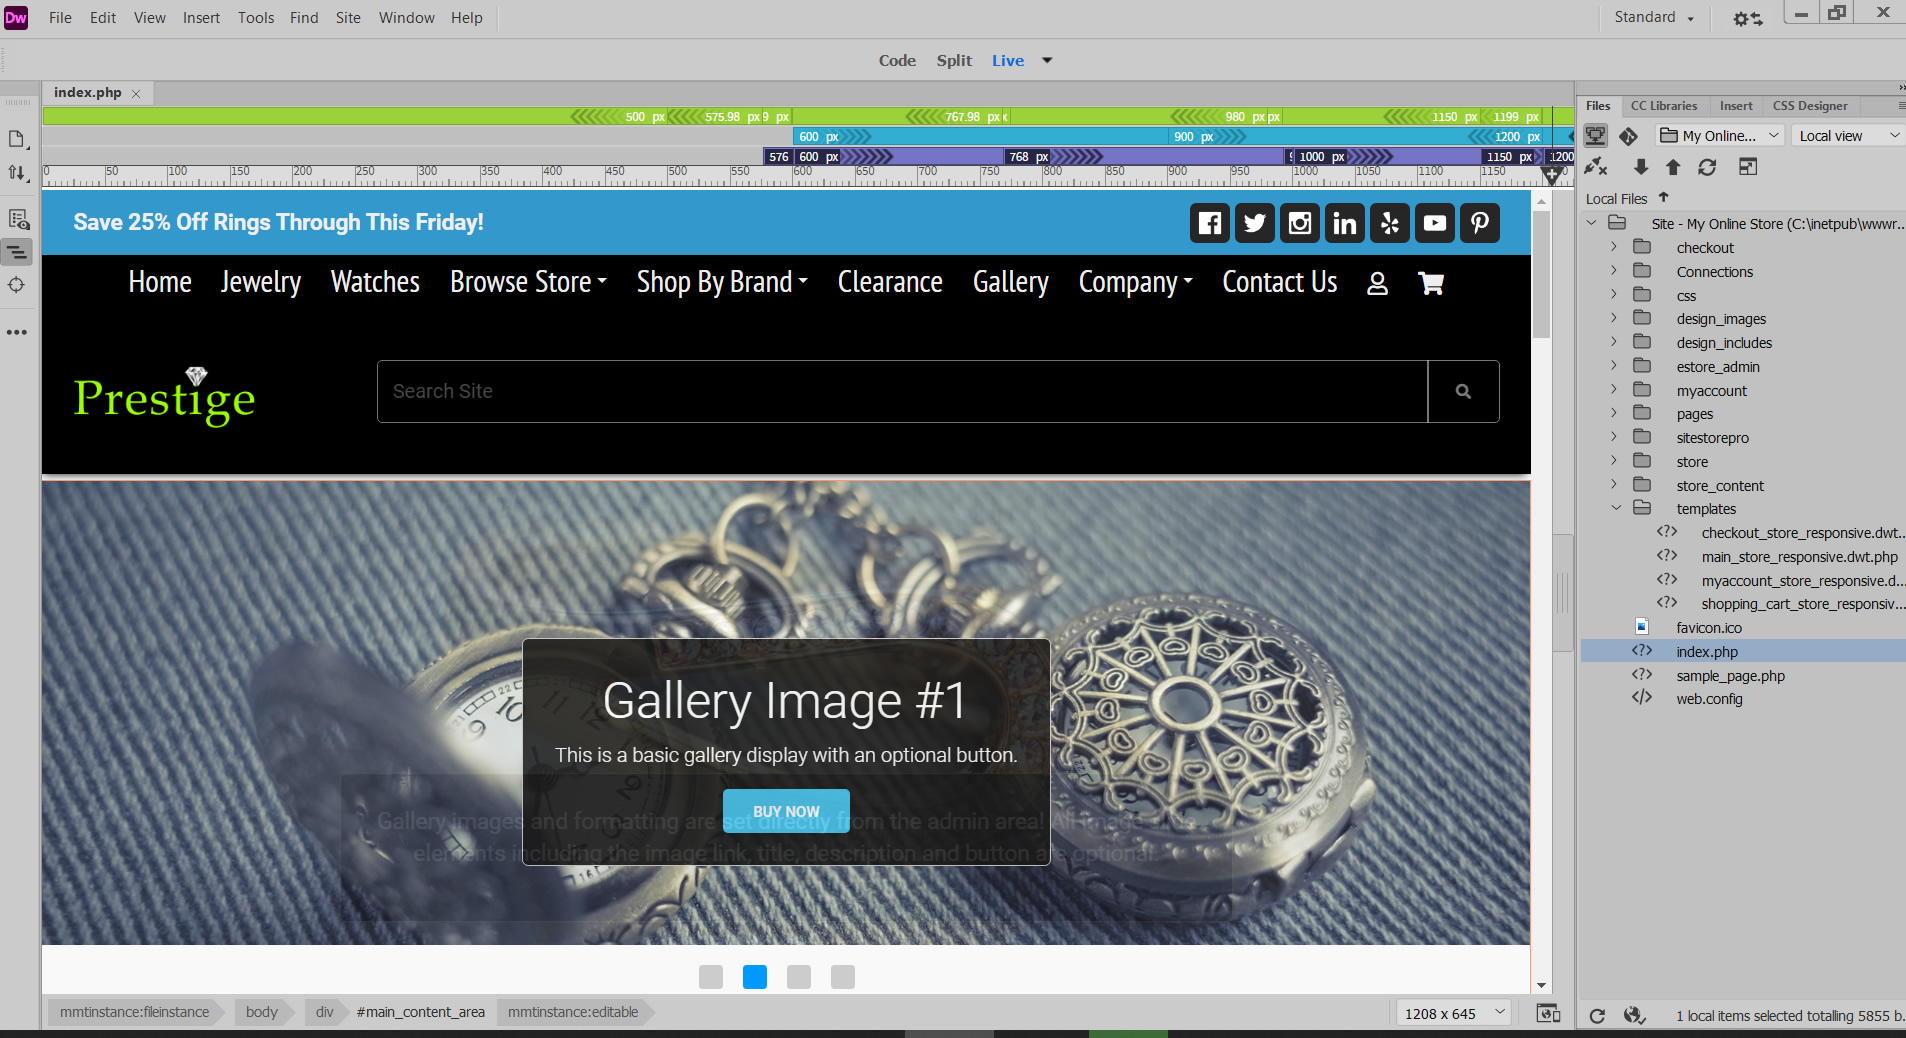
Below is a screen shot of the sample store home page (/index.php) displayed inside of Dreamweaver with the modifications made in this tutorial applied and the dynamic store home page elements being loaded into the page from the MySQL database.
Now that we have showed you how to setup Live Preview.. we will now tell you not to use it...
The live preview feature's primary benefit is the ability to instantly see any CSS and layout changes, but as per above, it is not required for design integration or any store features.
The Dreamweaver Live preview feature can be helpful in certain situations but generally it will not save you any time. Simply uploading your file changes to a hosted server is much more efficient since eventually you will need to post BOTH the files and database up to a remote server anyway.
For example, we do a ton of design integration projects and we never use the Dreamweaver Live Preview feature. We do ALL of our design integration inside Dreamweaver even if the design is not a DWT template design but we don't use the Live Preview feature.
We highly recommended posting and testing all your development changes on the same server where the site will eventually be hosted.
This prevents prevents any issues you may run into with the server not being properly configured, having to change all the content URLs from a localhost install to a live server URL, etc. Any time you may save by using a local server to view design changes will be erased by having to move everything from the local version to a live server and retest it.
If you are going to run your store on the same server as your current live website, simply create a test (development) directory on your current hosting account and use that for development. (Just be careful that you always post your files to the test folder and not the root of the site FTP until you are ready to move all your content from the dev folder to the site root.)
We hope this addendum for the localhost/preview feature of Dreamweaver helped clarify the pros and cons of the feature. If you need assistance with your site integration, please do not hesitate to contact support.

