Dreamweaver Version - Design Integration Tutorial - Existing Site Design (Gen 3)
Note: This tutorial is for the previous plarform of Site Store Pro. If you have downloaded Site Store Pro after August 1, 2023, please view the new 4th GEN version tutorial.
Site Store Pro includes Dreamweaver Template (DWT) support to make the design integration process quick and painless. If your Dreamweaver designed website uses DWT files for design updates, please continue with the tutorial below. If you are using Dreamweaver to create an entirely new website based on the included sample store design, please review the Dreamweaver New Site Integration tutorial.
f you are using Dreamweaver as your design software but are using design include files instead Dreamweaver's DWT template feature or are your using a different HTML editor such as ATOM, NotePad++ etc, please read the Web Designer Version Integration Tutorial.
Note: If you are a paid support plan user, you are entitled to one FREE design integration. If you provide a working layout of your design in HTML, we will apply it to your store files and set it up on your host / server.
Install Your Dreamweaver Shopping Cart First
If you just downloaded your Site Store Pro Dreamweaver Shopping Cart version and have not installed it yet on your hosting account or local server, please review and follow the Install Guide before proceeding with your design integration.
If you will be using the Dreamweaver DWT template feature for the fastest design integration, your site must be setup inside a Dreamweaver site definition so make sure that you follow the steps in the optional Dreamweaver site definition setup section.
After your have created a new site definition in Dreamweaver for your online store or you have added all the store files to an existing Dreamweaver site definition, open up your Dreamweaver site.
How Dreamweaver Updates The Shopping Cart With Your Design
Site Store Pro is a dynamic shopping cart system where all the content that runs the online store is stored in the MySQL database and is pulled into the website design files. The online store content such as categories, products, shopping cart display, registration and checkout forms and order confirmation pages are managed in the web-based admin and completed separated from the front-end design. Therefore, changing your front-end design or skinning has no affect on the online store content and vice-versa.
All the online store application pages including the store catalog, item view, shopping cart display, checkout and myaccount are pre-built and included in the installation.
However, all the online store pages are 'skinned' with a sample design. To run the Site Store Pro ecommerce application inside your current website design, we are simply going to re-skin the online store application pages with your design by modifying DWT template files.
Site Store Pro comes with 12 folders and a few root files but only the highlighted folders and files will be modified during the design integration process.
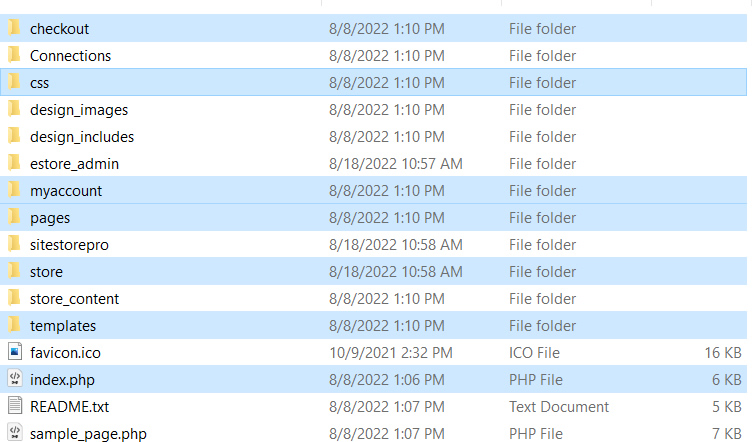
You will not be editing or modifying any of the files or folders in the /sitestorepro/ or /estore_admin/ folders and most likely will not be touching any of the other folders that are not highlighted above in blue with the exception of the /css/ folder that contains the application css files. You eventually may want to edit some of the application css files to fine-tune the display of the dynmically-populated online store content such as item displays, registration forms and checkout page formatting before your online store is launched. However, for this tutorial we will just be covering the general design integration where your main design is applied to the core cart files.
The pre-skinned online store pages are located in the /checkout/, /myaccount/, /pages/ and /store/ folders as well as the root /index.php file.
The pre-skinned online store pages are all associated (linked) to a specific Dreamweaver DWT file that is located in the /templates/ folder. If you change the design of the DWT templates that are included with the cart installation by replacing the sample store design in those templates with your website's design, it will automatically apply your design to the entire shopping cart system.
Although it may take you about an hour or so to get through this tutorial and apply your design to the cart files the first time. Once you understand the process and do it a few times, you can skin the entire Site Store Pro online store application with a new custom Dreamweaver design and activate it on a live store in less than 15 minutes.
Integrate The Store Files Into A Current Dreamweaver Site Design
For this tutorial, we added the folders and files from the "New Installation" folder to an existing sample website that contained some other site files in root such as home.php, about.php, privacy, project.php and contact.php to simulate how the integration would proceed when adding the cart to an existing Dreamweaver site design.
Below is a screen shot of what your Dreamweaver site definition might look like with the Site Store Pro folders and the root /index.php file from the "New Installation' copied files highlighted in a existing website design.
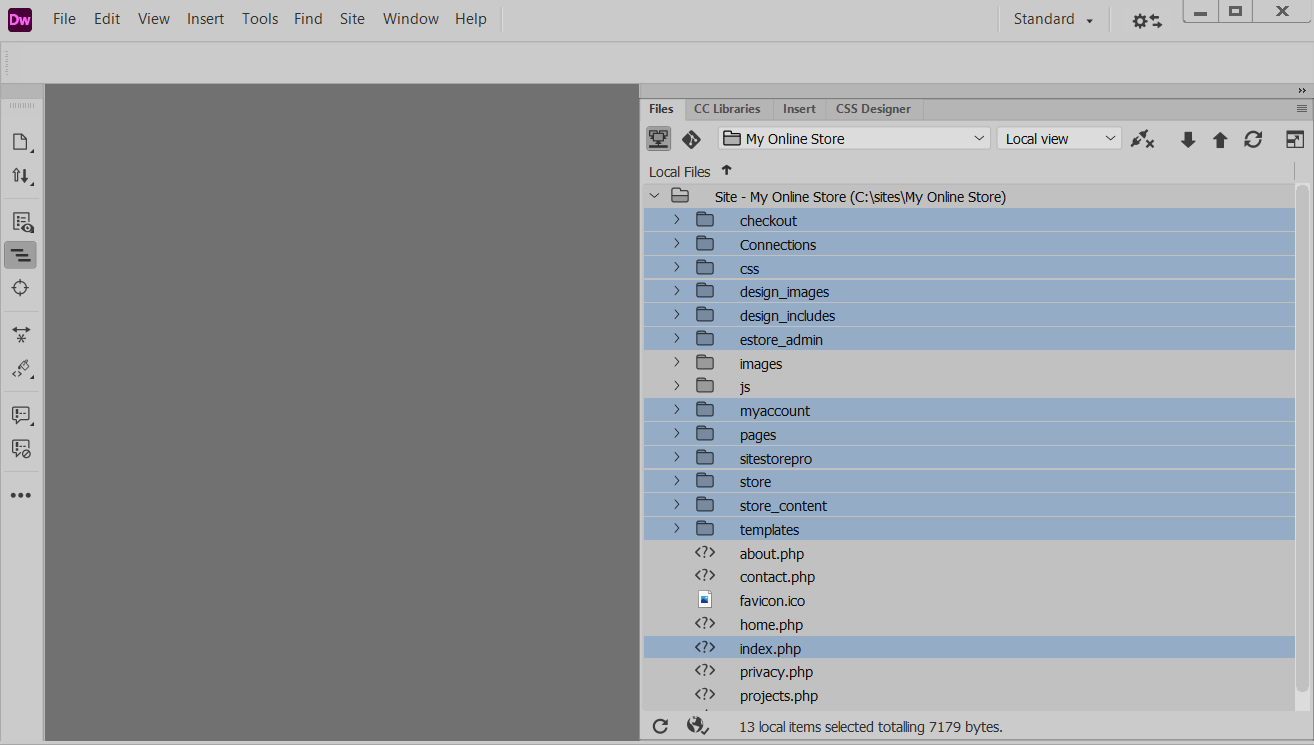
IMPORTANT: if your current website is already using /index.php as the home page, do not overwrite your existing /index.php file with the one from the "New Installation" folder. Simply skip that file since you already have a website home page.
Duplicate Your Existing Website DWT Template File
For the fastest integration, you will want to make a copy of the DWT template file that you are using for your main website content files.
When you open up your templates folder, you should see the four (4) template files (highlighted below in blue) that are included in the Site Store Pro install along with any existing templates you have previously created.
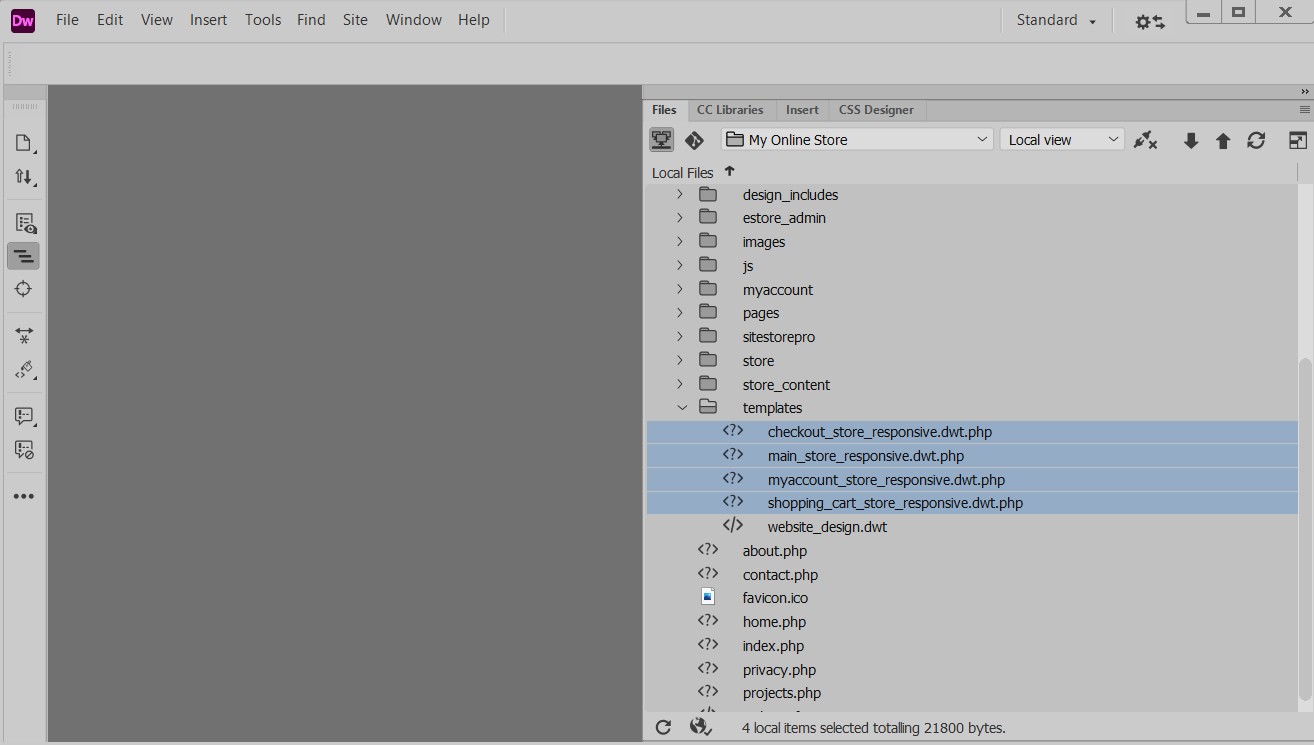
In this example, we will make a copy of a template called website_design.dwt which is used for the existing site content files in the root of our site.
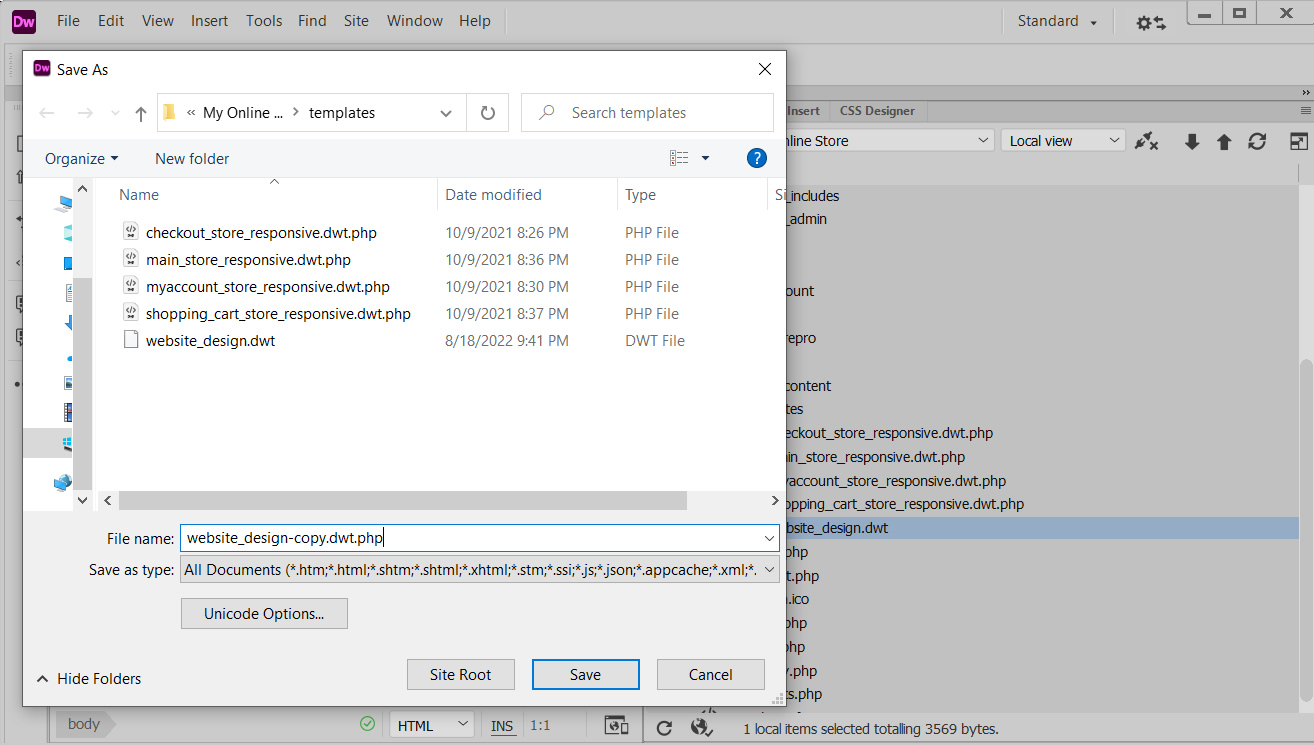
- Open up your current DWT template file and then click on the File > Save As.
- Rename the file with a different name but add a .php extension to the end of the file name.
- Example, if your DWT file is mydesign.dwt, the copy could be renamed mydesign2.dwt.php
- Click save to create your DWT file copy.
Below we are making a copy of our design template as website_design-copy.dwt.php
Copy Head HTML Content Into Your New DWT File
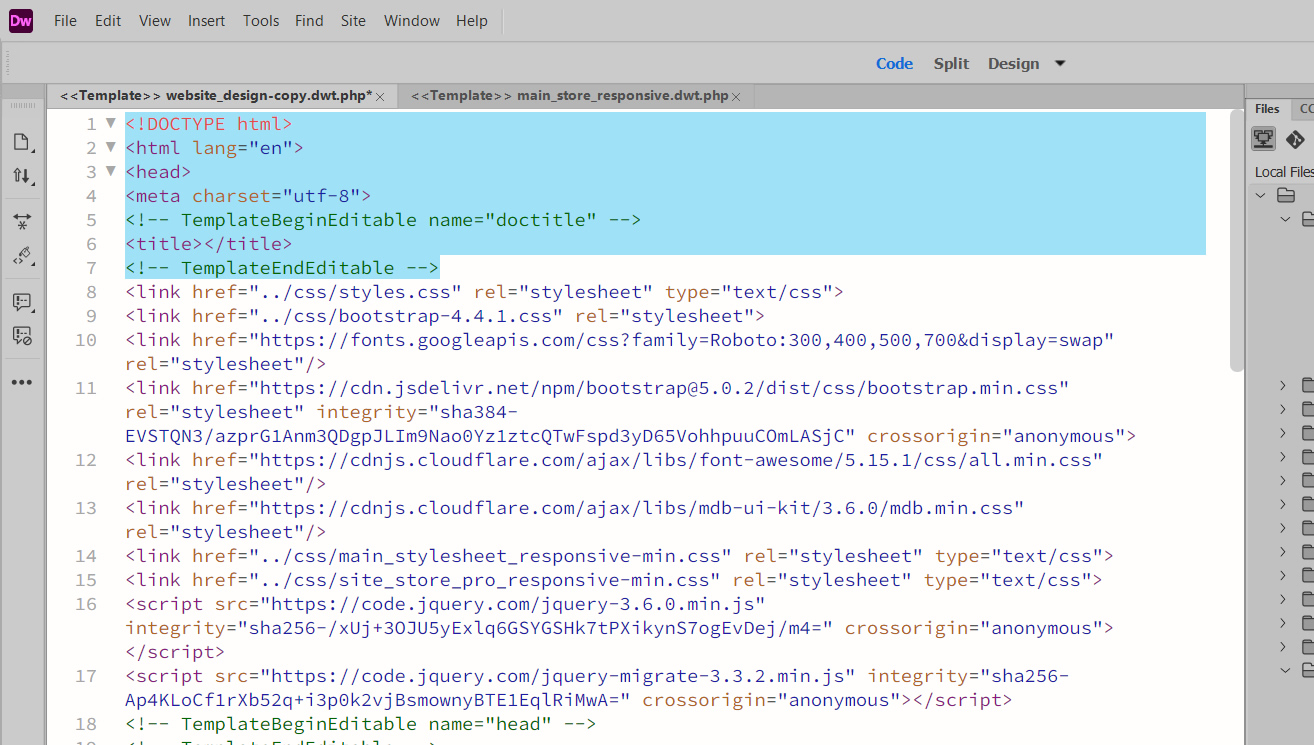
Open up your templates folder again and then open the main_store_responsive.dwt.php file in code view.
Once it is open, copy all the code above the head editable region start tag (TemplateBeginEditable name="head") to ending template tag for the doc description editable region (TemplateEndEditable) as shown below:
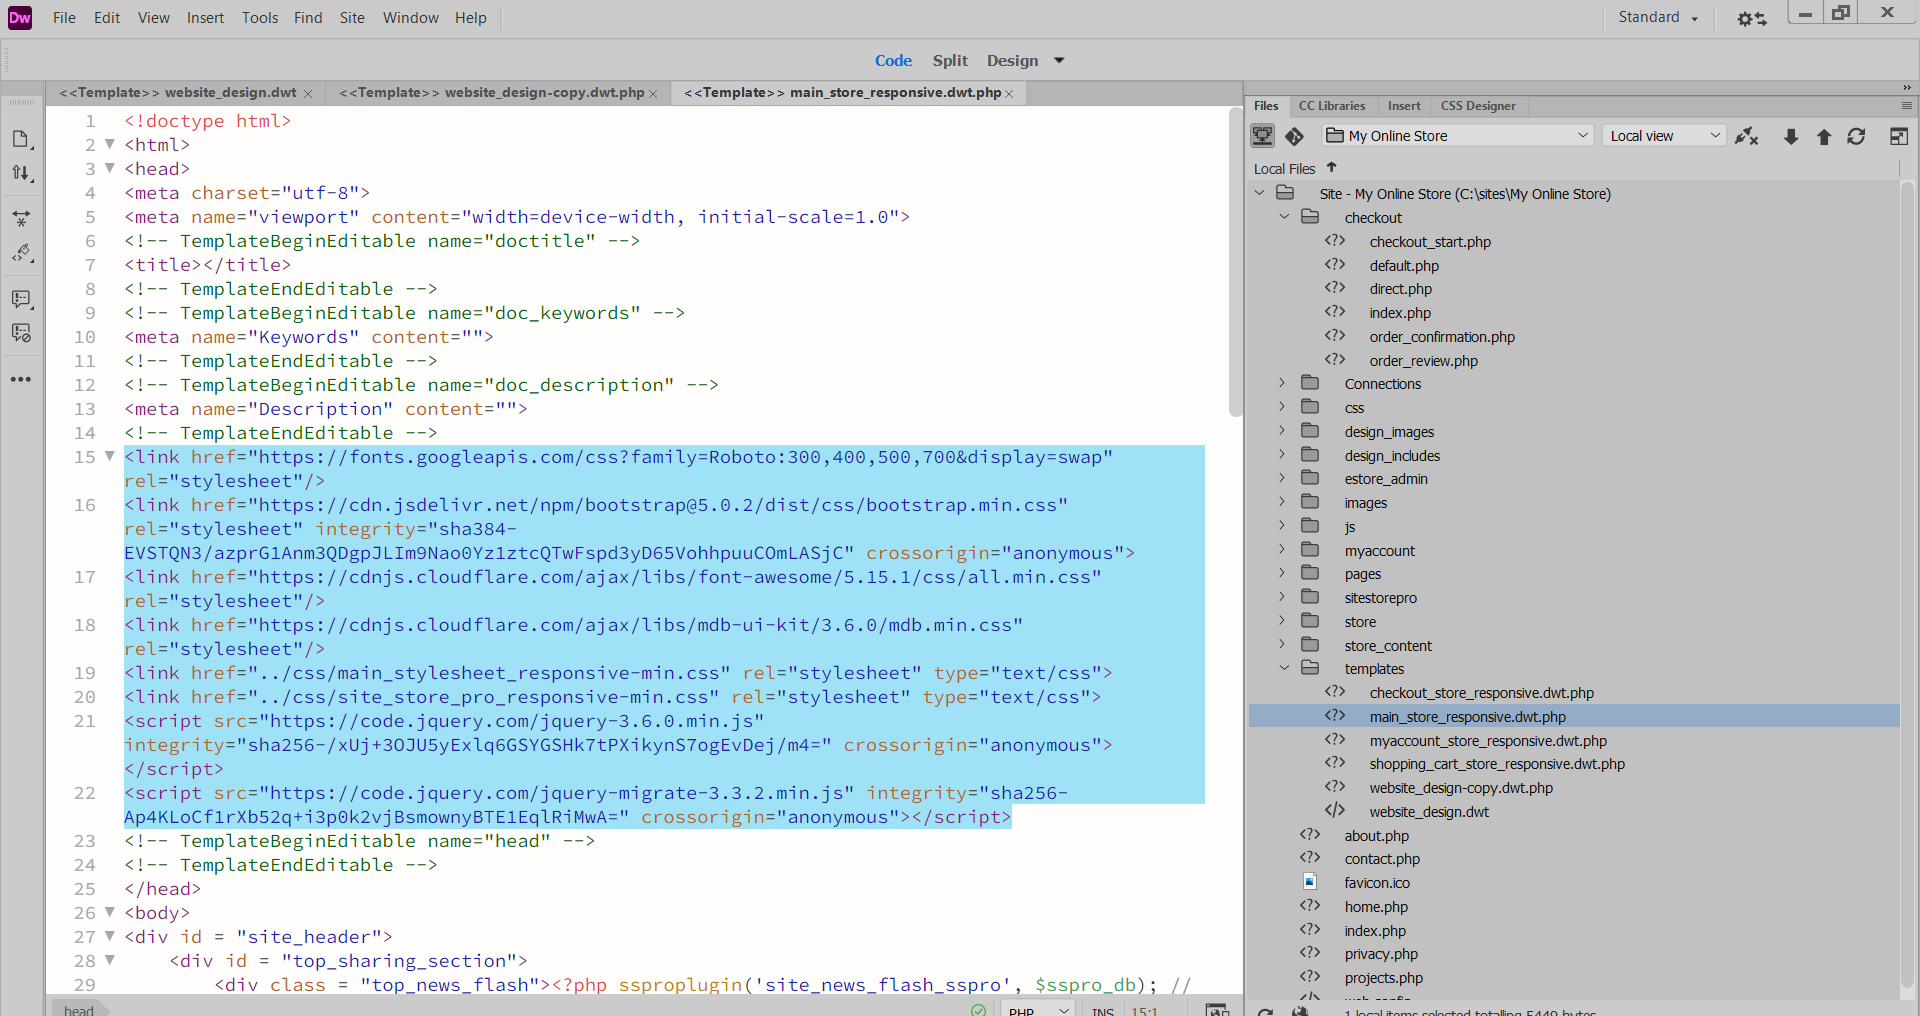
Below is the code that is copied in most current version of main_store_responsive.dwt.php (August 2022)
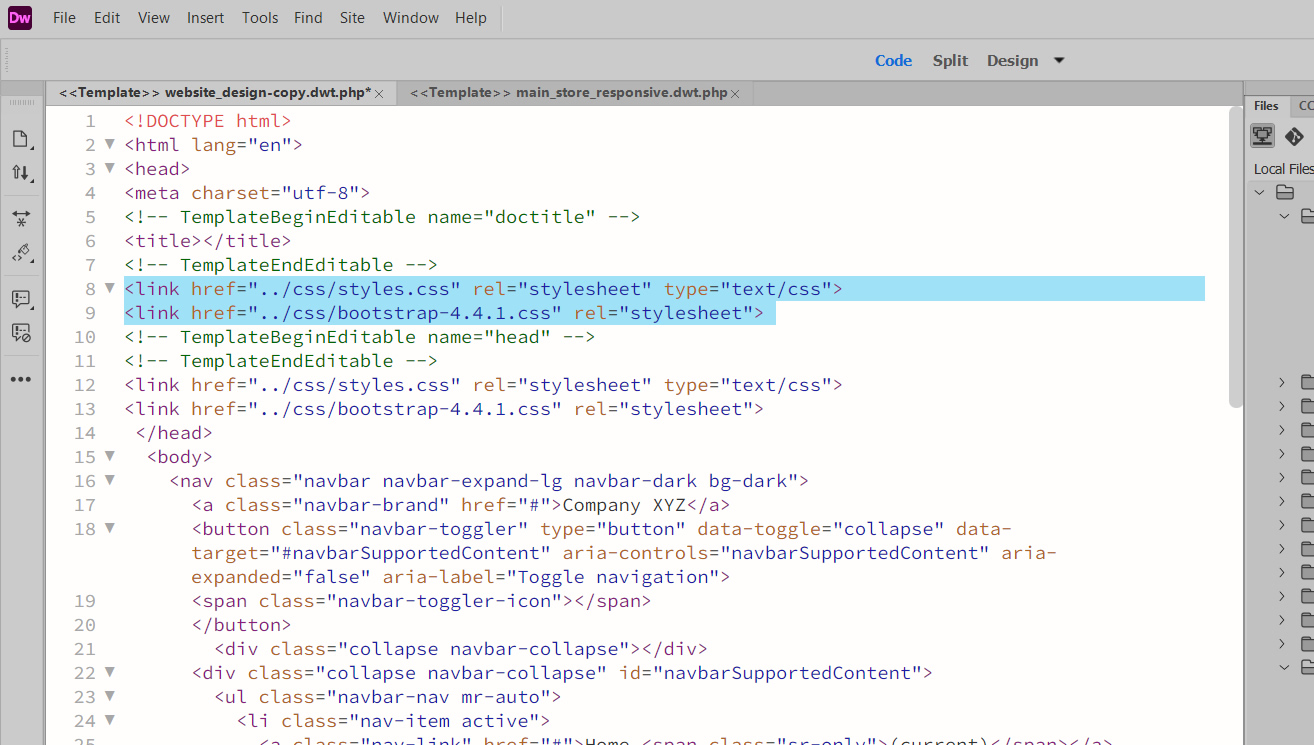
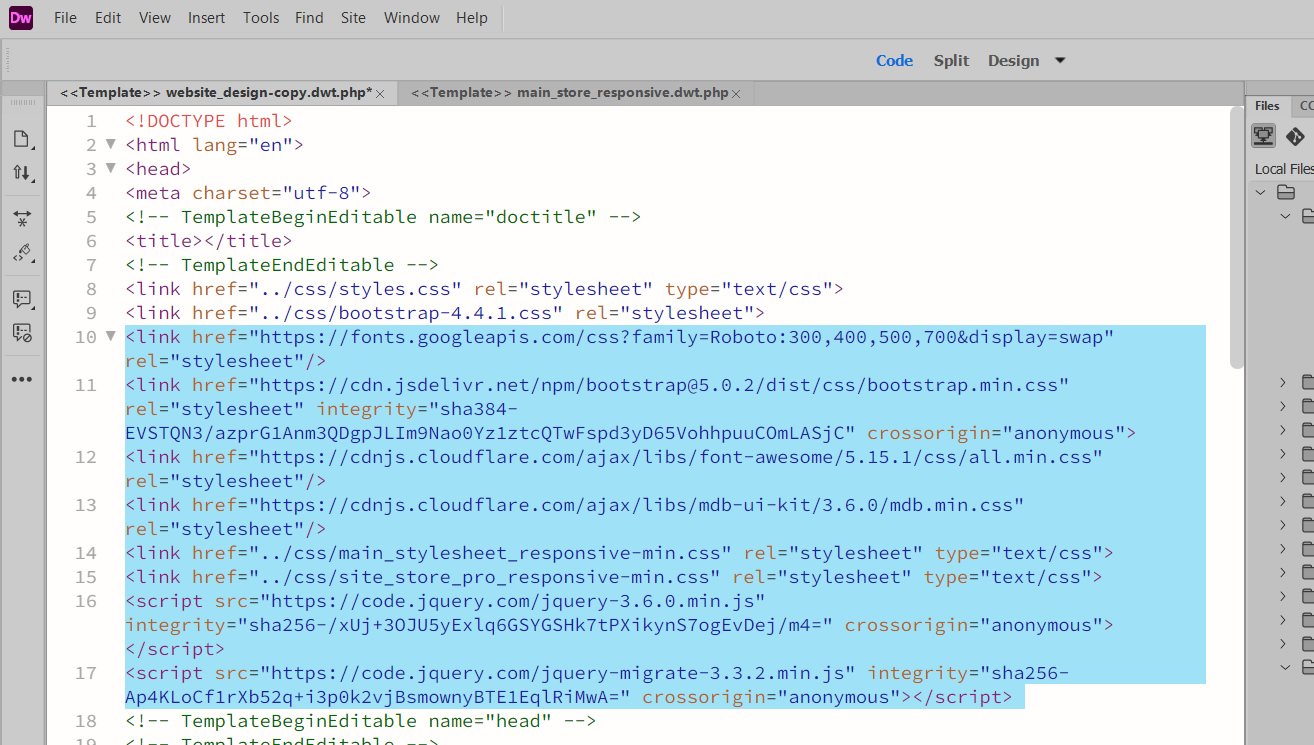
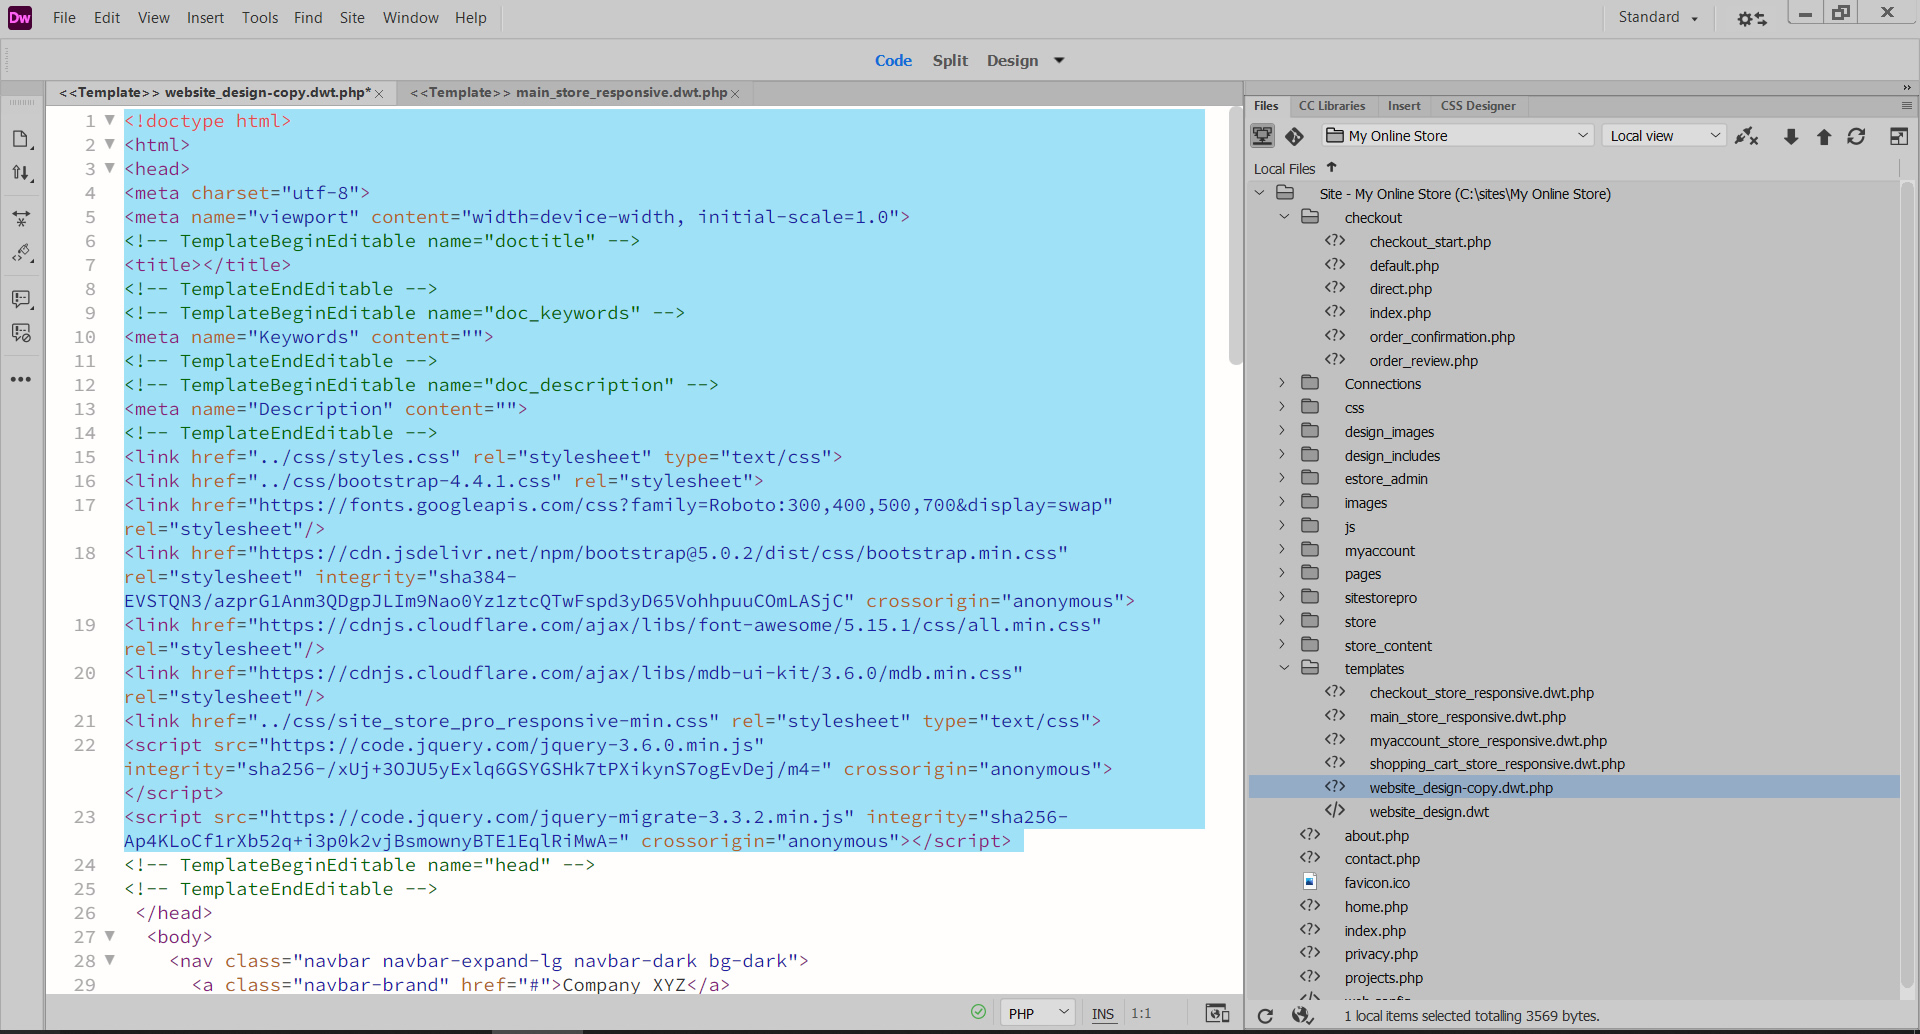
Open up the duplicate (copy) you made of your website's DWT file and then paste the code above the TemplateBeginEditable name="head" in your file.
Your file may contain content in that area already included your site design CSS file includes and JS includes. simply paste the content above or below your existing content.
Below are before and after screen shots of our sample DWT fle that show the current content and then the current content plus the copied and pasted content from main_store_responsive.dwt.php.
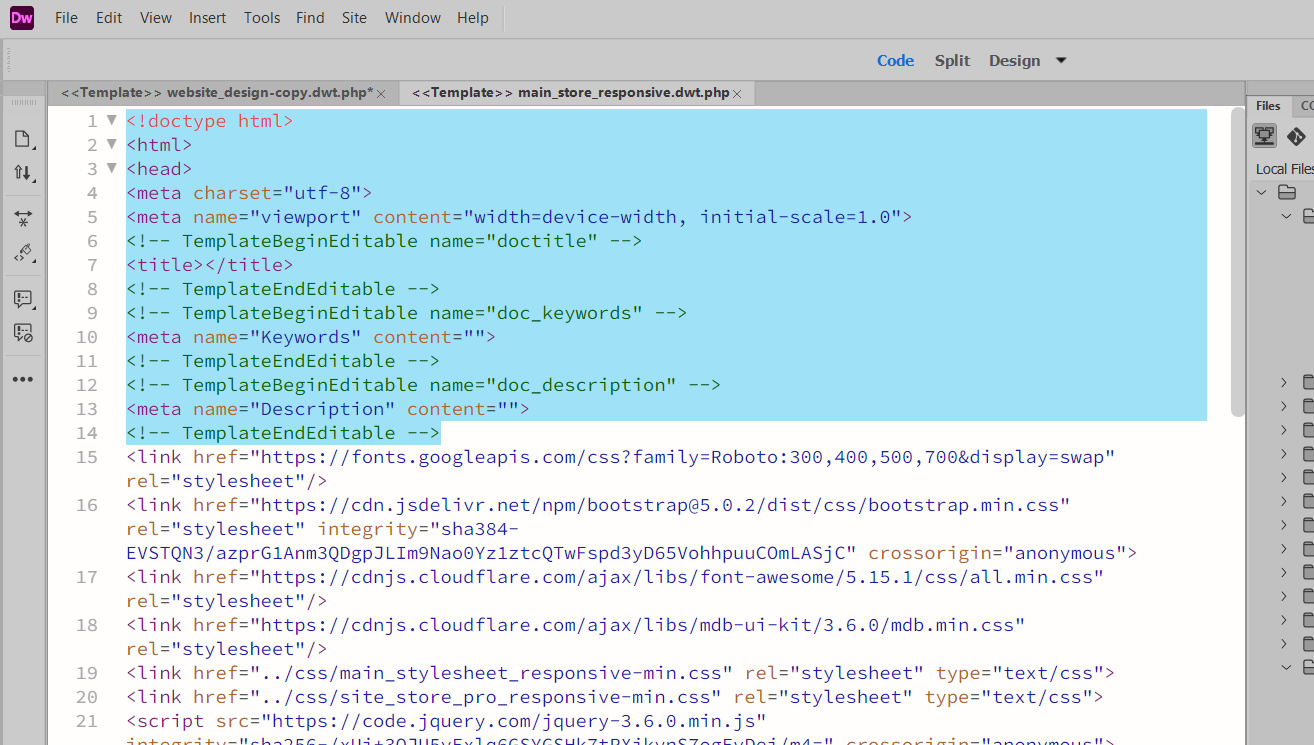
You will now need to DELETE the main_stylesheet_css include line of the copied code in your DWT file since it is a primary CSS file from the sample store design that will conflict with your primary CSS file. (i.e. it contains site fonts, link styles, page background color, etc)
Delete the line from the copied head code that reads:
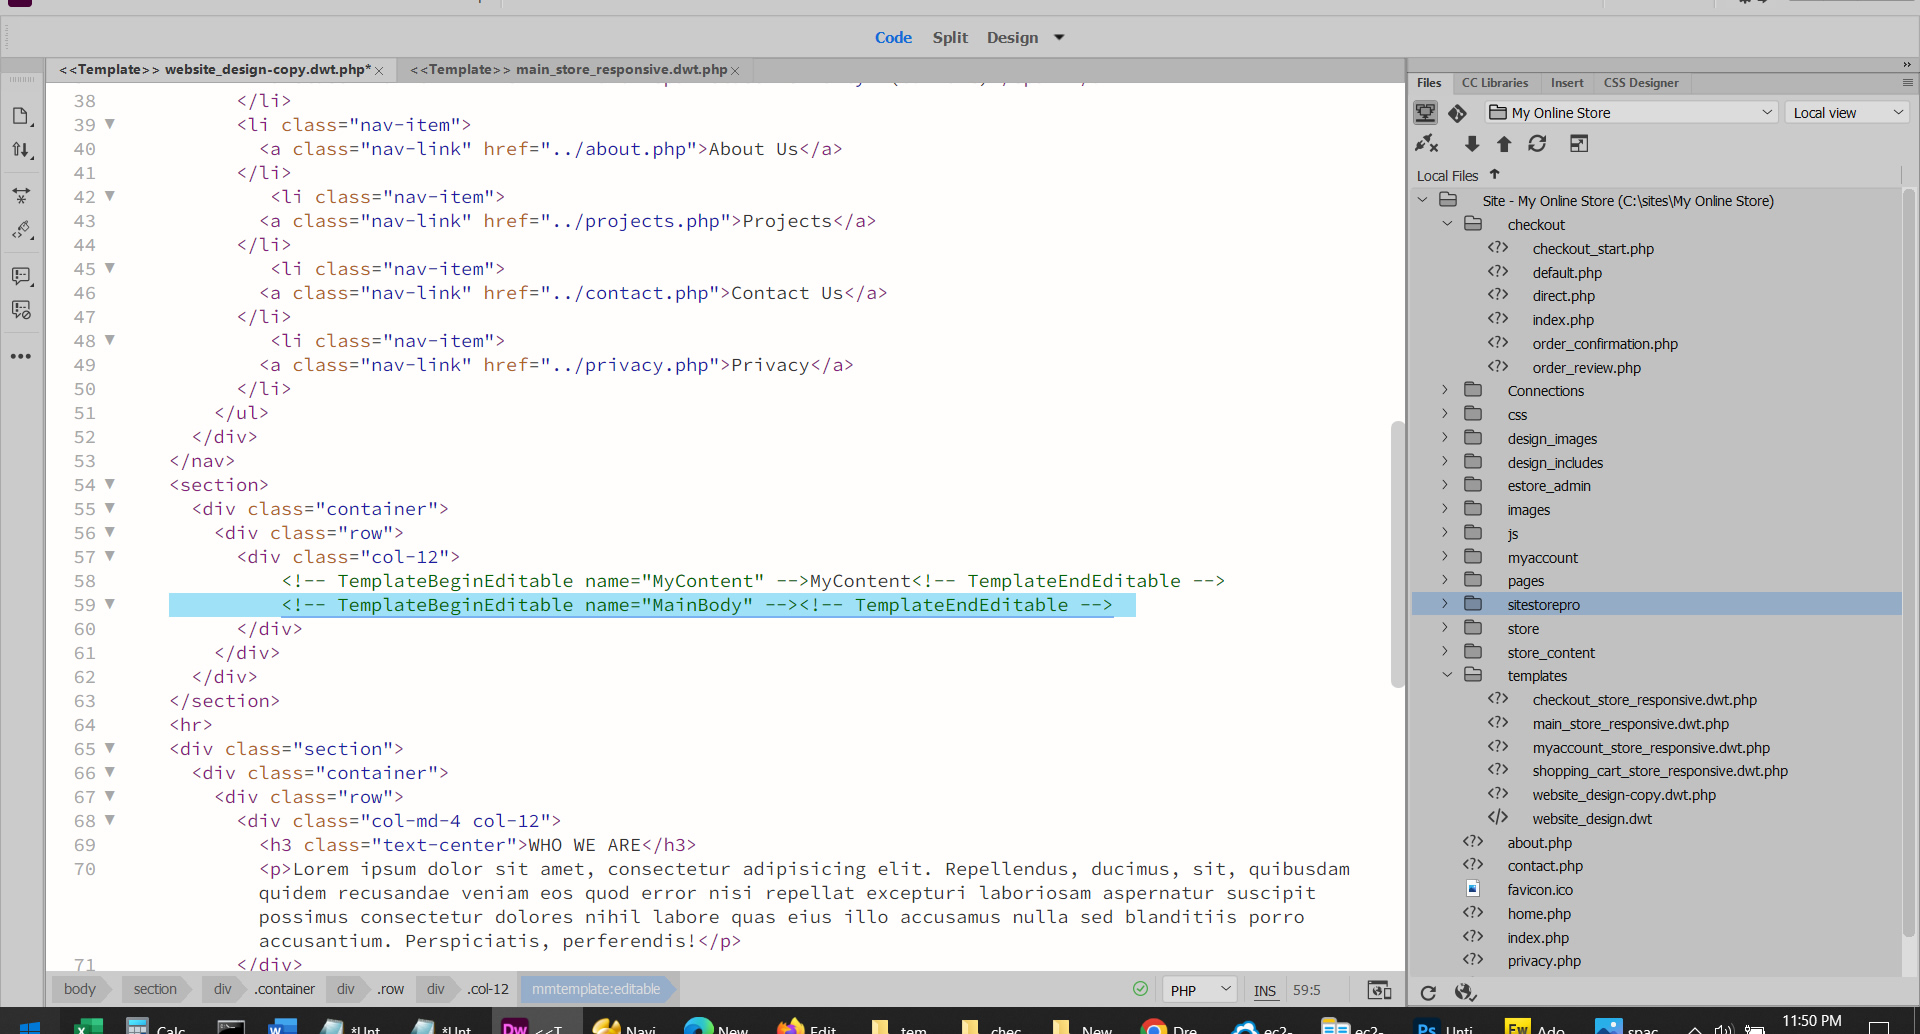
Next, copy the editable regions shown below from main_store_responsive.dwt.php and replace all the editable regions above the content you pasted in the previous setup and everything else to the top of your DWT file so that you are essentially duplicated everything from the main_store_responsive.dwt.php file in your DWT file but including any CSS and JS references that were already in your file. .
Screen shot of copied editable regions and the html content from main_store_responsive.dwt.php
Below is the actual code that is being copied from main_store_responsive.dwt.php
Screen shot below of our sample DWT file BEFORE pasting the above content (i.e before removing the current content and replacing with the above content.
Below is the completed modified head section of the DWT file including all the content from main_store_responsive.dwt.php and any previous CSS and/or JS content and any other code that was in your document head previously that wasn't DWT template regions.(excluding the main_stylesheet.css line that we deleted)
Next you will create the DWT editable region in your site design where the shopping cart content will dynamically populated.
Create the Dynamic Shopping Cart Content Editable Region
Open up the main_store_responsive.dwt.php file again and copy the following editable region code:
Paste the above code into your DWT file where the main content of the page is displayed (i.e. below the site navigation and above the footer.)
You can remove your current main content editable region but it is not required. In this example, we will leave the current main editable content region in the file and just paste the MainBody editable region directly below it.
Important... save your DWT file now by clicking on File > Save
Nothing will happen since the DWT file is not associated with any files in your site definition but now the real shopping cart integration magic happens!
Close the main_store_responsive.dwt.php file if it is still open in your Dreamweaver window.
Replace The Site Store Pro Sample Store Design With Your Design
Now that you have created a new DWT file that contains your design and the required DWT file elements for the Site Store Pro installation, you simply have to overwrite the existing Site Store Pro DWT files with your new file to apply your design to the application files.
Below are the four template files that come with Site Store Pro and which online store pages that are assigned to:
- main_store_responsive.dwt.php > Updates the root index.php file (if you are not using your own /index.php, the, store catalog and product display files in the /store/ folder, and the admin's built-in CMS generated pages in /pages/)
- shopping_cart_store_responsive.dwt.php > Updates the shopping cart display page. (/store/shopping_cart.php)
- checkout_store_responsive.dwt.php> Updates the store checkout pages in the /checkout/ folder
- myaccount_store_responsive.dwt.php > Updates the account registration page and my account pages in the /myaccount/'
Although there are four seperate DWT files, by default, they are exactly the same. The only reason there are four different DWT file names instead of one is that some designers like to have different designs / skinning for different areas of their online store. (i.e. they may want the checkout area to have a different header than the online store product pages.
Open up the saved DWT file that contains your design and the content you copied into it from the previous steps and click on File > Save As.
Select the main_store_responsive.dwt.php file in the /templates/ folder and overwrite it as shown below.

You will then be prompted to confirm that you want to replace the main_store_responsive.dwt.php file. Click "Yes"
When the new version of main_store_responsive.dwt.php is opened on your screen, switch to code view (if not already in code-view) and anywhere on the file that does not contain code i..e whitespace (example at the end of a CSS include line), click it and then hit your space bar.
Or you can remove some whitespace some in the file by clicking somewhere without content and then your backspace button. Just be careful not to delete any content or accidentally add some text to the file. All you are doing with this trick is marking the DWT file as edited. This will make Dreamweaver think the file has changed but will not actually add any content to it.
The reason we need Dreamweaver to think that the file has changed is that it will not update files associated with the template unless it records that the file has changed. When you overwrote the main_store_responsive.dwt.php file with your DWT file, it obviously changed it but Dreamweaver will not recognize that that it has changed unless we make some type of small edit to the file again.
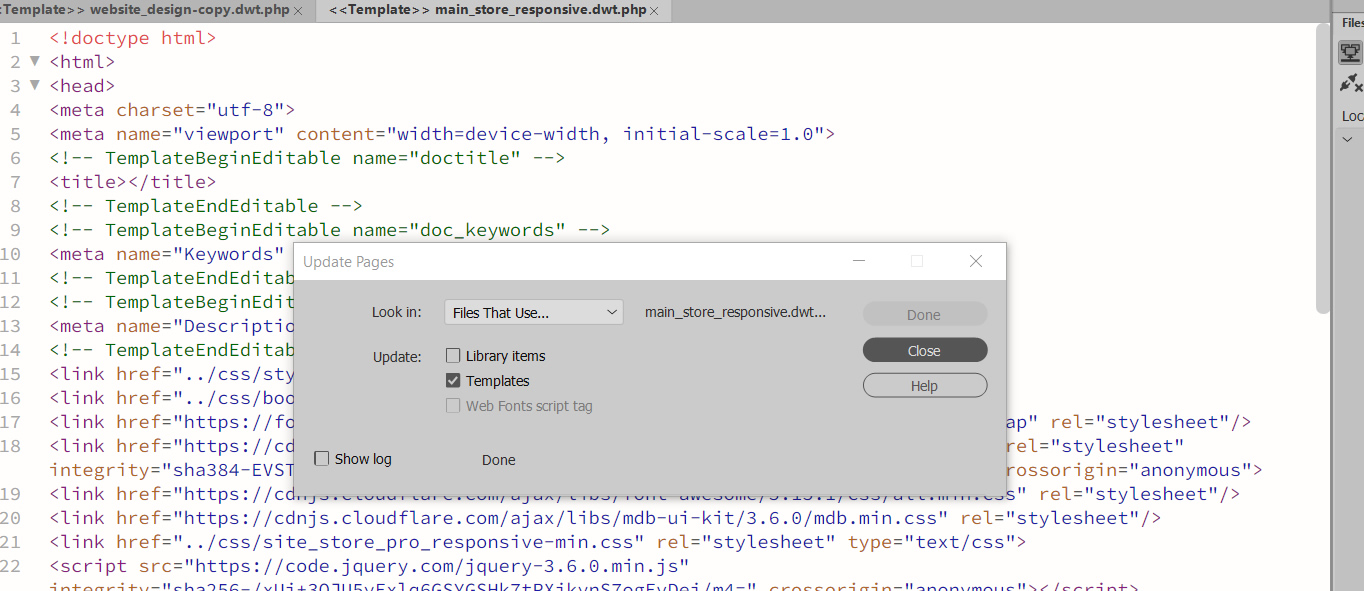
Now that the template has a small pseudo change on it, click File > Save.
If your site definition was setup correctly, you will be prompted by Dreamweaver to update all the files associated with the changed template file as shown below:

Click on the "Update" button and viola, your custom design has now been applied to several of the store application pages.
if you are not prompted with an alert identical to the one above, it either means your are not working inside a Dreamweaver site definition or your site definition cache need to be rebuilt so Dreamweaver knows which templates are associated with which files. If you are working in a Dreamweaver site definition and you do not get the above alert to update the files, click on Site > Advanced > Recreate Site Cache and then repeat the steps above where you make a space on the template file and save it. You should now be prompted with the above update alert it you were not the first time.
After the template update process completes, click on the "Close" button that appear as shown below:
Now that you have updated some of the store pages with your design, you need to repeat the process for the other 3 DWT files.
Click on File > Save As and overwrite the checkout_store_responsive.dwt.php file and then repeat the process of adding a space to the file and then resaving the template file (File > Save) to trigger the template update.
Repeat the same process for the shopping_cart_store_responsive.dwt.php and my_account_store_responsive.dwt.php file so that you update all the online store pages with your design. Each overwrite of a template must prompt you to update the associated pages to completely re-skin the application.
Now that you have reskinned the application you just have to upload the files to your website to test your design (or test it on your local server if you have a local webserver and local MySQL server configured already. ie. XAMPP, IIS/MySQL)
Upload The Online Store Files With Your Applied Design
To verify that your install is working with your custom website design, you will need to post all the files that were changed (updated) by the DWT templates to your running cart installation.
The following folders such be posted:
- /checkout/
- /pages/
- /myaccount/
- /store/
and the root /index.php page if you are not using our own home page.
Be careful not to overwrite any files if you are posting to a live website, especially /index.php which is normally the home page for LINUX-hosted websites.
Once the folders have been uploaded to your web server, type in /store/ after your site URL and you should see your design applied to the Site Store Pro online store application. If you do not see your site design, make sure that the files in the above folders were updated with your design and that they were uploaded correctly (i.e open a file in Dreamweaver like /store/index.php or /store/shopping_cart.php and you should see your design on the file when viewing it in either code or design view. Then confirm that the file on your web server is the same version as the one that has been updated with your design).
You have now completely skinned your Site Store Pro application with your custom site design!