Install Guide For WPCartPro™ WordPress Shopping Cart
Below is the self-install guide for the WPCartPro WordPress Shopping Cart. However, if you prefer that our support team does the installation on your hosting account or server, please submit a ticket at https://www.sitestorepro.com/myaccount/ to schedule your free installation.
WPCartPro™ Introduction
The WPCartPro™ plugin allows you to run a completely integrated Site Store Pro installation inside any WordPress theme.
All store features that are available with a Site Store Pro stand-alone installation are also available when using WPCartPro on your WordPress site (with the exception of the stand-alone website page CMS features since the site content and design is managed through WordPress.)
The WPCartPro plugin was designed to allow merchants to switch seamlessly from stand-alone Site Store Pro installations using their own custom design to WordPress installations using a theme for the design skinning and vice versa. Since the WPCartPro uses the same unified core cart framework and enterprise-level database structure as a regular Site Store Pro install, merchants came switch from either platform without having to learn different ecommerce admin functions and features. More importantly, since WPCartPro uses the same data and cart code as Site Store Pro, merchants can switch design environments anytime without losing any online store settings, products info, discounts, shipping rules, payment settings, customers and orders.
The primary difference between a stand-alone Site Store Pro installation and a WPCartPro install, is that the store CSS files are located inside the WPCartPro plugin’s CSS folder instead of the site’s root /css/ folder.
Since the plugins (store) CSS files are inside the plugin folder, they can be edited from inside WordPress. (if required) instead of by using a third-party CSS/HTML tool like Dreamweaver. The WPCartPro plugin also has several WordPress specific features such as display Widgets and dynamic menu features.
The installation of the WPCartPro plugin to run Site Store Pro on a WordPress install is very similar to the standard Site Store Pro installation process.
- Download your WPCartPro installation zip file from your order confirmation email or your order confirmation page.
- Extract the contents of the install folder to a directory on your local system.
- Edit The Connection File To Reflect Your MySQL database connection credentials
- Upload the entire contents of the ‘New Installation’ folder (including your edited db connection file) up to your WordPress installation root directory
- Activate the WPCartPro plugin inside of WordPress
- Click on the WPCartPro Menu Item In WordPress To Open Your Store Admin System.
- Install the Online Store Database With Either Demo Content or Clean Installation.
- Set the Master Admin Account For the Store Admin Area.
- Verify Your Online Store URL and Checkout URL Settings Inside Your Admin Area.
Each step above is outlined in detail in the following sections.
WpCartPro Application Elements
The WpCartPro™ ecommerce application contains:
The Store-Front Files
The WP Cart Pro (Site Store Pro) storefront files , which include the main store page, product results, item details, shopping cart display , customer registration, order checkout and the “My Account” area are designed to integrate seamlessly into virtually any WordPress theme. Unlike a stand-alone Site Store Pro installation, the store-front files are not edited directly for design purposes. The design of the store pages are set by the active WordPress theme. However, the store pages content can be fine-tuned by editing the included CSS files located in the WPCartPro plugin’s CSS folder.
The Web-Based Administration System
All ecommerce features such as products configuration, customers and orders management, payment providers, shipping preferences, emails and discounts are controlled through the Site Store Pro web-based admin system that can be accessed directly from inside the WordPress admin area.
The MySQL Database
WPCartPro is “powered” by the same MySQL back-end database that runs stand-alone Site Store Pro stores. In order to run WPCartPro on your WordPress site, the Site Store Pro database must be setup on your webhost’s MySQL Server. The database is automatically installed during the online setup process. The Site Store Pro database stores all of the categories, product information, customer data, order history, store configuration settings and usage stats.
WPCartPro System Requirements
- PHP 8.0 Or Higher.
- MySQL 5.6 Or Higher.
- WordPress 5.1 or Higher
- cURL enabled in PHP.
- PHP mail or access to a SMTP mail server for outgoing store emails.
(SMTP mailing services such as SendGrid and SparkPost can be used for the store emails) - GD2 or ImageMagic enabled in PHP
Website Hosting Questions?
If you are unsure that your current website hosting account supports Site Store Pro / WPCartPro or would like advice on a hosting plan prior to setting up an account, please email [email protected] for assistance.
SiteStorePro.com does not recommend any specific webhosting company for the Site Store Pro and the WPCartPro plugin. However, we can inform you if your current or desired webhost is compatible and what specific plan would be best suited for running Site Store Pro.
Download The WPCartPro Zip File
Login to your account at https://www.sitestorepro.com/myaccount with the email address and password entered when you registered for your account at SiteStorePro.com to download the latest version of WPCartPro or click on the download button in your order confirmation email to download the lastest WPCart version.
Extract The Folders From The Downloaded WPCartPro Zip File
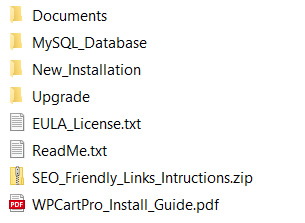
Folders In the Site Store Pro WPCartPro Installation Include:
- Documents: Site Store Pro Supplemental Reference PDF Documents
- MySQL_Database: The manual database installation scripts. These are provided for advanced users only and no longer required to setup the store. The store database is automatically setup online through a browser.
- New_Installation: This folder contains the complete sample store and all the required Site Store Pro (WPCartPro) shopping cart engine files and web-based admin system files that will be uploaded to your server.
- Upgrade: This folder contains the files/folders that will allow you to upgrade your current version of WPCartPro to the most recent release.
IMPORTANT NOTICE: If you have already setup your Site Store Pro folder(s) and are UPGRADING from a previous version, please read the section at the end of this document about upgrading. Failure to follow the proper upgrade procedures may result in loss of previous CSS file modifications.
Here is a snapshot of what the extracted folder(s) will look like on your local system.
Edit The MYSQL (DATABASE) Connection File
Once the files have been extracted from the downloaded zip file to your local system, the /Connections/SiteStoreProDB.php file must be edited to include your specific MYSQL database login information.
The SiteStoreProDB.php file is located in the ‘Connections’ folder in the ‘New_Installation’ folder of the files you extracted from the downloaded zip file.
Using a text file editor such as NotePad or your preferred HTML editor, you must replace the default SQL connection string values with the login information for your specific MYSQL database where you installed the SQL script in the previous step.
The connection string will have the following info:
$hostname_SiteStoreProDB = "localhost";
$database_SiteStoreProDB = "database";
$username_SiteStoreProDB = "username";
$password_SiteStoreProDB = "password";
You must replace the 4 values in red with your specific MySQL database login information.
$hostname_SiteStoreProDB = The servername or IP Address of your MYSQL
$database_SiteStoreProDB = The name of the database provided by your webhost or entered when setting up the database.
$username_SiteStoreProDB = The username provided by your webhost or entered when setting up the database
$password_SiteStoreProDB = The password provided by your webhost or entered when setting up the database
You can also get the above values from your wp-config.php file on your hosting account. If your WordPress site is already running (which is required), you can use the same values from your wp-config.php file for the hostname, database, username and password. The corresponding variable names in wp-config are : DB_HOST, DB_NAME, DB_USER and DB_PASSWORD. Simply copy the values assigned to the above settings to the SiteStoreProDB.php file.
If you need assistance setting the correct MYSQL connection string for your Site Store Pro installation, please email [email protected].
FTP (Transfer) The Store And Admin Files From The New Installation Folder To Your Webserver
Now that the SiteStoreProDB.php connection string in the /Connections/ folder has been edited to reflect your specific MYSQL information, you are now ready to transfer the Site Store Pro shopping cart files and WPCartPro plugin files up to your website.
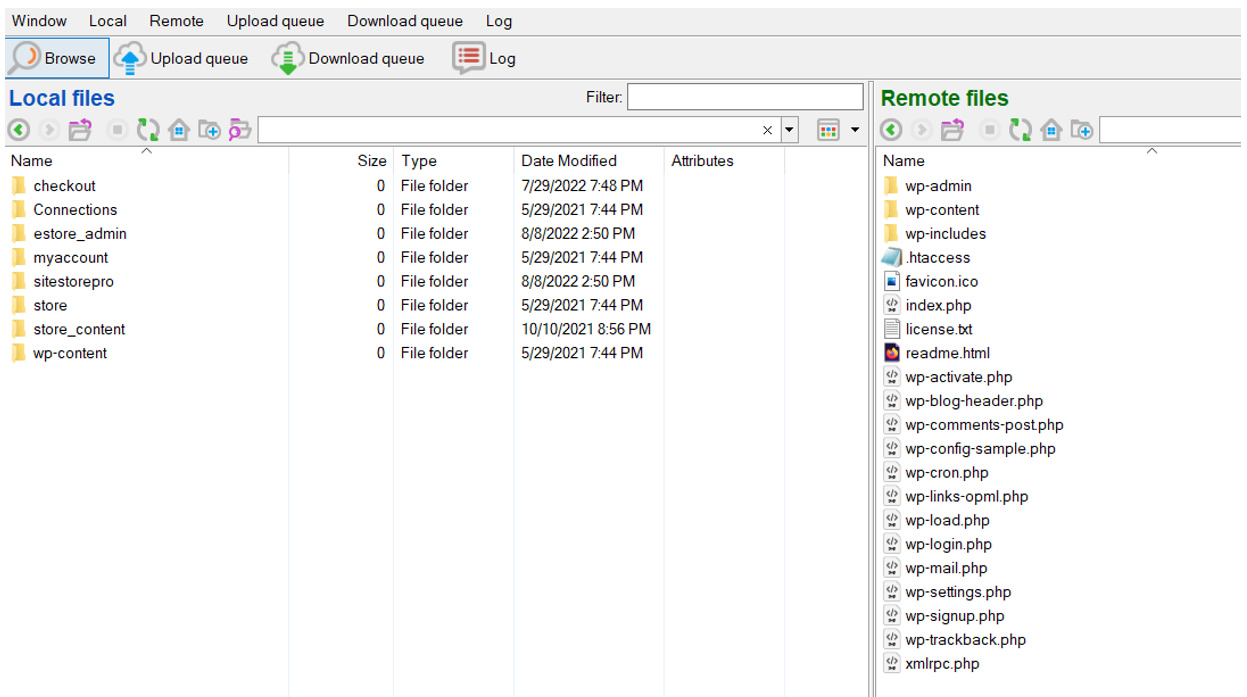
Using an FTP program such as FileZilla, CuteFTP or WS_FTP, transfer (copy) all the files and folders located INSIDE the ‘New_Installation’ folder up to the root directory of your website (WordPress installation).
Screenshot below shows the folder structure of your local system BEFORE copying all the folders from inside the ‘New Installation’ folder up to your hosting account with a running version of WordPress already on the server.
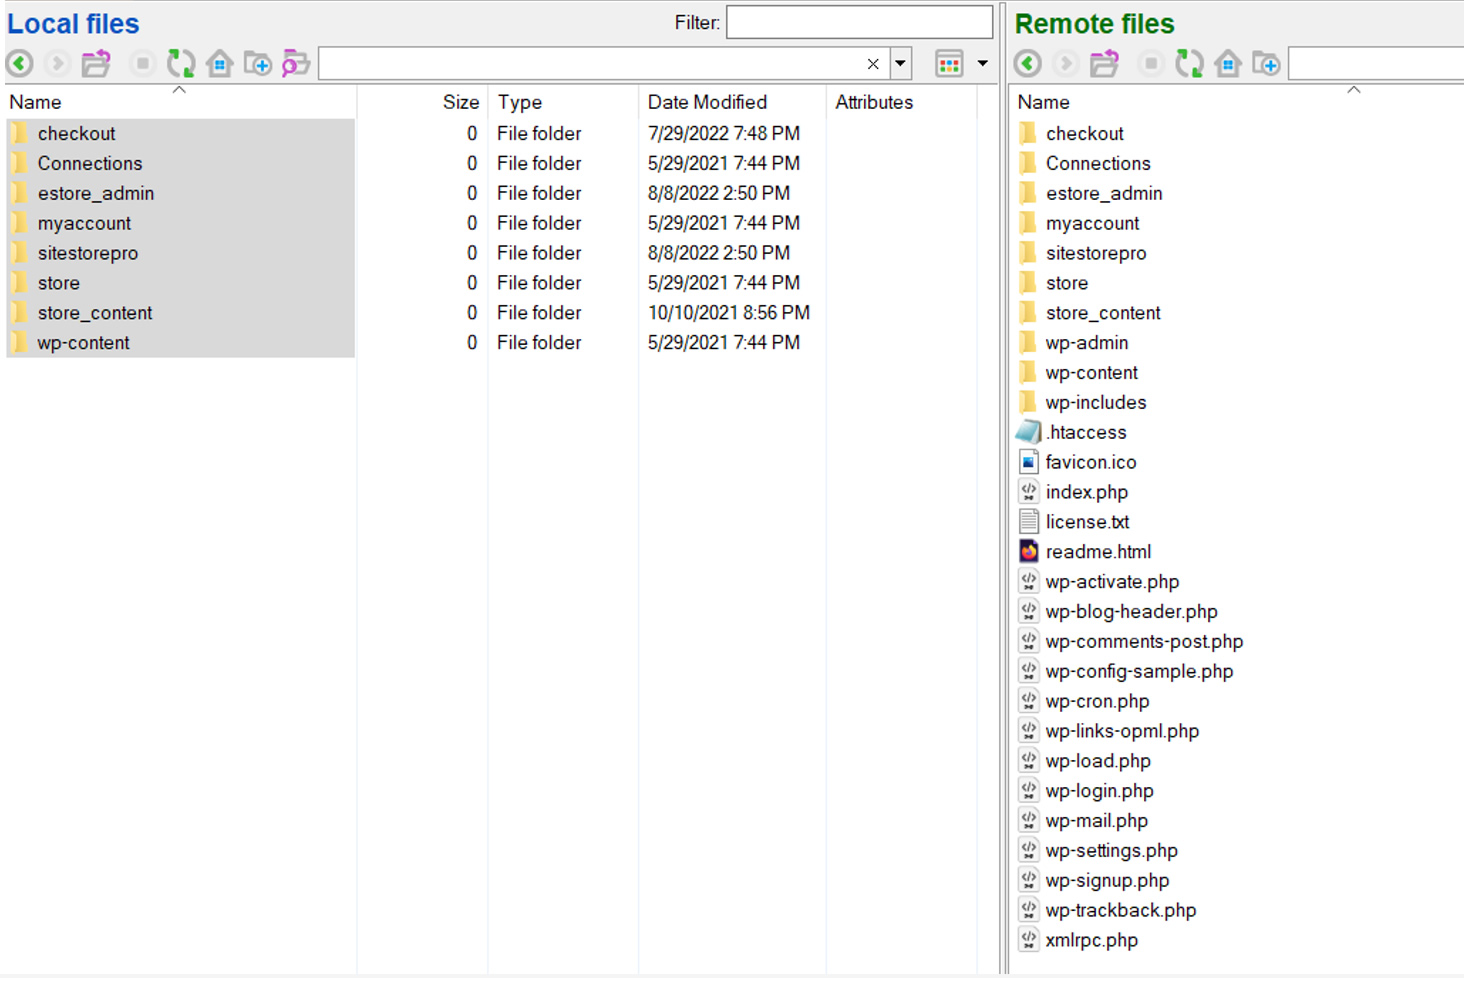
Screenshot below shows the remote server folder structure AFTER all the folders have been uploaded with FTP to the server
Note: make sure that the folders/files you upload includes the edited version of the /Connections/SiteStoreProDB.php file that contains your specific database login credentials and not the default version of the database connection file that was included in the “New Installation/Connections/ folder when it was extracted to your local system from the downloaded zip file.
Activate the Plugin Inside Of WordPress
Now that the Site Store Pro and WPCartPro plugin files have been transferred to your webhost, you can now activate your copy of WPCartPro inside of WordPress and finish the shopping cart installation.
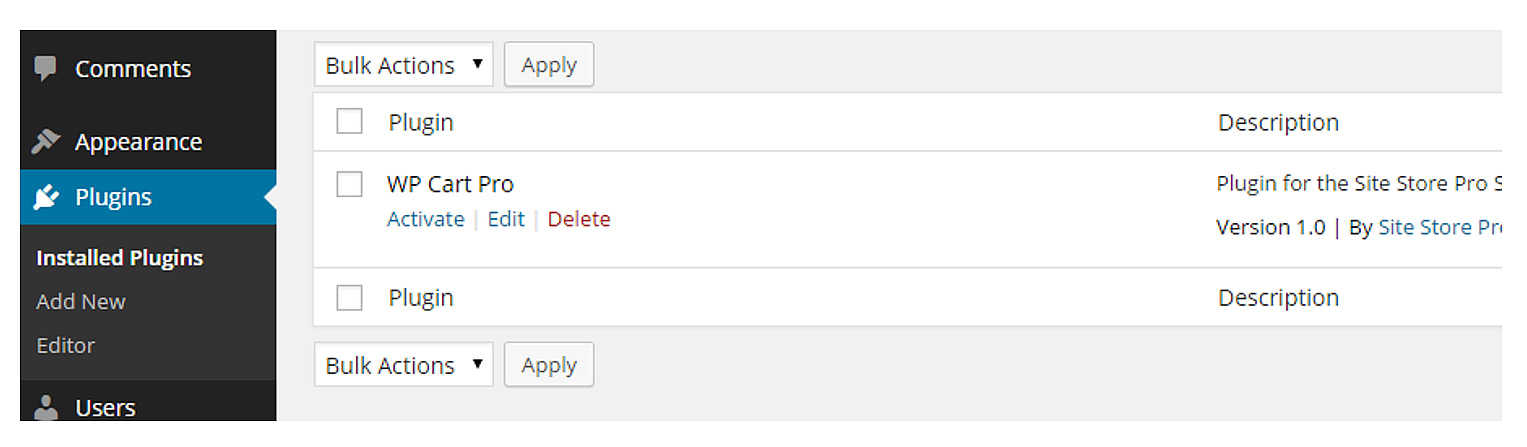
Login to your WordPress admin area, click on ‘Plugins’ and then click on the ‘Activate’ link under the WPCartPro plugin as shown:
After you have activated the WPCartPro Plugin, you will see a new icon on the left menu as shown below:
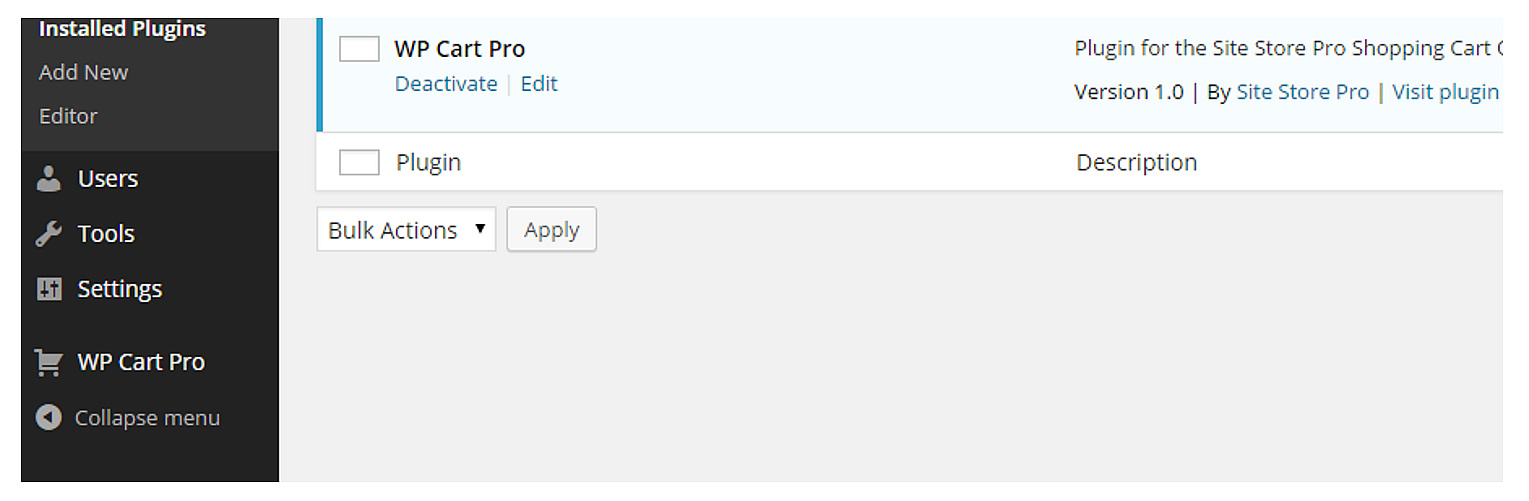
Click on the WPCartPro Menu link to open up the Site Store Pro admin area inside of WordPress.
You can also access the admin area like a stand-alone Site Store Pro install by going to /estore_admin/ on your website: Example: https://www.myonlinestore123.com/estore_admin/
Activating the Site Store Pro Admin Area
When you first click on the WPCartPro menu link or go directly to /estore_admin/ on your hosting account, you will be prompted to install the required MySQL database tables.You will be prompted with the following screen:
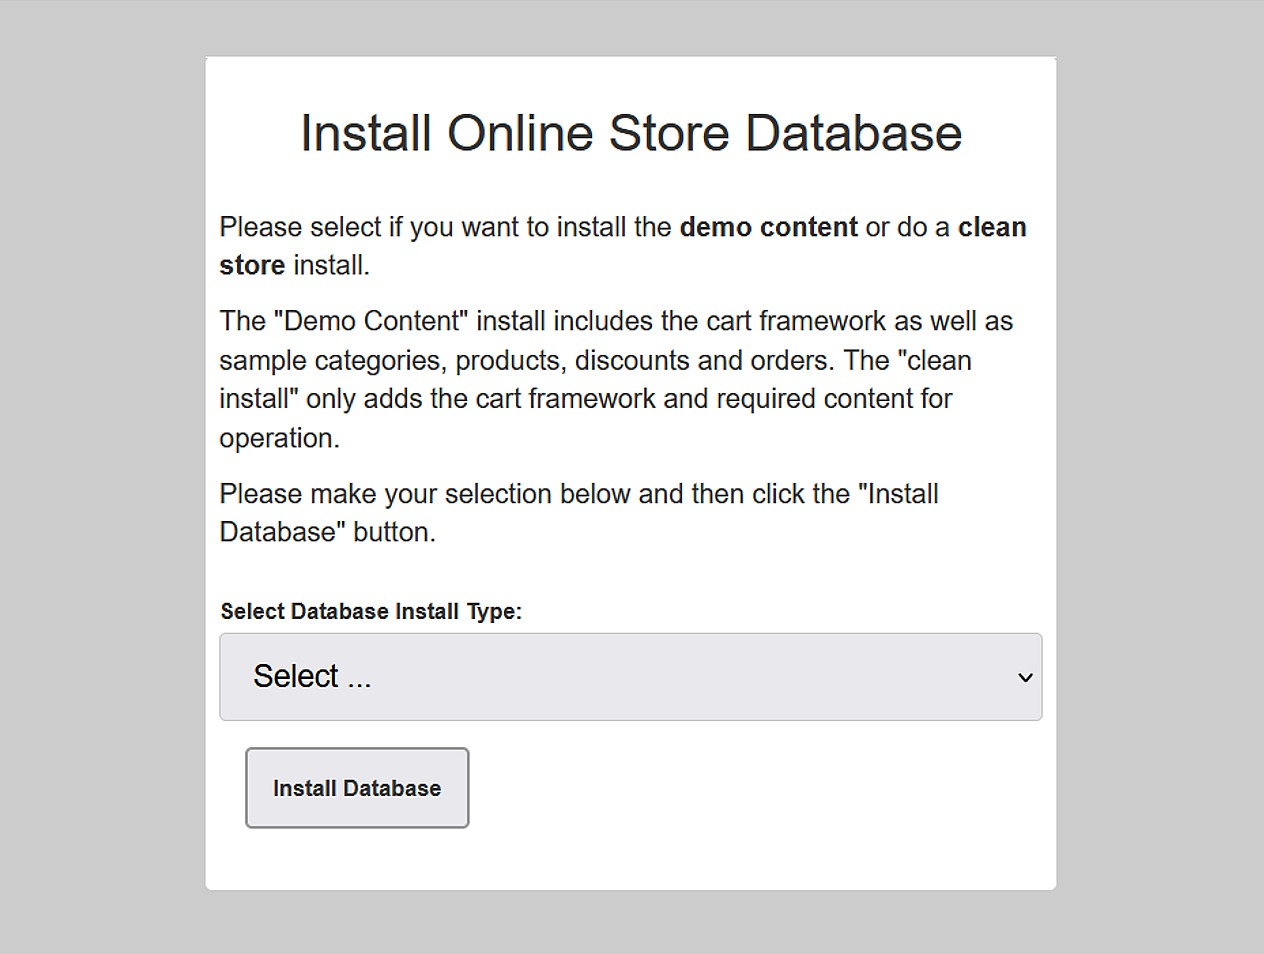
Select the type of install you want for your online store…
Demo Content: Includes the full cart framework plus sample products, categories, orders and other demo online store content to pre-populate the installation with usable test data.
Clean Install: Includes only the full cart framework and minimal required store content to run the shopping cart and will require you add your own products before using or testing the site.
Note: if this is the first time you are using Site Store Pro, it is recommended that you to select the “Demo Content” option since it will allow you to learn the features of the shopping cart much more efficiently.
After you have made your database install type selection, click on the “Install Database” button.
Then the database installation completes, you will be automatically redirected to a new screen to setup your Master online store administration login account.
Create Your Master Administrator Account
New installations will be prompted to create a MASTER Administrator account for the store admin area. The Master Administrator can perform all store administration functions as well as create new administrator accounts and other MASTER administrators.
Below is the screen that will prompt you to create a new Master Administrator account.
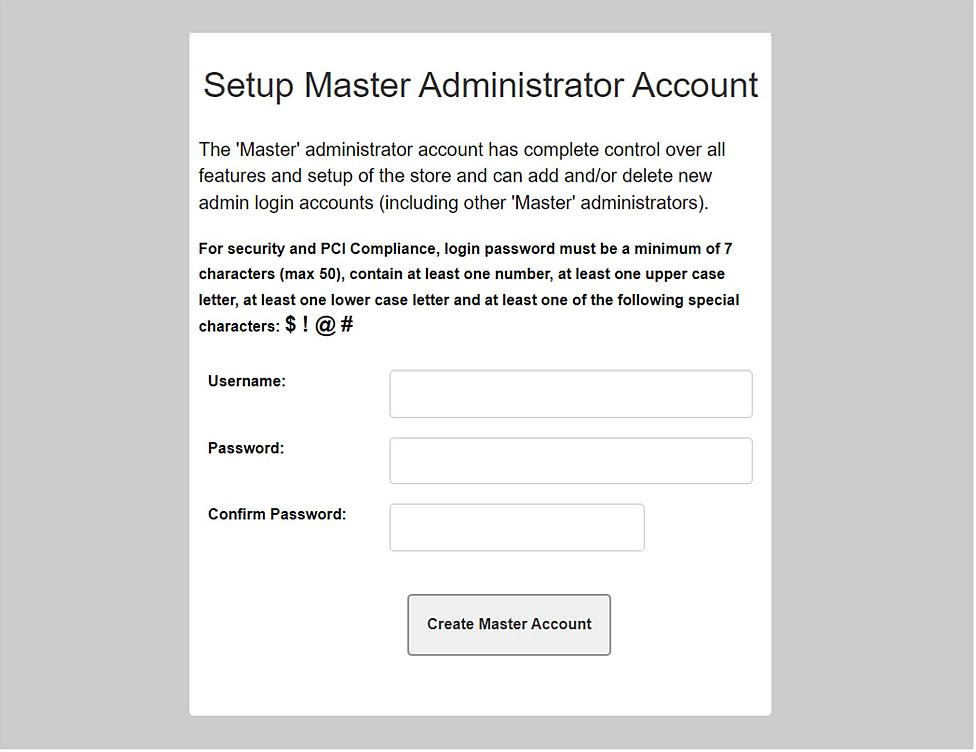
After you have setup your Master Admin account, you will be logged into the admin and asked to verify your site URL and checkout URL settings (see next page).
Verify Your Store URL and Checkout URL Settings
After you setup your Master Administrator account, you will be redirected into the admin area and shown a screen similar to the one shown below. Your Store URL and Checkout URL values should be automatically set with the correct values. However, it is recommended that verify both values as the correct URL for your install. Both the Store URL and the Checkout URL values should be set as the same URL. (The only situation where you would have a different Checkout URL than your Store URL is if your checkout area would be setup as a sub-domain).
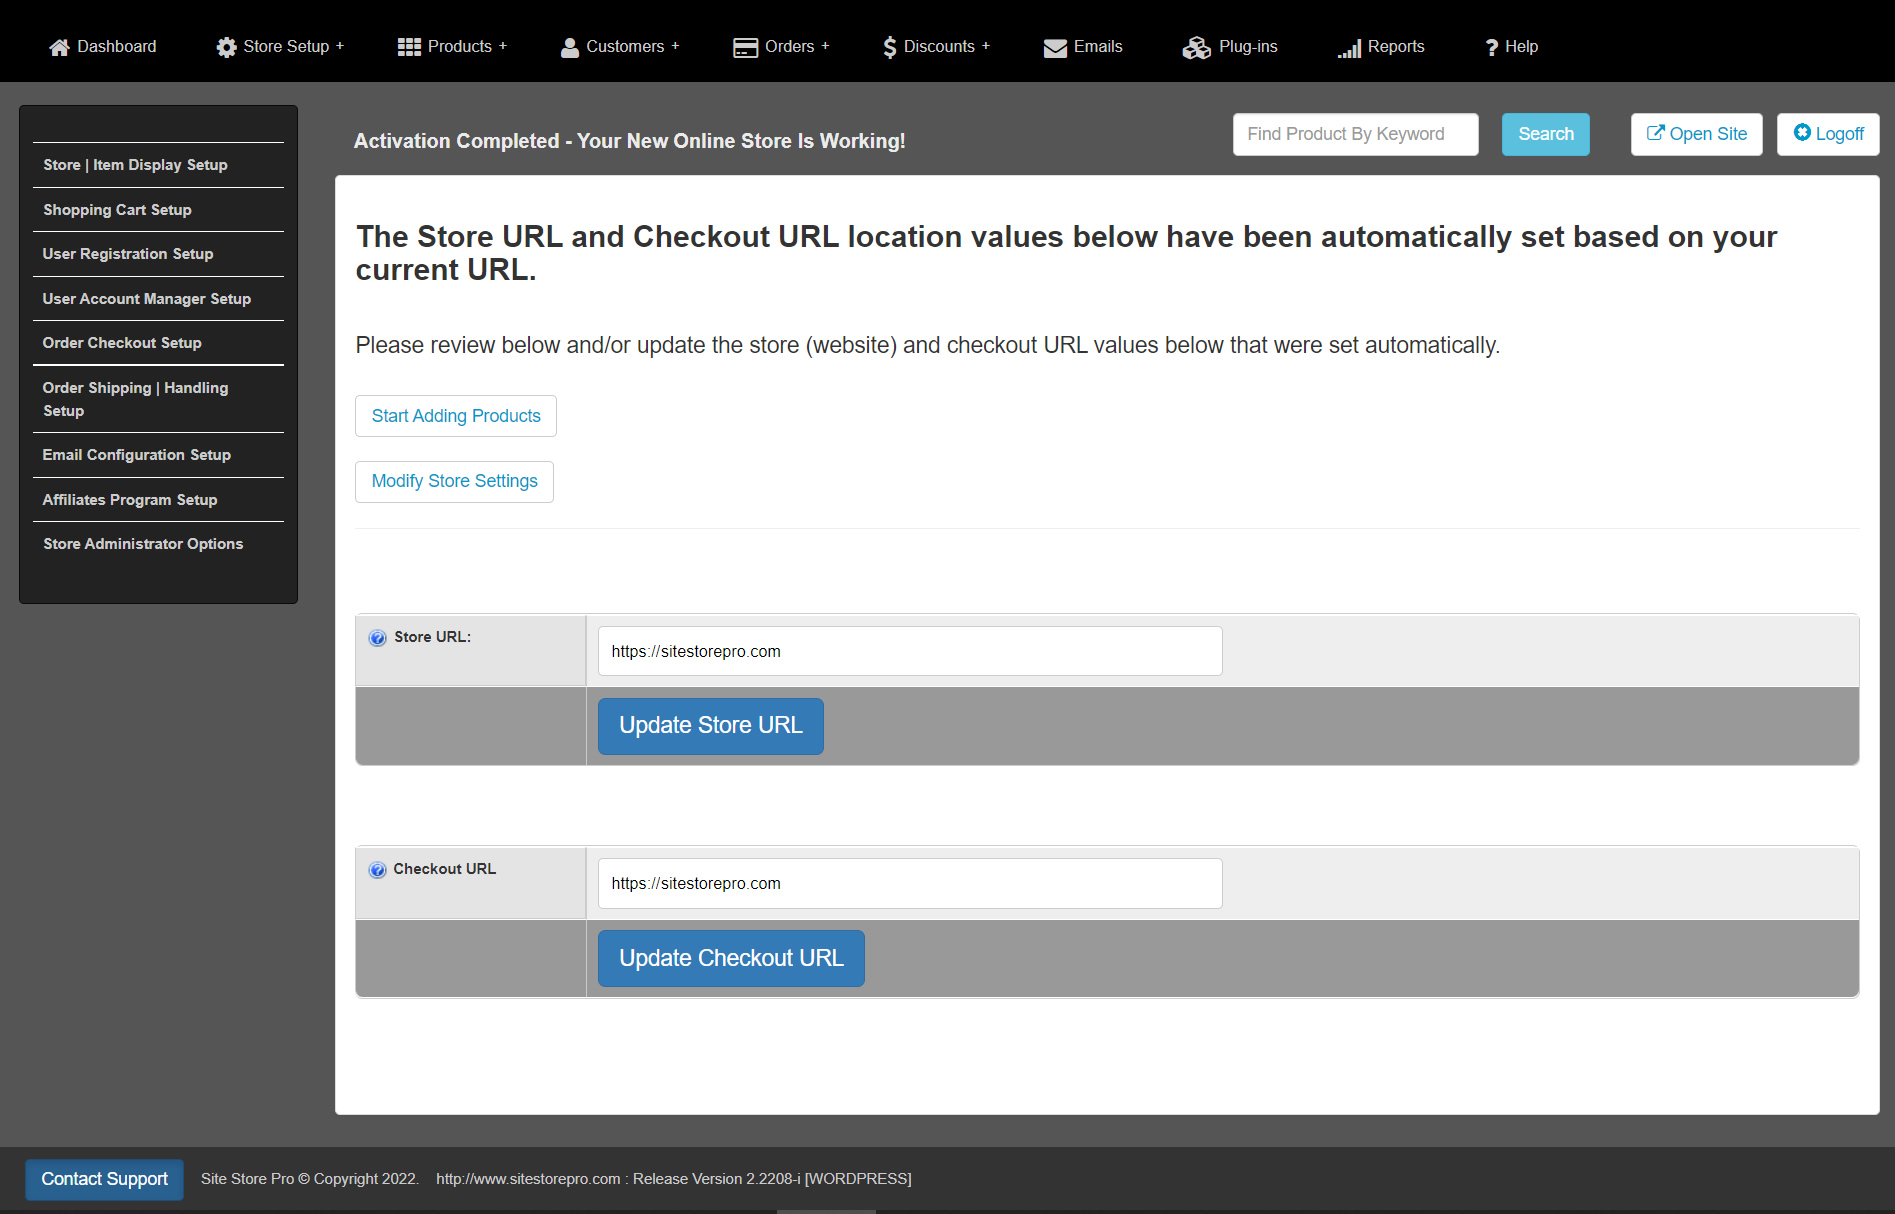
If you will be using SSL (https) on your site and the SSL certificate has already been installed and is working on your server, you should edit the Checkout URL from http:// to https:// at this time if your did your activation in non-secure mode and the values are showing http.
Do not enable https in the checkout URL field if you don’t have a valid SSL certificate installed on your hosting account/server or if you are running the installation on your local system for test purposes.
Please note that if you change either value (Store URL and/or Checkout URL), you must click on the 'Update' button for each specific value after modifying for the change to take effect.
The WP Cart Pro installation is now finished, and you can now start to add your products, store settings and ecommerce related content directly from inside your WPCartPro online store (Site Store Pro) admin area.
WPCartPro Shortcodes Quick Reference Guide
Shopping Cart Status Display (Quick Cart)
Short Code:
[wpcartpro_quickcart2022_display]Description: Displays a font-awesome shopping cart icon with the number of items in the cart and the cart subtotal. The cart quick display may be used anywhere on the site via the shortcode or the widget (pages, posts, footer, header) However, if you want to show the quick cart display in one of your menus (ie the top navigation), you will need to install a third party plugin that enables shortcode usage in menus. Example: https://wordpress.org/plugins/shortcode-in-menus/
When the quick cart display is clicked, it automatically will open a "sliding cart display" that slides in from the top-right of the page and shows the current cart contents.
Developer/Designer Tip: You can also open up the sliding cart display from any link or button using the class "sliding_cart_display".
Example: <a href="#" class = "sliding_cart_display">My Cart</a>
Settings Management: The cart contents features and field labels for the cart line items are managed in the /estore_admin/ area at Store Setup > Shopping Cart Display > Products Cart Display Setup.
Home Page Items Display (Flex Box Grid)
Short Code:
[wpcartpro_home_page_items_2022]Description: Displays Items Marked To "Display Item On Home Page" in your store admin area. The items will be displayed in a responsive flexbox grid with product thumbnail, title, short description, pricing, a quick-view (open modal window) button and/or a view options or add-to-cart button. Note: Even though this feature is designed for a home page items diplay, it can be used on any page or post with the shortcode or the widget.
Settings Management: All settings/options for the Home Page Items display are set in your /estore_admin/ under the specific product. If you open a product in your store admin, click on the "General Info" tab and scroll down to the bottom section of the page labeled "Item Features | Display Options" you will be able to mark the item to "Display Item On Home Page" as well as turn on the quick-view, view details and add-to-cart buttons (and specify their labels The image display is the product thumbnail image that is set to "Show in Search Results" (For items with multiple images).All settings are specific to each individual item on your store.
Home Page Items Scroller (Carousel)
Short Code:
[wpcartpro_home_page_items_scroller]Description: Displays Items Marked To "Display Item On Home Page" in your store admin area. The product images will be displayed in a horizonal scrolling carousel with navigation buttons and pagination dots. Unlike the Flex Box Grid display feature above, only the image is displayd in the scroller.Note: Even though this feature is designed for a home page items diplay, it can be used on any page or post with the shortcode or the widget.
Settings Management: All settings/options for the Home Page Items display are set in your /estore_admin/ under the specific product. If you open a product in your store admin, click on the "General Info" tab and scroll down to the bottom section of the page labeled "Item Features | Display Options" you will be able to mark the item to "Display Item On Home Page". The image display is the product thumbnail image that is set to "Show in Search Results" (For items with multiple images).All settings are specific to each individual item on your store.
Brand Images | Names Display
Short Code:
[wpcartpro_home_page_brands]Description: Displays Store Brands Marked To "Display Item On Home Page" in your store admin area. The brand images and/or names will be displayed in a responsive grid. Even though this feature is designed for a home page diplay, it can be used on any page or post with the shortcode or the widget.
Settings Management: All settings/options for the brand display are set in your /estore_admin/ under the specific Brand (Manufacturer) listing. If you open a BRAND in your store admin (i.e add a new brand or edit an existing one), the settings that control if an image and/or title is display for the specific brand are the last two options at the bottom of the settings form (Home Page Category Settings)
Category Images | Names Display
Short Code:
[wpcartpro_home_page_categories]Description: Displays Store Categories Marked To "Display Item On Home Page" in your store admin area. The categories images and/or names will be displayed in a responsive grid. Even though this feature is designed for a home page diplay, it can be used on any page or post with the shortcode or the widget.
Settings Management: All settings/options for the category display are set in your /estore_admin/ under the specific main category. If you open a MAIN CATEGORY in your store admin (i.e add a new category or edit an existing one), the settings that control if an image and/or title is display for the specific category are the last two options at the bottom of the settings form (Home Page Category Settings)
Sub-Category Images | Names Display
Short Code:
[wpcartpro_home_page_subcategories]Description: Displays Store Sub-Categories Marked To "Display Item On Home Page" in your store admin area. The sub-categories images and/or names will be displayed in a responsive grid. Even though this feature is designed for a home page diplay, it can be used on any page or post with the shortcode or the widget.
Settings Management: All settings/options for the sub-category display are set in your /estore_admin/ under the specific sub-category. If you open a SUB CATEGORY in your store admin (i.e add a new sub-category or edit an existing one), the settings that control if an image and/or title is display for the specific sub-category are the last two options at the bottom of the settings form (Home Page Category Settings)
Item Quick View Button
Short Code:
[wpcartpro_quick_view id="00000" label="Button Text"]Description: The quick view button allows you to popup a quick view modal window specific product anywhere on the site. For example, you can use it on a blog post for a product announcement or on the site's homepage to highlight a new product. The quick-view buttons can be used for any type of product, including items with sizes, colors and other user-configurable options. However, the button must be on a site. Unlike the "Buy Now" button/links, Quick view buttons cannot be used on emails, social media posts or any other external (non-site) resource.
The item quick view shortcode takes two parameters: the item/product ID number (available in your estore_admin when viewing the product's details) and the label of the button that will open the quick view window. Example if your Item ID was 5 and you want to create a quick view window that is triggered by a button that says 'Download XYZ', the shortcode would be:
[wpcartpro_quick_view id="5" label="Download XYZ"]Developer/Designer Tip: You can also accomplish the same functionality of a quick view button shortcode on any text link by adding the class "cart_quick_view" and an "id" attribute tag for the product ID inside the link.
Example:
<a href="#" class = "cart_quick_view" id = "5">Buy Product XYZ Now</a>Settings Management: The Item ID value for the individual item is retreived in your /estore_admin/ by locating the item in the products area and then copying the Item ID value from the Summary Page.
Item "Buy Now" Button
Short Code:
[wpcartpro_buynow itemcode="XXXXX" label="Button Text"]Description: The "Buy Now" button allows you to place a button for the user to quickly purchase an item and bypass the item details page (or quick view window) Buy Now buttons should never be used for a product that requires any type of required user-selection (i.e. sizes, colors, materials, shipping preference, etc.) The "Buy Now" feature should ONLY be used for items that only have an Add-to-Cart button and not other options on the item details page. (i.e. Downloadable items that are download-only (not available as ship and/or download), service-only items and any other item that has no options assigned to it.Items added to the shopping cart will have a default qty of one (1) and the user will be automatically redirected to the checkout area after clicking on the buy now button or link.
The "Buy Now" shortcode takes two parameters: the item's unique buy now CODE (available in your estore_admin when viewing the product's details) and the label of the button. Example if your product's buy now code is HY86BVQ and you want to create a button that says 'Buy This Item" the shortcode would be:
[wpcartpro_buynow itemcode="HY86BVQ" label="Buy This Item"]Developer/Designer Tip: You can also accomplish the same functionality of a "Buy Now" shortcode by creating a text link using the unique product buy now code. The "Buy Now" code and a link example is located on the bottom of the product details (Summary) page in the admin area. As per above however, do not use the "Buy Now" feature if the item requires any type of user-selectable option(s).
Settings Management: The "Buy Now" code for the individual item is retreived in your /estore_admin/ by locating the item in the products area and then copying the item's "Buy Now" code value from the Summary Page. The 'Buy Now' code is located at the bottom of the same page.
Store Account Login | Order History
Short Code:
[wpcartpro_account_manager]Description: This shortcode will display the online store's my account area login form & the customer account manager/order history (when logged-in) anywhere on the site. You can add it to any page or post using the shortcode 'wpcartpro_account_manager' or simply add the widget. The content that is displayed with the shortcode or widget is the same content that is located at /myaccount/.
Settings Management:The Login Form content is controlled in your admin area at Store Setup > Customer's Account Manager > Account Login Page Configuration & Content. The login form can be styled by editing the CSS file located in the plugin's css folder at /store_content/cms/plugins/wpcartpro/css/site_store_pro_account_login_responsive-min.css.
The account manager page is managed in the admin under Store Setup > Customer's Account Manager > My Account Page Configuration & Content. The Account Manager can be styled by editing the CSS file located in the plugin's css folder at /store_content/cms/plugins/wpcartpro/css/site_store_pro_my_account_responsive-min.css
Designer/Developer CSS Editing Tip: All the css files can be edited through WordPress by going to Plugins > Plugin File Editor > WPCartPro. The css directory contains both non-minified (with comments and spaced formatted) and minified versions (for faster page load times). A helpful tip is to make the styling changes in the non-minified version first (file not ending in -min.css), copy the entire file contents from the non-minified version and replace the file content in the minified version and then save the minified version. Test your style changes on the site and then simply compress (minify) the content in the -min.css file version when you are finished. There are several free online tools to minify CSS including: https://www.cleancss.com/css-minify/ and https://www.minifier.org/. Minifing the CSS content is not required however and you can always just use the non-minified CSS content in the -min.css files.
Setting Up SEO Friendly Links For Store And Product Pages
Site Store Pro includes the option to have dynamically generated content use friendly page names (similar to the WordPress permalinks setting(s). In order to use SEO friendly links on your store, you must turn on that option in the admin area and then add some rules to your .htaccess file or web.config.
To setup SEO friendly store links (page names), login to your /estore_admin/, then go to Store Setup and ‘Store URL’
Check the box that says “Turn On SEO” Friendly URLS (links) and save your settings.
If you are hosted your WordPress installation on a Linux server, you will need to add the following lines to your .htaccess file inside the rewrite rules area:
RewriteRule ^(sitestorepro|wp-admin|store|estore_admin|myaccount|checkout)($|/) - [L]
RewriteRule ^([a-zA-Z0-9_-]+)/$ pages/index.php?title=$1
RewriteRule ^items/([^/.]+) store/item_view.php?itemlink=$1
RewriteRule ^brands/([^/.]+)/?$ store/store_results.php?brandname=$1 [L]
RewriteRule ^section/([^/.]+)/?$ store/store_results.php?mastercatname=$1 [L]
RewriteRule ^subcats/([^/.]+)/?$ store/store_results.php?subcatname=$1 [L]
RewriteRule ^collections/([^/.]+)/?$ store/store_results.php?collectionname=$1 [L]
RewriteRule ^occasions/([^/.]+)/?$ store/store_results.php?shopoccasions=$1 [L]
RewriteRule ^styles/([^/.]+)/?$ store/store_results.php?shopstyles=$1 [L]
Your edited .htaccess file should looks similar to the example below:
<IfModule mod_rewrite.c>
RewriteEngine On
RewriteRule ^(sitestorepro|wp-admin|store|estore_admin|myaccount|checkout)($|/) - [L]
RewriteRule ^([a-zA-Z0-9_-]+)/$ pages/index.php?title=$1
RewriteRule ^items/([^/\.]+) store/item_view.php?itemlink=$1
RewriteRule ^brands/([^/\.]+)/?$ store/store_results.php?brandname=$1 [L]
RewriteRule ^section/([^/\.]+)/?$ store/store_results.php?mastercatname=$1 [L]
RewriteRule ^subcats/([^/\.]+)/?$ store/store_results.php?subcatname=$1 [L]
RewriteRule ^collections/([^/\.]+)/?$ store/store_results.php?collectionname=$1 [L]
RewriteRule ^occasions/([^/\.]+)/?$ store/store_results.php?shopoccasions=$1 [L]
RewriteRule ^styles/([^/\.]+)/?$ store/store_results.php?shopstyles=$1 [L]
# BEGIN WordPress
# The directives (lines) between "BEGIN WordPress" and "END WordPress" are
# dynamically generated, and should only be modified via WordPress filters.
# Any changes to the directives between these markers will be overwritten.
RewriteRule .* - [E=HTTP_AUTHORIZATION:%{HTTP:Authorization}]
RewriteBase /
RewriteRule ^index\.php$ - [L]
RewriteCond %{REQUEST_FILENAME} !-f
RewriteCond %{REQUEST_FILENAME} !-d
RewriteRule . /index.php [L]
# END WordPress
</IfModule>
If you are hosting your WordPress install on a Windows server, you will need to edit your web.config file with the following lines (URL rewrite rules):
                <rule name="SEFURL Rule 1" stopProcessing="true">
                    <match url="^items/([^/\.]+)" ignoreCase="false" />
                    <action type="Rewrite" url="store/item_view.php?itemlink={R:1}" appendQueryString="false" />
                </rule>
                <rule name="SEFURL Rule 3" stopProcessing="true">
                    <match url="^brands/([^/\.]+)/?$" ignoreCase="false" />
                    <action type="Rewrite" url="store/store_results.php?brandname={R:1}" appendQueryString="false" />
                </rule>
                <rule name="SEFURL Rule 5" stopProcessing="true">
                    <match url="^section/([^/\.]+)/?$" ignoreCase="false" />
                    <action type="Rewrite" url="store/store_results.php?mastercatname={R:1}" appendQueryString="false" />
                </rule>
                <rule name="SEFURL Rule 7" stopProcessing="true">
                    <match url="^subcats/([^/\.]+)/?$" ignoreCase="false" />
                    <action type="Rewrite" url="store/store_results.php?subcatname={R:1}" appendQueryString="false" />
                </rule>
                <rule name="SEFURL Rule 9" stopProcessing="true">
                    <match url="^collections/([^/\.]+)/?$" ignoreCase="false" />
                    <action type="Rewrite" url="store/store_results.php?collectionname={R:1}" appendQueryString="false" />
                </rule>
                <rule name="SEFURL Rule 11" stopProcessing="true">
                    <match url="^occasions/([^/\.]+)/?$" ignoreCase="false" />
                    <action type="Rewrite" url="store/store_results.php?shopoccasions={R:1}" appendQueryString="false" />
                </rule>
                <rule name="SEFURL Rule 13" stopProcessing="true">
                    <match url="^styles/([^/\.]+)/?$" ignoreCase="false" />
                    <action type="Rewrite" url="store/store_results.php?shopstyles={R:1}" appendQueryString="false" />
                </rule>
		<rule name="CMS Rule 1" stopProcessing="true">
		    <match url="^([^/]+)/?$" />
  			<conditions>
   			         <add input="{REQUEST_FILENAME}" matchType="IsFile" negate="true" />
   				 <add input="{REQUEST_FILENAME}" matchType="IsDirectory" negate="true" />
  				 <add input="{URL}" negate="true" pattern="\.php$" />
  			</conditions>
  		    <action type="Rewrite" url="pages/?title={R:1}" />
		</rule>
Your web.config file will look similar to the example below after the rules above are added to the <rewrite><rules> ... </rules></rewrite> area.
<?xml version="1.0" encoding="UTF-8"?>
<configuration>
<system.webServer>
<rewrite>
        <rules>
               <rule name="Main Rule" stopProcessing="true">
                    <match url="^(.*)/$" />
                      <conditions logicalGrouping="MatchAll">
                       <add input="{REQUEST_FILENAME}" matchType="IsFile" negate="true" />
                       <add input="{REQUEST_FILENAME}" matchType="IsDirectory" negate="true" />
                       </conditions>
                    <action type="Rewrite" url="index.php" />
                </rule>
                <rule name="SEFURL Rule 1" stopProcessing="true">
                    <match url="^items/([^/\.]+)" ignoreCase="false" />
                    <action type="Rewrite" url="store/item_view.php?itemlink={R:1}" appendQueryString="false" />
                </rule>
                <rule name="SEFURL Rule 3" stopProcessing="true">
                    <match url="^brands/([^/\.]+)/?$" ignoreCase="false" />
                    <action type="Rewrite" url="store/store_results.php?brandname={R:1}" appendQueryString="false" />
                </rule>
                <rule name="SEFURL Rule 5" stopProcessing="true">
                    <match url="^section/([^/\.]+)/?$" ignoreCase="false" />
                    <action type="Rewrite" url="store/store_results.php?mastercatname={R:1}" appendQueryString="false" />
                </rule>
                <rule name="SEFURL Rule 7" stopProcessing="true">
                    <match url="^subcats/([^/\.]+)/?$" ignoreCase="false" />
                    <action type="Rewrite" url="store/store_results.php?subcatname={R:1}" appendQueryString="false" />
                </rule>
                <rule name="SEFURL Rule 9" stopProcessing="true">
                    <match url="^collections/([^/\.]+)/?$" ignoreCase="false" />
                    <action type="Rewrite" url="store/store_results.php?collectionname={R:1}" appendQueryString="false" />
                </rule>
                <rule name="SEFURL Rule 11" stopProcessing="true">
                    <match url="^occasions/([^/\.]+)/?$" ignoreCase="false" />
                    <action type="Rewrite" url="store/store_results.php?shopoccasions={R:1}" appendQueryString="false" />
                </rule>
                <rule name="SEFURL Rule 13" stopProcessing="true">
                    <match url="^styles/([^/\.]+)/?$" ignoreCase="false" />
                    <action type="Rewrite" url="store/store_results.php?shopstyles={R:1}" appendQueryString="false" />
                </rule>
		<rule name="CMS Rule 1" stopProcessing="true">
		    <match url="^([^/]+)/?$" />
  			<conditions>
   				<add input="{REQUEST_FILENAME}" matchType="IsFile" negate="true" />
   				<add input="{REQUEST_FILENAME}" matchType="IsDirectory" negate="true" />
  				<add input="{URL}" negate="true" pattern="\.php$" />
  			</conditions>
  		    <action type="Rewrite" url="pages/?title={R:1}" />
		</rule>
       </rules>
</rewrite>
</system.webServer>
</configuration>
If you need assistance setting up your SEO settings on your WordPress installs, please submit a support request at https://www.sitestorepro/mysupport/
Upgrading WPCartPro To The Latest Version
When upgrading WPCartPro (Site Store Pro), you do NOT need to reinstall the entire application or database.
You simply have to replace the /estore_admin and /sitestorepro/ directories with the folders of the SAME NAME located in the ‘UPGRADE’ directory from your downloaded application zipfile.
Replacing ONLY the ‘estore_admin’ and ‘sitestorepro’ upgrade files prevents the possibility of overwriting CSS files that were changed after your original install date.
The upgrade folder will have the latest version of the Site Store Pro core cart files, the latest WPCartPro WordPress plugin files and the latest admin area file. However, it will not include the CSS files that are included in the "New Installation" folder so you won't overwrite any CSS modifications you made the wpcartpro/css/ files since your original install date.