Rewards Program Display Options
You can upload and set the properties of the image (banners) that Rewards Program members will place on their website(s), blog(s) and social networking page(s) after they have joined the program.
To add/edit new Rewards Program displays (banners), login to web-based administration system, click on the ‘Rewards’ tab and then ‘Manage Display Options Content’
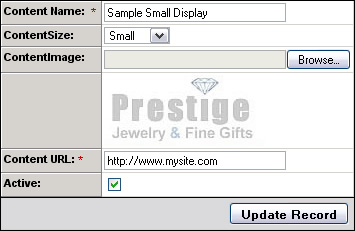
When adding or editing a Rewards Display Banner you will be shown a screen like the one below:
|
|
· Content Name: Title Of Banner Display · Content Size: The size type of the image display (small, medium or large). This is used to give the rewards member an idea of which banner to display on their site(s) based on size. · Content Image: Upload field to select image from your local computer. Picture (image) must be a jpeg (.jpg)
· Content URL: The content URL specifies where the image display will link to from the member’s website, blog or social networking page. You can enter any page in the root of the site, the store default page or to a specific item’s URL. · Active: If checked, this banner will be available as a display choice to the rewards members in their account manager. |
Note: Changing the content image for a specific display will automatically replace it on ALL sites where it has been previously posted (installed).
However, replacing the Content URL (destination link), will not update all the member’s implementations of the specific display. Although it will update the auto-generated HTML display code “snippet” in the member’s account manager, the member will have to repost the new HTML “snippet” to their existing display implementations for the link change to be in effect.